Introduction
Welcome to the delightful world of Butterfinger balls! If you’re looking for a fun and easy treat to make at home, you’ve come to the right place. In this article, we’ll explore the ins and outs of creating these delectable goodies that are perfect for any occasion. Whether you’re a seasoned baker or a novice in the kitchen, this recipe is sure to satisfy your sweet tooth.
Butterfinger balls are a beloved classic that combines the rich flavors of peanut butter and chocolate into bite-sized delights. The best part? They require no baking, making them a convenient and quick dessert option for busy days. With our easy-to-follow recipe, you’ll be whipping up these irresistible treats in no time.
Not only are Butterfinger balls a delicious indulgence, but they also hold a special place in many hearts. Whether it’s a childhood favorite or a newfound love, these little gems have a way of bringing joy to any gathering. So, let’s dive into the world of Butterfinger balls and discover how to make your own batch of these tasty morsels.
Why You’ll Love This Recipe
One of the main reasons you’ll love this Butterfinger balls recipe is its simplicity. With just a few ingredients and minimal preparation time, you can create a batch of these delectable treats with ease. Whether you’re a busy parent, a college student, or anyone in between, this recipe is perfect for satisfying your sweet cravings in a pinch.
Additionally, this homemade Butterfinger balls recipe offers a healthier alternative to store-bought candies. By using wholesome ingredients and controlling the sugar content, you can enjoy a guilt-free indulgence that still delivers on flavor. Plus, you can customize the recipe to suit your dietary preferences, whether you’re gluten-free, vegan, or simply looking to cut back on sugar.
Another reason to love this recipe is its versatility. You can make a big batch of Butterfinger balls to enjoy as a holiday treat, party snack, or even a fun DIY project with the kids. The possibilities are endless when it comes to incorporating these delicious treats into your culinary repertoire.
So, grab your apron and get ready to embark on a delicious culinary adventure with our easy Butterfinger balls recipe!
Ingredients
For this easy Butterfinger balls recipe, you will need the following ingredients:
1. 2 cups creamy peanut butter
2. 1 cup powdered sugar
3. 2 cups crushed Butterfinger candy bars
4. 1/2 cup unsalted butter, melted
5. 2 cups chocolate chips (dark, milk, or white chocolate)
Optional ingredient substitutions:
– You can use almond butter or sunflower seed butter as a substitute for peanut butter.
– If you prefer a lower sugar option, you can use sugar-free powdered sweetener instead of powdered sugar.
– Feel free to experiment with different types of chocolate chips for coating your Butterfinger balls.
Now that you have all your ingredients ready, let’s move on to the step-by-step instructions for making these delectable Butterfinger balls!
Step-by-Step Instructions
1. In a large mixing bowl, combine the creamy peanut butter, powdered sugar, crushed Butterfinger candy bars, and melted butter. Mix until well combined.
2. Shape the mixture into balls, about 1 inch in diameter, and place them on a baking sheet lined with parchment paper.
3. Place the baking sheet in the refrigerator and chill the Butterfinger balls for at least 30 minutes to allow them to firm up.
4. In a microwave-safe bowl, melt the chocolate chips in 30-second intervals, stirring in between, until smooth and fully melted.
5. Using a fork or toothpick, dip each chilled Butterfinger ball into the melted chocolate, ensuring it is fully coated. Place the coated ball back on the parchment paper-lined baking sheet.
6. Once all the balls are coated, return the baking sheet to the refrigerator to allow the chocolate coating to set, usually for about 15-20 minutes.
7. Your homemade Butterfinger balls are now ready to be enjoyed! Store them in an airtight container in the refrigerator for up to a week.
These easy-to-follow instructions will guide you through the process of creating your very own batch of Butterfinger balls that are sure to impress your friends and family. Now, let’s explore some expert tips to ensure your Butterfinger balls turn out perfectly every time.
Expert Tips for Success
1. Use room temperature peanut butter to make it easier to mix with the other ingredients.
2. For a smoother texture, you can pulse the crushed Butterfinger candy bars in a food processor before adding them to the mixture.
3. To prevent the chocolate from seizing when melting, avoid getting any water in the chocolate and stir gently during the melting process.
4. If the chocolate becomes too thick while coating the Butterfinger balls, you can add a teaspoon of coconut oil to thin it out.
5. Get creative with toppings by sprinkling crushed nuts, sea salt, or colorful sprinkles on top of the chocolate-coated balls before they set.
6. Allow the Butterfinger balls to come to room temperature before serving to achieve the perfect balance of flavors and textures.
By following these expert tips, you’ll elevate your Butterfinger balls to a new level of deliciousness and ensure they are a hit with everyone who tries them. Now, let’s explore some fun variations and substitutions to customize this recipe to your liking.
Variations and Substitutions
1. For a vegan version of Butterfinger balls, use dairy-free chocolate chips and vegan butter in the recipe.
2. If you’re a fan of white chocolate, try coating the Butterfinger balls with white chocolate for a unique twist on the classic recipe.
3. Add a tablespoon of cocoa powder to the peanut butter mixture for a richer chocolate flavor in the center of the balls.
4. Experiment with different types of nut butters, such as almond or cashew butter, for a varied flavor profile.
5. For a festive touch, roll the chilled balls in colored sugar or edible glitter before coating them in chocolate.
6. Create a peanut butter and jelly version by adding a dollop of jelly in the center of each ball before shaping and coating them.
With these creative variations and substitutions, you can put your own unique spin on the classic Butterfinger balls recipe and tailor it to suit your taste preferences. Now, let’s move on to serving suggestions to make the most of your homemade treats.
Serving Suggestions
When serving your Butterfinger balls, consider pairing them with a glass of cold milk or a cup of hot cocoa for a delightful treat. These bite-sized delights are perfect for parties, potlucks, or as a sweet surprise in your lunchbox.
You can also display your Butterfinger balls on a decorative platter or in colorful cupcake liners for a festive touch. For a special occasion, arrange them in a gift box or tin and share them with friends and family as a thoughtful homemade gift.
For an extra indulgent treat, serve the Butterfinger balls alongside a scoop of vanilla ice cream or drizzle them with caramel sauce for a decadent dessert experience. The possibilities are endless when it comes to enjoying these delightful homemade treats.
Now that you’ve learned how to make Butterfinger balls and explored various ways to customize and serve them, let’s address some common questions that may arise during the cooking process.
FAQs
Q: Can I freeze Butterfinger balls for later consumption?
A: Yes, you can freeze Butterfinger balls in an airtight container for up to 3 months. Thaw them in the refrigerator before serving.
Q: How can I prevent the chocolate coating from cracking on the Butterfinger balls?
A: Make sure the peanut butter mixture is firm before coating it with chocolate, and handle the balls gently when dipping them to avoid cracks.
Q: Can I make mini-sized Butterfinger balls for bite-sized treats?
A: Absolutely! Simply reduce the size of the balls during shaping for adorable mini versions of this delicious treat.
Q: Are Butterfinger balls suitable for people with nut allergies?
A: Unfortunately, Butterfinger balls contain peanut butter, so they are not suitable for individuals with nut allergies. Consider alternative nut-free recipes for those with dietary restrictions.
Now that we’ve covered some common questions and troubleshooting tips, let’s wrap up this article with some final thoughts on the joy of making and sharing Butterfinger balls with your loved ones.
Final Thoughts
In conclusion, Butterfinger balls are a delightful treat that brings together the timeless flavors of peanut butter and chocolate in a fun and easy-to-make form. Whether you’re creating them for a special occasion, a holiday gathering, or simply as a sweet surprise for your family, these homemade treats are sure to bring smiles to everyone’s faces.
By following our detailed recipe and expert tips, you can create a batch of Butterfinger balls that are not only delicious but also customizable to suit your dietary preferences and taste preferences. So, gather your ingredients, roll up your sleeves, and get ready to enjoy the process of making these delightful treats at home.
We hope this article has inspired you to try your hand at making Butterfinger balls and to share the joy of homemade treats with those around you. So, go ahead, whip up a batch of these delectable goodies, and savor the sweet moments they bring into your life. Happy baking!
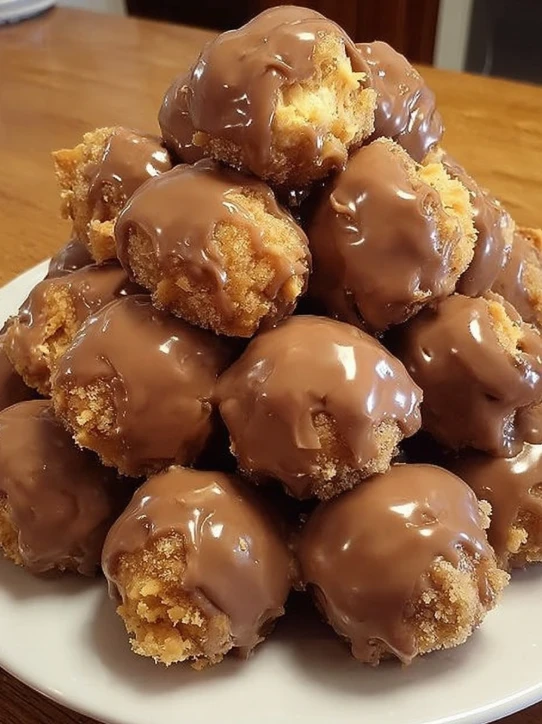
Butterfinger Balls
Delicious and easy-to-make Butterfinger balls that combine the rich flavors of peanut butter and chocolate into bite-sized delights. Perfect for any occasion, these treats require no baking and are sure to satisfy your sweet tooth.
Ingredients
- 2 cups creamy peanut butter
- 1 cup powdered sugar
- 2 cups crushed Butterfinger candy bars
- 1/2 cup unsalted butter, melted
- 2 cups chocolate chips (dark, milk, or white chocolate)
Directions
- In a large mixing bowl, combine the creamy peanut butter, powdered sugar, crushed Butterfinger candy bars, and melted butter. Mix until well combined.
- Shape the mixture into balls, about 1 inch in diameter, and place them on a baking sheet lined with parchment paper.
- Chill the Butterfinger balls in the refrigerator for at least 30 minutes to allow them to firm up.
- Melt the chocolate chips in a microwave-safe bowl in 30-second intervals, stirring in between, until smooth and fully melted.
- Dip each chilled Butterfinger ball into the melted chocolate using a fork or toothpick, ensuring it is fully coated. Place the coated ball back on the parchment paper-lined baking sheet.
- Once all the balls are coated, refrigerate the baking sheet to allow the chocolate coating to set, usually for about 15-20 minutes.
- Store the homemade Butterfinger balls in an airtight container in the refrigerator for up to a week.