Introduction
Imagine the delightful aroma of freshly baked snacks filling your kitchen, tempting your taste buds with the promise of cheesy goodness. Today, we dive into the world of homemade Cheez-Its, exploring the art of crafting these crunchy, savory treats from scratch. Whether you’re a seasoned home cook or a kitchen novice, this easy Cheez-Its recipe is sure to captivate your senses and elevate your snacking experience to new heights. Get ready to embark on a culinary adventure that combines nostalgia, creativity, and deliciousness in every bite.
As we unravel the secrets behind creating the perfect batch of Cheez-Its, you’ll discover why this recipe holds a special place in the hearts of many. From its simple yet irresistible flavor profile to its versatile nature that caters to various dietary preferences, homemade Cheez-Its are more than just a snack – they’re a symbol of homemade goodness and culinary ingenuity. Join us on this journey as we explore the nuances of crafting these iconic crackers right in your kitchen.
Whether you’re looking to surprise your kids with a healthier snack alternative, impress guests at a gathering, or simply satisfy your own craving for a crispy, cheesy indulgence, this homemade Cheez-Its recipe is here to fulfill your snacking desires. Let’s dive into the world of gluten-free homemade Cheez-Its, organic Cheez-Its DIY, and everything in between to create a batch of delectable treats that will surely become a household favorite.
Get ready to roll up your sleeves, preheat your oven, and unleash your inner chef as we embark on a culinary journey filled with cheesy goodness, creativity, and a touch of homemade magic.
Why You’ll Love This Recipe
Indulge in the joy of creating your own crispy, cheesy snacks with this easy Cheez-Its recipe from scratch. Elevate your snacking experience with these homemade delights that are not only delicious but also tailored to meet your dietary preferences. From gluten-free options to organic ingredients, this recipe offers a versatile and customizable approach to crafting Cheez-Its that suit your individual needs.
Experience the satisfaction of making something tasty from start to finish, knowing exactly what goes into each batch of these delectable treats. Say goodbye to store-bought snacks loaded with additives and preservatives, and say hello to a healthier, homemade alternative that promises pure cheesy goodness in every bite.
Whether you’re following a keto, vegan, or low-carb lifestyle, this recipe can be adapted to suit your dietary requirements, making it a versatile option for a wide range of food preferences. Embrace the joy of creating something delicious and nutritious with this homemade Cheez-Its recipe that puts you in control of your snacking choices.
Prepare to be amazed by the simplicity and deliciousness of these homemade Cheez-Its, as you discover a world of flavor possibilities that go beyond the traditional store-bought versions. From spicy variations to cheese alternatives, this recipe allows you to explore your creativity and experiment with different flavors to create the perfect batch of personalized snacks.
Ingredients
Before you embark on your Cheez-Its baking adventure, make sure you have the following ingredients ready:
– Organic all-purpose flour
– Unsalted butter
– Cheddar cheese, shredded
– Salt
– Paprika
– Water
Feel free to substitute ingredients based on your dietary preferences or flavor choices. You can experiment with different types of cheeses, spices, or even gluten-free flour options to create a personalized version of this classic snack.
Step-by-Step Instructions
1. In a mixing bowl, combine the organic all-purpose flour, unsalted butter, shredded cheddar cheese, salt, and paprika.
2. Mix the ingredients until the dough comes together, adding water as needed to achieve the right consistency.
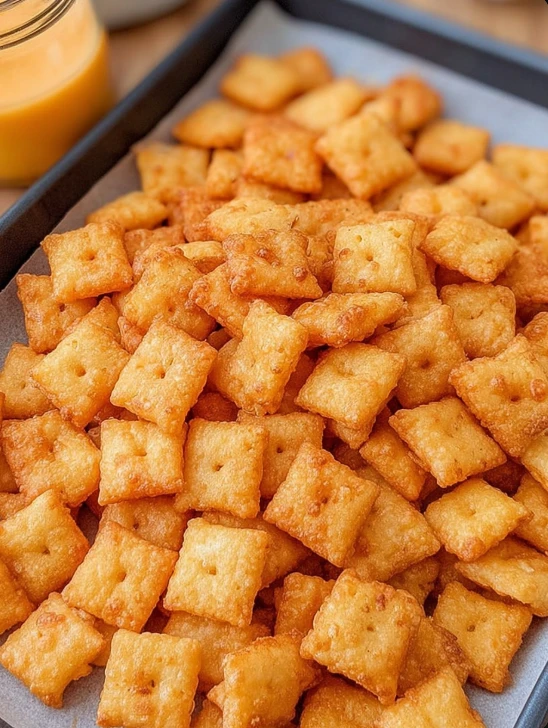
3. Roll out the dough on a floured surface and cut it into small squares using a knife or cookie cutter.
4. Place the Cheez-Its on a baking sheet lined with parchment paper and bake in a preheated oven until golden and crispy.
5. Allow the Cheez-Its to cool before serving and enjoying the cheesy goodness.
Pro Tip: For extra flavor, sprinkle some homemade seasoning mix on the Cheez-Its before baking to enhance their taste and aroma.
Expert Tips for Success
For the best results when making homemade Cheez-Its, keep these expert tips in mind:
– Use high-quality, real cheese for an authentic flavor that shines through in every bite.
– Ensure the dough is well-chilled before rolling it out to make cutting easier and maintain the shape of the crackers.
– Experiment with different seasonings and spices to customize the flavor profile of your Cheez-Its and create unique variations.
– Store the finished Cheez-Its in an airtight container to maintain their crispiness and freshness for longer periods.
Variations and Substitutions
Looking to switch things up with your homemade Cheez-Its? Here are some creative variations and ingredient substitutions to try:
– Swap the cheddar cheese for Gouda, Parmesan, or your favorite cheese for a different flavor profile.
– Add a sprinkle of cayenne pepper or garlic powder to the dough for a spicy kick that will tantalize your taste buds.
– Experiment with gluten-free flour blends to create a batch of homemade Cheez-Its that cater to gluten-sensitive individuals.
– For a vegan twist, use dairy-free cheese alternatives and plant-based butter to make a cruelty-free version of this classic snack.
Serving Suggestions
Once your homemade Cheez-Its are ready to be enjoyed, consider these serving suggestions to elevate your snacking experience:
– Pair the Cheez-Its with a selection of artisanal cheeses, fruits, and nuts for a sophisticated cheese platter that’s perfect for entertaining.
– Serve the Cheez-Its alongside a creamy dip or salsa for a delicious contrast of textures and flavors that will delight your taste buds.
– Enjoy the Cheez-Its on their own as a satisfying snack, or incorporate them into your favorite recipes as a crunchy topping or flavorful ingredient.
FAQs
Q: Can I make these Cheez-Its ahead of time and store them for later?
A: Yes, you can prepare a batch of homemade Cheez-Its in advance and store them in an airtight container at room temperature for up to a week.
Q: Are homemade Cheez-Its suitable for kids with dietary restrictions?
A: Absolutely! You can customize this recipe to accommodate various dietary preferences, making it a versatile and kid-friendly snack option.
Q: What is the nutritional information for homemade Cheez-Its?
A: Homemade Cheez-Its made with high-quality ingredients offer a nutritious alternative to store-bought snacks, providing a good source of protein and calcium.
Q: How can I add a spicy twist to my homemade Cheez-Its?
A: Simply sprinkle some cayenne pepper, chili powder, or hot sauce on the Cheez-Its before baking to infuse them with a fiery kick that will appeal to spicy food lovers.
Final Thoughts
As you embark on your homemade Cheez-Its baking journey, remember that the key ingredient in this recipe is your creativity and passion for cooking. Whether you’re making these cheesy treats for yourself, your family, or a special occasion, the joy of crafting something delicious from scratch is a reward in itself.
So, gather your ingredients, preheat your oven, and get ready to experience the satisfaction of creating a batch of homemade Cheez-Its that are not only tasty but also made with love and care. From choosing the best cheese for DIY Cheez-Its to mastering the art of seasoning, this recipe offers a world of possibilities to explore and enjoy.
Indulge in the magic of homemade Cheez-Its, where every crispy bite is a testament to your culinary skills and dedication to wholesome, preservative-free snacking. Embrace the flavors, share the joy with your loved ones, and savor the satisfaction of creating something truly special in your kitchen.
Now, it’s time to roll up your sleeves, sprinkle some cheese, and bake your way to homemade Cheez-Its perfection. Let the cheesy goodness begin!
HOMEMADE CHEEZ-ITS
Indulge in the joy of creating your own crispy, cheesy snacks with this easy Cheez-Its recipe from scratch. Elevate your snacking experience with these homemade delights that are not only delicious but also tailored to meet your dietary preferences.
Ingredients
- 2 cups organic all-purpose flour
- 1 cup unsalted butter
- 2 cups cheddar cheese, shredded
- 1 tsp salt
- 1/2 tsp paprika
- 1/4 cup water
Directions
- In a mixing bowl, combine the organic all-purpose flour, unsalted butter, shredded cheddar cheese, salt, and paprika.
- Mix the ingredients until the dough comes together, adding water as needed to achieve the right consistency.
- Roll out the dough on a floured surface and cut it into small squares using a knife or cookie cutter.
- Place the Cheez-Its on a baking sheet lined with parchment paper and bake in a preheated oven at 375°F for about 12 minutes or until golden and crispy.
- Allow the Cheez-Its to cool before serving and enjoying the cheesy goodness.