Introduction
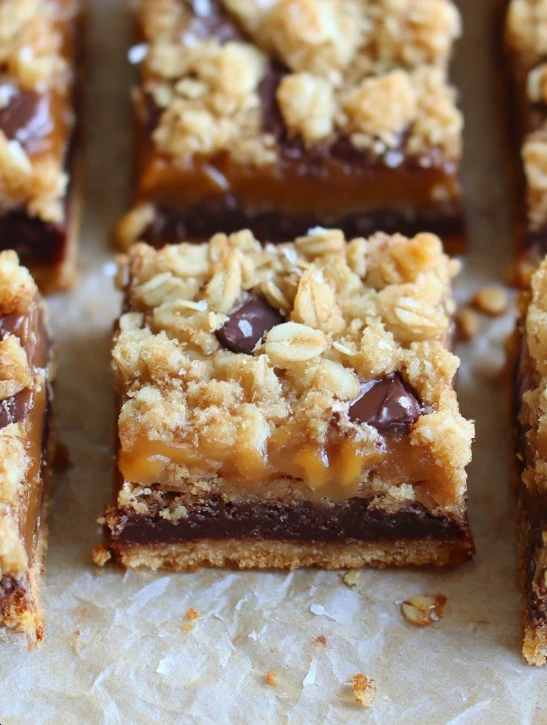
Welcome to the world of retro bakery style Caramelitas! Imagine the perfect blend of gooey caramel, rich chocolate, and buttery oats coming together in a delightful treat that will transport you back to the nostalgic charm of old-school bakeries. This recipe is not just a dessert; it’s a journey down memory lane, filled with warmth and sweetness.
What makes Caramelitas so special is their irresistible combination of flavors and textures. The crunchy oat crust, the velvety smooth caramel layer, and the decadent chocolate topping create a symphony of taste in every bite. Whether you’re a seasoned baker or a novice in the kitchen, this recipe is sure to win your heart.
With roots in classic American baking traditions, Caramelitas have stood the test of time for a reason. They are the ultimate comfort food, perfect for sharing with loved ones or indulging in a moment of self-care. So, roll up your sleeves, preheat your oven, and let’s dive into the world of retro bakery goodness!
Get ready to experience the magic of homemade Caramelitas that will have you coming back for more with each delectable bite.
Why You’ll Love This Recipe
One of the standout features of Caramelitas is their simplicity despite the complex flavors they offer. With basic pantry staples and a few easy steps, you can create a luxurious treat that rivals any bakery offering. Whether you’re short on time or looking for a crowd-pleasing dessert, these Caramelitas fit the bill perfectly.
Moreover, these indulgent bars can be customized to suit various dietary preferences. You can easily adapt the recipe to be gluten-free, dairy-free, or even vegan without compromising on taste or quality. This versatility makes Caramelitas a go-to option for gatherings where dietary restrictions may apply.
Additionally, the make-ahead nature of Caramelitas makes them a convenient option for busy schedules. Prepare a batch in advance and enjoy the convenience of having a sweet treat ready to satisfy your cravings whenever the mood strikes. Their long shelf life also makes them great for gifting or sharing with friends and family.
Whether you’re a fan of classic desserts or looking to explore a new baking adventure, Caramelitas offer a perfect balance of familiar flavors and exciting textures that will leave you craving more.
Ingredients
To create these delectable Caramelitas, you’ll need the following ingredients:
– 1 cup of all-purpose flour
– 1 cup of rolled oats
– 3/4 cup of light brown sugar
– 1/2 teaspoon of baking soda
– 1/4 teaspoon of salt
– 3/4 cup of unsalted butter, melted
– 1 cup of caramel sauce
– 1 cup of semisweet chocolate chips
– Optional: 1/2 cup of chopped nuts (such as pecans or walnuts)
Feel free to make ingredient substitutions according to your taste preferences or dietary needs. You can use gluten-free flour, dairy-free butter, or vegan caramel sauce to customize the recipe to your liking.
Step-by-Step Instructions
1. Preheat your oven to 350°F (175°C) and line a 9×9-inch baking pan with parchment paper.
2. In a mixing bowl, combine the flour, oats, brown sugar, baking soda, and salt. Stir in the melted butter until the mixture resembles coarse crumbs.
3. Press half of the oat mixture into the bottom of the prepared pan to form the crust.
4. Bake the crust for 10 minutes to set slightly.
5. Remove the pan from the oven and pour the caramel sauce over the baked crust, spreading it evenly.
6. Sprinkle the chocolate chips and nuts (if using) over the caramel layer.
7. Crumble the remaining oat mixture on top of the chocolate layer.
8. Bake for an additional 20-25 minutes until the top is golden brown.
9. Allow the Caramelitas to cool completely before slicing into bars and serving.
Pro Tip: For easier slicing, chill the Caramelitas in the refrigerator before cutting into bars. This helps set the layers and ensures clean cuts.
Expert Tips for Success
1. Use high-quality caramel sauce for the best flavor and texture in your Caramelitas.
2. Make sure to line your baking pan with parchment paper for easy removal and cleanup.
3. Experiment with different types of chocolate chips or add-ins to customize your Caramelitas to your liking.
4. Allow the bars to cool completely before attempting to slice them to maintain their shape and prevent crumbling.
5. Store any leftovers in an airtight container at room temperature for up to 5 days or in the refrigerator for longer shelf life.
Variations and Substitutions
There are endless possibilities for customizing your Caramelitas:
– Swap the semisweet chocolate chips for white chocolate, butterscotch chips, or a mix of both.
– Add a sprinkle of sea salt on top of the bars for a sweet and salty contrast.
– Mix in dried fruits like cranberries or cherries for a fruity twist.
– For a nut-free version, omit the nuts or replace them with seeds or coconut flakes.
Feel free to get creative and tailor the recipe to suit your preferences or dietary requirements.
Serving Suggestions
For a delightful serving experience, enjoy your Caramelitas warm with a scoop of vanilla ice cream or a drizzle of caramel sauce on top. These bars also pair well with a hot cup of coffee or a cold glass of milk for a comforting treat any time of day.
Consider serving them at potlucks, bake sales, or as a sweet ending to a family dinner. The rich flavors and satisfying textures of Caramelitas are sure to impress your guests and leave them asking for more.
FAQs
Q: Can I freeze Caramelitas for later?
A: Yes, you can freeze Caramelitas in an airtight container for up to 3 months. Thaw them in the refrigerator overnight before serving.
Q: My Caramelitas turned out too sticky. What went wrong?
A: If your bars are too sticky, they may need more time to set in the refrigerator or additional baking time to ensure they are fully cooked through.
Q: Can I use store-bought caramel sauce for this recipe?
A: Absolutely! Feel free to use your favorite store-bought caramel sauce to save time without compromising on taste.
Q: How can I make these bars more chewy or crispy?
A: Adjust the baking time to achieve your desired texture. For chewier bars, bake them for a shorter time, and for crispier bars, extend the baking time slightly.
Final Thoughts
As you embark on your Caramelitas baking journey, remember that the joy of creating homemade treats lies in the process as much as the end result. From the comforting aroma wafting through your kitchen to the first decadent bite of these retro bakery style bars, every moment is a celebration of flavors and memories.
So, gather your ingredients, follow the simple steps, and immerse yourself in the delightful world of Caramelitas. Share these delectable bars with your loved ones, create new memories, and savor the sweet moments that baking brings into your life.
Get ready to experience the magic of Caramelitas—a timeless classic that never fails to delight and inspire. Happy baking!
Retro Bakery Style Caramelitas
Experience the nostalgia of retro bakery style Caramelitas with a perfect blend of gooey caramel, rich chocolate, and buttery oats. These decadent bars offer a symphony of flavors and textures in every bite, making them the ultimate comfort food for any occasion.
Ingredients
- 1 cup all-purpose flour
- 1 cup rolled oats
- 3/4 cup light brown sugar
- 1/2 tsp baking soda
- 1/4 tsp salt
- 3/4 cup unsalted butter, melted
- 1 cup caramel sauce
- 1 cup semisweet chocolate chips
- Optional: 1/2 cup chopped nuts (such as pecans or walnuts)
Directions
- Preheat oven to 350°F (175°C) and line a 9×9-inch baking pan with parchment paper.
- In a mixing bowl, combine flour, oats, brown sugar, baking soda, and salt. Stir in melted butter until mixture resembles coarse crumbs.
- Press half of the oat mixture into the bottom of the prepared pan to form the crust.
- Bake crust for 10 minutes to set slightly.
- Pour caramel sauce over the baked crust, spreading it evenly. Sprinkle chocolate chips and nuts (if using) over the caramel layer.
- Crumble the remaining oat mixture on top of the chocolate layer.
- Bake for an additional 20-25 minutes until the top is golden brown.
- Allow Caramelitas to cool completely before slicing into bars and serving.