Cheese and green pepper pinwheels are the perfect addition to any gathering, offering a delightful crunch and savory flavor that appeals to everyone. These rolled tortilla appetizers are not only visually appealing but also incredibly easy to prepare, making them a favorite among home cooks and party planners alike. The combination of creamy cheese and crisp green bell peppers creates a refreshing snack that is both satisfying and nutritious. Their colorful presentation makes them a great option for parties, picnics, and even casual family dinners. The versatility of cheese and green pepper pinwheels allows them to fit seamlessly into various occasions, and they can be enjoyed by people of all ages. Whether you’re hosting a casual get-together or packing a lunchbox for kids, these pinwheels promise to deliver on taste and presentation.
Ingredients
- For the Pinwheels:
- 4 large flour tortillas (choose soft and pliable tortillas for easier rolling)
- 8 oz cream cheese, softened (room temperature cream cheese is key for spreading)
- 1 cup shredded cheddar cheese (sharp cheddar adds a delightful tang)
- 1 large green bell pepper, finely chopped (make sure to remove the seeds and white pith for best flavor)
- 2 tablespoons fresh chives or green onions, chopped (these add a fresh bite and color)
- 1 teaspoon garlic powder (a great way to infuse flavor without the hassle of fresh garlic)
- 1/2 teaspoon paprika (adds a mild smoky flavor and a hint of color)
- Salt and pepper to taste (seasoning enhances all the other flavors in the pinwheels)
- For Garnish (optional):
- Extra green onions, chopped (for a pop of color on top)
- Fresh herbs (e.g., parsley or cilantro, which can provide a refreshing finish)
Steps / Instructions
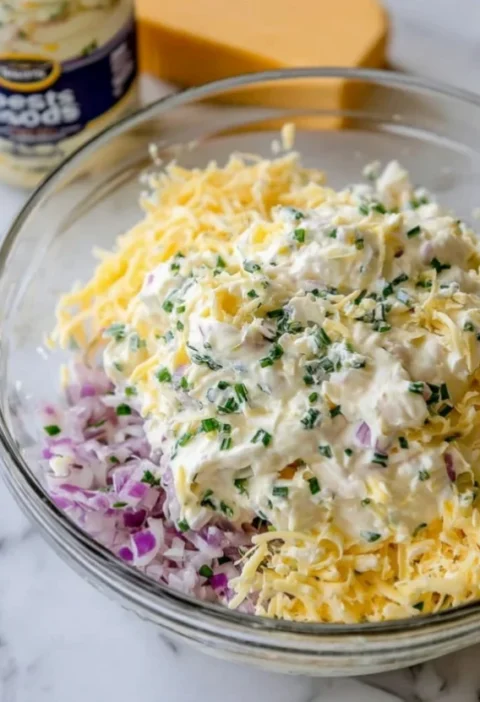
- Prepare the Cream Cheese Mixture: In a medium-sized bowl, combine the softened cream cheese, shredded cheddar cheese, chopped green bell pepper, chives or green onions, garlic powder, paprika, salt, and pepper. Mix until all ingredients are well incorporated. The mixture should be smooth and spreadable, making it easy to apply on the tortillas without tearing them.
- Spread the Mixture: Lay one tortilla flat on a clean cutting board. Use a spatula or the back of a spoon to spread a generous layer of the cheese mixture evenly over the entire surface of the tortilla, leaving a small border around the edges. This ensures that the filling doesn’t ooze out when you roll it.
- Roll the Tortilla: Starting from one edge, carefully roll the tortilla tightly to form a log shape. Ensure that the filling stays inside as you roll, pressing gently but firmly to create a compact roll. Repeat this process for the remaining tortillas, using up all of the cheese mixture.
- Chill the Pinwheels: Wrap each rolled tortilla in plastic wrap and refrigerate for at least 30 minutes. This step helps the pinwheels hold their shape and makes slicing easier; the chilling process firms up the filling, making it less messy when cutting.
- Slice and Serve: Once chilled, remove the tortillas from the refrigerator. Using a sharp knife, slice each roll into 1-inch thick pinwheels. A serrated knife works well for this task to prevent squishing the rolls. Arrange them on a serving platter, and if desired, garnish with extra chopped green onions or fresh herbs for an attractive presentation.
Tips & Tricks
- Storage: Cheese and green pepper pinwheels can be stored in an airtight container in the refrigerator for up to 3 days. They make great lunchbox snacks for kids or quick appetizers for unexpected guests. For optimal freshness, it’s best to keep them wrapped until ready to serve.
- Make Ahead: Prepare the pinwheels a day in advance and keep them refrigerated. Just slice and serve when ready to entertain; this saves time on the day of your event and allows the flavors to meld beautifully.
- Avoid Moisture: Ensure that the green bell pepper is finely chopped and patted dry to avoid excess moisture in the filling, which can make the tortillas soggy. This step is crucial for maintaining the texture of the pinwheels.
- Experiment with Flavors: Feel free to swap out the green bell pepper for other vegetables like roasted red peppers or spinach for different flavor profiles. You can also try adding other ingredients, such as diced jalapeños for some heat or olives for brininess, to customize your cheese and green pepper pinwheels.
Conclusion
With their creamy filling and vibrant colors, cheese and green pepper pinwheels are sure to impress at any gathering. They embody the essence of easy, no-cook appetizer recipes that everyone loves. Make a batch for your next party, and watch them disappear quickly! You can learn more about this topic.

Cheese and Green Pepper Pinwheels
Cheese and green pepper pinwheels are the perfect addition to any gathering, offering a delightful crunch and savory flavor that appeals to everyone. These rolled tortilla appetizers are not only visually appealing but also incredibly easy to prepare, making them a favorite among home cooks and party planners alike.
Ingredients
- 4 large flour tortillas
- 8 oz cream cheese, softened
- 1 cup shredded cheddar cheese
- 1 large green bell pepper, finely chopped
- 2 tablespoons fresh chives or green onions, chopped
- 1 teaspoon garlic powder
- 1/2 teaspoon paprika
- Salt and pepper to taste
Directions
In a medium-sized bowl, combine the softened cream cheese, shredded cheddar cheese, chopped green bell pepper, chives or green onions, garlic powder, paprika, salt, and pepper. Mix until all ingredients are well incorporated.
Lay one tortilla flat on a clean cutting board. Use a spatula or the back of a spoon to spread a generous layer of the cheese mixture evenly over the entire surface of the tortilla, leaving a small border around the edges.
Starting from one edge, carefully roll the tortilla tightly to form a log shape. Ensure that the filling stays inside as you roll.
Wrap each rolled tortilla in plastic wrap and refrigerate for at least 30 minutes.
Once chilled, remove the tortillas from the refrigerator. Using a sharp knife, slice each roll into 1-inch thick pinwheels.
Recipe Reviews
- ★★★★★
Excellent recipe!
Leave a Reply
Your email address will not be published. Required fields are marked *