Introduction
Welcome to Aunt Millie’s Retro Bakery, where every bite is a nostalgic journey back in time. Today, we are diving into the delicious world of Aunt Millie’s famous Dirt Ball Cookies. These cookies hold a special place in our hearts as they remind us of simple joys and childhood memories. Imagine biting into a cookie that is crunchy on the outside, chewy on the inside, and bursting with flavors that transport you to a carefree era. Let’s uncover the magic behind these delightful treats that have been a beloved favorite for generations.
What makes Aunt Millie’s Dirt Ball Cookies truly special is not just their taste but the love and tradition that goes into each batch. These cookies are a testament to the timeless art of baking and the joy of sharing homemade goodies with loved ones. Whether you are a seasoned baker or a novice in the kitchen, these cookies are sure to bring a smile to your face and warmth to your heart.
Join us on this culinary adventure as we explore the secrets of Aunt Millie’s Retro Bakery and learn how to recreate these delectable Dirt Ball Cookies in your own kitchen. Get ready to roll up your sleeves, dust off your mixing bowls, and embark on a baking journey that will leave you craving for more.
Why You’ll Love This Recipe
One bite of Aunt Millie’s Dirt Ball Cookies, and you’ll be hooked for life. These cookies are a perfect blend of sweetness, crunchiness, and chewiness, making them a delightful treat for any occasion. Whether you need a quick pick-me-up during the day or a comforting dessert after dinner, these cookies are sure to satisfy your cravings.
What sets these cookies apart is their versatility. You can enjoy them with a glass of milk, crumble them over ice cream, or pack them for a picnic—they are perfect for any setting. Moreover, Aunt Millie’s Dirt Ball Cookies can be customized to suit various dietary preferences, making them a crowd-pleaser for everyone.
Prepare to be amazed by the simplicity and deliciousness of this recipe. With just a few basic ingredients and easy steps, you can whip up a batch of these cookies in no time. Get ready to impress your family and friends with a homemade treat that tastes just like a hug from Aunt Millie herself.
So, roll up your sleeves, preheat your oven, and let’s dive into the world of Aunt Millie’s Dirt Ball Cookies!
Ingredients
To recreate Aunt Millie’s iconic Dirt Ball Cookies, you will need the following ingredients:
– 2 cups all-purpose flour
– 1 teaspoon baking soda
– 1/2 teaspoon salt
– 1 cup unsalted butter, softened
– 3/4 cup granulated sugar
– 3/4 cup packed brown sugar
– 1 teaspoon vanilla extract
– 2 large eggs
– 2 cups semisweet chocolate chips
– 1 cup chopped nuts (optional)
Feel free to customize this recipe by adding your favorite mix-ins such as dried fruits, coconut flakes, or even a sprinkle of sea salt for a gourmet twist. Let your creativity shine as you mix and match ingredients to create your own signature version of Aunt Millie’s Dirt Ball Cookies.
Step-by-Step Instructions
1. Preheat your oven to 350°F (175°C) and line a baking sheet with parchment paper.
2. In a medium bowl, whisk together the flour, baking soda, and salt. Set aside.
3. In a separate large bowl, cream together the butter, granulated sugar, brown sugar, and vanilla extract until light and fluffy.
4. Add the eggs one at a time, mixing well after each addition.
5. Gradually add the dry ingredients to the wet ingredients, mixing until just combined.
6. Stir in the chocolate chips and nuts until evenly distributed throughout the dough.
7. Using a cookie scoop or spoon, form the dough into balls and place them on the prepared baking sheet.
8. Bake in the preheated oven for 10-12 minutes, or until the edges are golden brown.
9. Remove from the oven and let the cookies cool on the baking sheet for 5 minutes before transferring them to a wire rack to cool completely.
10. Enjoy your freshly baked Aunt Millie’s Dirt Ball Cookies with a tall glass of cold milk or your favorite beverage.
Expert Tips for Success
For perfectly chewy cookies, slightly underbake them and let them cool on the baking sheet before transferring. This will ensure a soft center with a crisp edge. Additionally, refrigerating the cookie dough for 30 minutes before baking can help prevent spreading and result in thicker cookies. Experiment with different types of chocolate chips and nuts to create unique flavor combinations that suit your taste preferences.
When measuring flour, spoon it into the measuring cup and level it off with a knife for accuracy. This will prevent your cookies from becoming too dense or dry. Don’t skip the step of creaming the butter and sugars together, as this creates a light and airy texture in the cookies. Finally, store any leftover cookies in an airtight container at room temperature for up to a week, or freeze them for longer shelf life.
Variations and Substitutions
There are endless possibilities for customizing Aunt Millie’s Dirt Ball Cookies to suit your preferences. Try swapping the chocolate chips for white chocolate, butterscotch, or peanut butter chips for a fun twist. If you’re not a fan of nuts, simply omit them or replace them with dried cranberries or shredded coconut.
For a gluten-free version, use a 1-to-1 gluten-free flour blend in place of all-purpose flour. You can also make these cookies vegan by using plant-based butter, dairy-free chocolate chips, and a flax egg as a substitute for eggs. Get creative with your mix-ins and enjoy a personalized batch of cookies that cater to your dietary needs and flavor preferences.
Serving Suggestions
When serving Aunt Millie’s Dirt Ball Cookies, pair them with a steaming cup of coffee for a delightful morning treat or a scoop of vanilla ice cream for a decadent dessert. These cookies also make a fantastic gift for friends and family—simply package them in a decorative box or tin for a thoughtful homemade present.
For a special occasion, consider sandwiching a scoop of ice cream between two cookies to create a delicious ice cream sandwich. You can also crumble the cookies over a bowl of yogurt or pudding for a crunchy topping. The possibilities are endless, so get creative and savor the goodness of Aunt Millie’s Dirt Ball Cookies in different ways.
FAQs
Q: Can I freeze the cookie dough for later use?
A: Yes, you can portion the cookie dough into balls, freeze them on a baking sheet, then transfer to a resealable bag for up to 3 months. When ready to bake, simply place the frozen dough balls on a baking sheet and bake as directed, adding a few extra minutes to the baking time.
Q: How can I make these cookies crispy instead of chewy?
A: To achieve a crispier texture, bake the cookies for a few extra minutes until they are golden brown all over. Be sure to watch them closely to prevent burning, as baking times may vary depending on your oven.
Q: Can I use margarine instead of butter in this recipe?
A: While butter offers the best flavor and texture, you can substitute margarine for a dairy-free option. Just make sure it is a stick margarine suitable for baking to achieve similar results.
Final Thoughts
Congratulations! You have now mastered the art of baking Aunt Millie’s Retro Bakery Dirt Ball Cookies. These delectable treats are not just cookies—they are a symbol of love, tradition, and the joy of sharing homemade goodness with others. Whether you enjoy them fresh out of the oven or save them for a special occasion, Aunt Millie’s Dirt Ball Cookies are sure to bring a smile to your face and warmth to your heart.
So, gather your ingredients, preheat your oven, and let the aroma of freshly baked cookies fill your kitchen with happiness. Share these cookies with your loved ones, create new memories, and continue the legacy of Aunt Millie’s Retro Bakery one delicious bite at a time. Thank you for joining us on this culinary journey, and may your baking adventures always be filled with sweetness and delight!
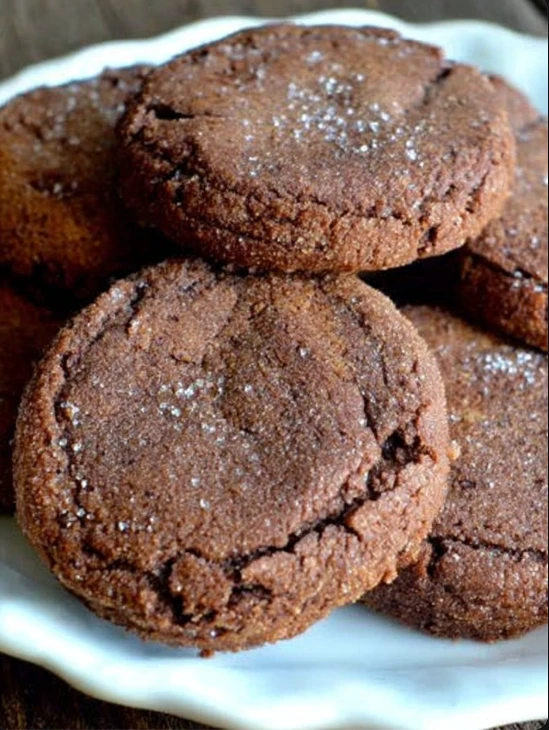
Aunt Millie’s Retro Bakery Dirt Ball Cookies
Delightful cookies that are crunchy on the outside, chewy on the inside, and bursting with flavors of chocolate chips and nuts, offering a nostalgic journey back in time.
Ingredients
- 2 cups all-purpose flour
- 1 teaspoon baking soda
- 1/2 teaspoon salt
- 1 cup unsalted butter, softened
- 3/4 cup granulated sugar
- 3/4 cup packed brown sugar
- 1 teaspoon vanilla extract
- 2 large eggs
- 2 cups semisweet chocolate chips
- 1 cup chopped nuts (optional)
Directions
- Preheat your oven to 350°F (175°C) and line a baking sheet with parchment paper.
- In a medium bowl, whisk together the flour, baking soda, and salt. Set aside.
- In a separate large bowl, cream together the butter, granulated sugar, brown sugar, and vanilla extract until light and fluffy.
- Add the eggs one at a time, mixing well after each addition.
- Gradually add the dry ingredients to the wet ingredients, mixing until just combined.
- Stir in the chocolate chips and nuts until evenly distributed throughout the dough.
- Using a cookie scoop or spoon, form the dough into balls and place them on the prepared baking sheet.
- Bake in the preheated oven for 10-12 minutes, or until the edges are golden brown.
- Remove from the oven and let the cookies cool on the baking sheet for 5 minutes before transferring them to a wire rack to cool completely.
- Enjoy your freshly baked Aunt Millie’s Dirt Ball Cookies with a tall glass of cold milk or your favorite beverage.
Nutrition Facts