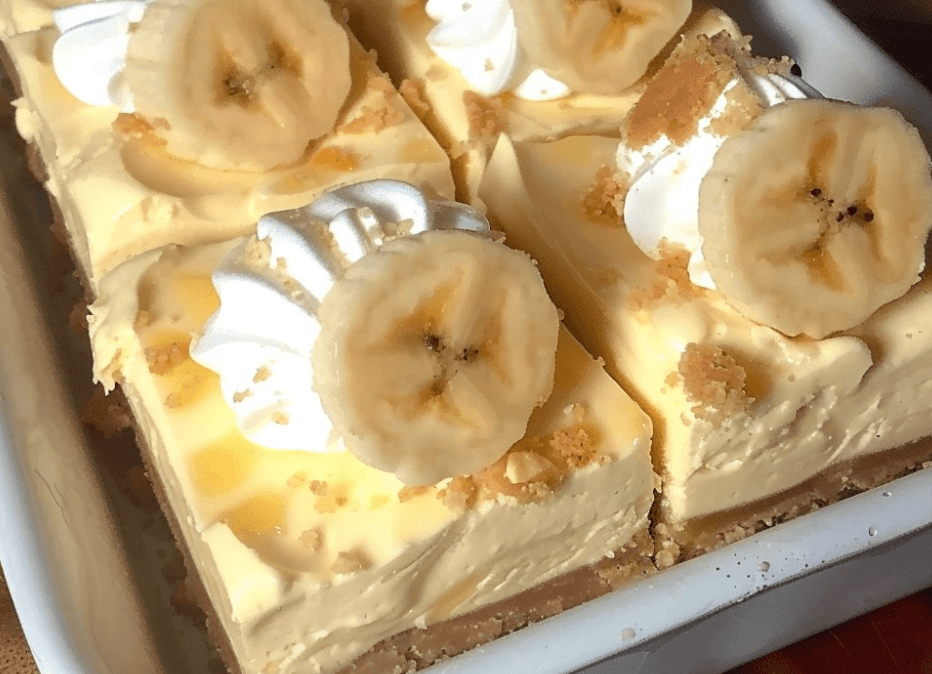
Banana Pudding Cheesecake Bars combine the best elements of cheesecake and classic banana pudding into a delightful dessert that is perfect for any occasion. With a buttery Nilla Wafer crust, creamy cheesecake filling infused with banana pudding flavor, and topped with fresh banana slices and whipped topping, these bars are sure to become a favorite among family and friends.
Ingredients
For the Crust:
- 1 1/2 cups crushed Nilla Wafers
- 5 tablespoons unsalted butter, melted
- 2 tablespoons granulated sugar
- Pinch of sea salt
For the Cheesecake Filling:
- 1 1/2 (8-ounce) blocks cream cheese, softened
- 1/2 cup granulated sugar
- 1 1/2 cups whipped topping (like Cool Whip)
- 1 (3.4-ounce) package instant banana pudding mix
- 1 3/4 cups whole milk
For the Topping:
- Additional whipped topping
- 1/2 banana, thinly sliced
- 9 Nilla Wafers, crushed
Instructions
Step 1: Prepare the Crust
- Preheat your oven to 350°F (175°C). Grease or line a 9×9-inch baking pan.
- In a medium bowl, combine crushed Nilla Wafers, melted butter, granulated sugar, and a pinch of sea salt. Mix until the crumbs are evenly moistened.
- Press the crumb mixture firmly into the bottom of the prepared baking pan, forming an even layer.
- Bake the crust in the preheated oven for 10 minutes, or until lightly golden. Remove from the oven and set aside to cool while preparing the filling.
Step 2: Make the Cheesecake Filling
- In a large mixing bowl, beat the softened cream cheese and granulated sugar together until smooth and creamy.
- Fold in the whipped topping until well combined and smooth.
- In a separate bowl, whisk together the instant banana pudding mix and whole milk until the pudding mix is dissolved and the mixture thickens slightly, about 2 minutes.
- Gradually add the pudding mixture to the cream cheese mixture, beating on low speed until smooth and well combined.
Step 3: Assemble the Bars
- Pour the prepared cheesecake filling over the cooled crust, spreading it evenly with a spatula.
- Cover the baking pan with plastic wrap or aluminum foil and refrigerate for at least 4 hours or overnight to allow the cheesecake to set.
Step 4: Add the Topping
- Before serving, spread a layer of whipped topping over the chilled cheesecake layer.
- Arrange sliced bananas over the whipped topping layer.
- Sprinkle crushed Nilla Wafers over the top for added texture and flavor.
Step 5: Serve and Enjoy!
- Use a sharp knife to cut the chilled cheesecake bars into squares.
- Serve chilled and garnish each bar with a slice of banana and a Nilla Wafer on top.
Tips for Success
- Room Temperature Ingredients: Ensure the cream cheese and whipped topping are at room temperature for smooth blending and texture.
- Chilling Time: Allow the bars to chill for the recommended time to set the layers properly and develop the best flavor.
- Variations: Experiment with different pudding flavors or add chocolate shavings for a different twist.
Frequently Asked Questions (FAQs)
Can I use homemade whipped cream instead of whipped topping?
Yes, you can substitute homemade whipped cream for the whipped topping. Ensure it is stabilized with powdered sugar or gelatin for the best results.
How long do Banana Pudding Cheesecake Bars last?
Store the bars covered in the refrigerator for up to 3-4 days. The crust may soften slightly over time, but the flavors will still be delicious.
Indulge in the creamy, banana-infused goodness of these Banana Pudding Cheesecake Bars. With their irresistible combination of buttery crust, creamy cheesecake filling, and delightful banana and whipped topping layers, these bars are a guaranteed hit at any gathering or as a special treat for yourself. Enjoy the simplicity and deliciousness of homemade dessert with every bite of these Banana Pudding Cheesecake Bars.
Make, share, and savor the joy of baking with family and friends. Happy baking!