Indulge in Delight with Classic Vanilla Custard Bars
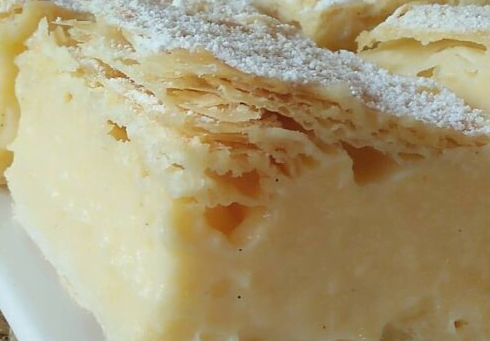
Prepare to embark on a culinary journey filled with sweetness and nostalgia as we delve into the world of Classic Vanilla Custard Bars. With a buttery puff pastry base and a luscious vanilla custard filling, these bars are a delightful treat for any occasion. Whether you’re hosting a gathering with friends or simply craving a comforting dessert, these custard bars are sure to impress. Join us as we explore the art of baking these delectable treats from scratch and elevate your dessert game to new heights.
Ingredients:
- 1/4 cup (1/2 stick) unsalted butter, cubed
- 2 teaspoons vanilla extract
- Powdered sugar, as needed
- 6 egg yolks, beaten
- 2/3 cup caster sugar or superfine sugar
- 1/3 cup all-purpose flour
- 1 (16 ounces) package of store-bought puff pastry, 2 sheets, thawed
- 1 1/2 cups heavy cream
- 1 1/2 cups whole milk
- 1/2 cup water
Instructions:
- Preheat the Oven: Preheat your oven to 375°F (190°C). Grease and line a 9×13-inch baking dish with parchment paper, ensuring that it hangs over the edges for easy removal.
- Prepare the Puff Pastry Base: Roll out one sheet of puff pastry to fit the bottom of the prepared baking dish. Press the pastry firmly into the bottom and up the sides of the dish, ensuring an even layer.
- Prepare the Custard Filling: In a medium saucepan, combine the heavy cream, whole milk, water, and cubed unsalted butter. Heat the mixture over medium heat until the butter is melted and the mixture is just beginning to simmer. Remove from heat and stir in the vanilla extract.
- Whisk the Egg Yolks and Sugar: In a separate mixing bowl, whisk together the beaten egg yolks, caster sugar, and all-purpose flour until smooth and well combined.
- Temper the Egg Mixture: Gradually pour a small amount of the hot milk mixture into the egg mixture, whisking constantly to temper the eggs and prevent them from scrambling. Once tempered, slowly pour the egg mixture back into the saucepan with the remaining milk mixture, whisking continuously.
- Cook the Custard: Return the saucepan to the stovetop and cook the custard mixture over medium heat, stirring constantly, until it thickens and coats the back of a spoon, about 5-7 minutes. Be careful not to let the mixture boil.
- Assemble the Bars: Pour the thickened custard mixture evenly over the prepared puff pastry base in the baking dish, smoothing it out with a spatula.
- Bake to Perfection: Roll out the second sheet of puff pastry and place it over the top of the custard filling. Trim any excess pastry and crimp the edges to seal. Pierce the top pastry layer with a fork to allow steam to escape during baking. Bake in the preheated oven for 25-30 minutes, or until the pastry is golden brown and the custard is set.
- Cool and Dust with Powdered Sugar: Remove the custard bars from the oven and allow them to cool completely in the baking dish. Once cooled, dust the top with powdered sugar using a fine mesh sieve.
- Slice and Serve: Use the parchment paper overhang to lift the custard bars out of the baking dish. Slice into squares or bars using a sharp knife. Serve chilled or at room temperature, and enjoy the creamy decadence of these Classic Vanilla Custard Bars.
Cook Notes and Variations:
- For added flavor, you can infuse the milk mixture with additional ingredients such as citrus zest, cinnamon sticks, or a splash of rum or brandy.
- Experiment with different types of extracts to customize the flavor of the custard. Almond extract or coconut extract can add a delightful twist to the classic vanilla flavor.
- Garnish the custard bars with fresh berries or a dollop of whipped cream for an extra touch of elegance and flavor.
Keto and Low-Carb Versions:
- Keto Version: Substitute the all-purpose flour with almond flour or coconut flour to reduce the carb content. Replace the caster sugar with a keto-friendly sweetener such as erythritol or monk fruit sweetener. Use a keto-friendly puff pastry dough made with almond flour or coconut flour, or make a crustless version by omitting the puff pastry altogether.
- Low-Carb Version: Follow the keto version instructions but further reduce the amount of sweetener and flour to minimize the carb content. You can also use heavy cream and whole milk with lower carb counts to keep the custard filling rich and creamy.
Frequently Asked Questions (FAQs):
Q: Can I use pre-made custard instead of making it from scratch? A: While pre-made custard can be used as a shortcut, making the custard from scratch allows for greater control over the flavor and consistency of the bars. Plus, homemade custard is always worth the extra effort for its superior taste and quality.
Q: Can I freeze custard bars for later? A: Yes, custard bars can be frozen for future enjoyment. Allow them to cool completely, then wrap individual bars tightly in plastic wrap and aluminum foil before placing them in an airtight container or freezer bag. Thaw overnight in the refrigerator before serving.
Q: Can I make these custard bars ahead of time? A: Absolutely! These custard bars can be made ahead of time and stored in the refrigerator for up to 2-3 days. Simply cover the baking dish tightly with plastic wrap or aluminum foil to prevent drying out.
Q: Can I use a different type of pastry dough for the base? A: Yes, you can use a different type of pastry dough such as shortcrust pastry or sweet pastry dough for the base if preferred. Just be sure to adjust the baking time and temperature accordingly.
In conclusion, Classic Vanilla Custard Bars are a delightful indulgence that combines the richness of creamy custard with the buttery goodness of puff pastry. With a few simple ingredients and easy-to-follow instructions, you can create a dessert that’s sure to impress. Whether enjoyed as a sweet treat for afternoon tea or as a decadent dessert for special occasions, these custard bars are sure to delight your taste buds and satisfy your sweet cravings. Get creative with variations and adaptations to make them your own, and enjoy the creamy goodness of these classic treats. Here’s to the joy of baking and the simple pleasures of homemade desserts!


