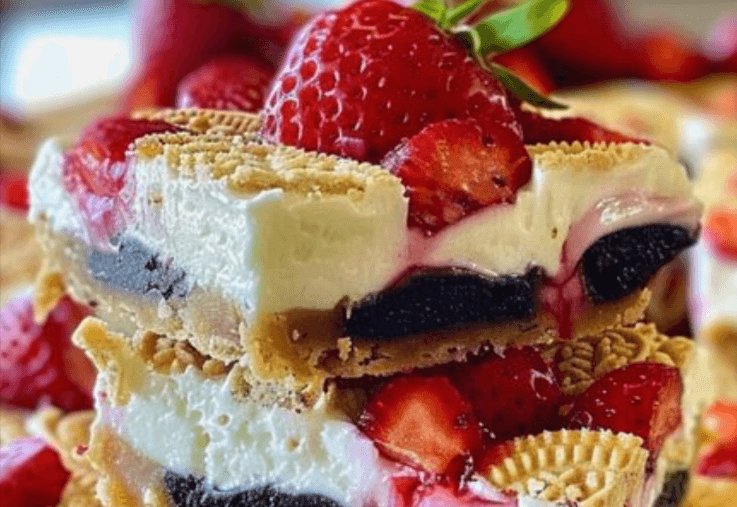
If you’re looking for a sweet treat that combines creamy cheesecake with the delightful crunch of Golden Oreos and the freshness of strawberries, you’ve come to the right place! These Golden Oreo Strawberry Cheesecake Bars are not only easy to make but also perfect for any occasion, from summer picnics to holiday gatherings. Let’s dive into this delicious recipe!
Ingredients
To make these scrumptious bars, you will need:
- 3 tablespoons unsalted butter, melted
- 24 Golden Oreos, divided
- 1 1/4 cups strawberries, diced
- 1 tablespoon sugar
- 1 tablespoon water
- 2 teaspoons lemon juice, freshly squeezed
- 1/2 teaspoon cornstarch
- 8 ounces cream cheese, softened
- 1/3 cup sour cream
- 1/3 cup sugar
- 1/2 teaspoon vanilla extract
- 1 large egg
Instructions
Step 1: Prepare the Oreo Crust
- Preheat the Oven: Preheat your oven to 325°F (160°C).
- Crush Oreos: In a food processor, crush 16 Golden Oreos into fine crumbs. Reserve the remaining 8 Oreos for topping.
- Mix with Butter: In a bowl, combine the crushed Oreos with melted butter. Mix until well combined.
- Press Into Pan: Line an 8×8-inch baking pan with parchment paper. Press the Oreo mixture firmly into the bottom of the pan to form a crust.
- Bake the Crust: Bake the crust in the preheated oven for about 10 minutes. Remove and allow to cool slightly.
Step 2: Prepare the Strawberry Topping
- Cook Strawberries: In a small saucepan over medium heat, combine the diced strawberries, 1 tablespoon sugar, 1 tablespoon water, lemon juice, and cornstarch. Stir gently and cook for about 5-7 minutes, or until the strawberries start to break down and the mixture thickens.
- Cool: Remove from heat and let the strawberry mixture cool while you prepare the cheesecake filling.
Step 3: Make the Cheesecake Filling
- Beat Cream Cheese: In a mixing bowl, beat the softened cream cheese until smooth.
- Add Sour Cream and Sugar: Mix in the sour cream, 1/3 cup sugar, and vanilla extract. Continue to beat until combined.
- Incorporate Egg: Add the egg and mix until smooth and creamy.
Step 4: Assemble the Bars
- Pour Filling: Pour the cheesecake filling over the cooled Oreo crust, spreading it evenly.
- Layer Strawberries: Spoon the cooled strawberry mixture over the cheesecake filling, spreading it gently to cover.
- Top with Oreos: Crush the remaining 8 Oreos and sprinkle them over the top of the strawberry layer.
Step 5: Bake
- Bake: Bake in the oven for an additional 25-30 minutes, or until the cheesecake is set and the edges are lightly golden.
- Cool: Let the bars cool at room temperature, then refrigerate for at least 2 hours to set completely.
Step 6: Serve
- Slice and Enjoy: Once chilled, lift the bars out of the pan using the parchment paper. Slice into squares and serve. Enjoy the creamy, fruity goodness!
Cook Notes
- Storage: These cheesecake bars can be stored in an airtight container in the refrigerator for up to 5 days.
- Freezing: You can freeze the bars for up to a month. Just make sure to wrap them tightly in plastic wrap and then foil.
- Serving Suggestions: Serve with whipped cream or extra fresh strawberries for a beautiful presentation.
Variations
Chocolate Lovers Version
Add a layer of chocolate ganache over the cheesecake filling before adding the strawberries for a rich chocolate flavor.
Mixed Berry Version
Substitute strawberries with a mix of your favorite berries, such as blueberries and raspberries, for a colorful twist.
Gluten-Free Option
Use gluten-free Golden Oreos to make this dessert gluten-free while still enjoying the same delicious taste.
Frequently Asked Questions (FAQs)
1. Can I use regular Oreos instead of Golden Oreos?
Yes, you can substitute regular Oreos, but the flavor and color of the crust will differ slightly.
2. How do I know when the cheesecake is done baking?
The cheesecake should be set around the edges but slightly jiggly in the center. It will firm up as it cools.
3. Can I make these bars ahead of time?
Absolutely! These bars can be made a day in advance and stored in the refrigerator until you’re ready to serve.


