Introduction
Imagine creating luscious, creamy dessert bars without the need for an oven. The beauty of 20-minute no-bake bars lies in their simplicity and convenience, making them a staple in quick dessert recipes. These bars offer a delightful combination of flavors and textures, providing the perfect answer for those seeking no-bake snacks that are both delicious and easy to prepare. Whether you’re looking for kid-friendly no-bake recipes or a quick fix for your sweet tooth, these bars fit the bill. Embrace the ease of these easy dessert ideas that you can whip up in no time. Ideal for busy weekdays or impromptu gatherings, they bring satisfaction without the stress of traditional baking. These bars are inspired by classic treats but offer a modern twist, allowing you to customize them with your favorite ingredients and adapt them to different dietary needs. Not only are they quick to make, but they also embody the essence of versatility, allowing you to experiment with different textures and flavors.
Ingredients
To make these delightful no-bake bars, gather the following ingredients. Be sure to use high-quality products for the best results. Each ingredient has been chosen to ensure a harmonious blend of flavors and nutrition, creating a wholesome treat that can cater to various palates. Selecting organic or locally sourced ingredients can elevate the taste further. Moreover, these ingredients are often pantry staples, making this recipe not just easy but also a go-to option whenever you need a quick dessert solution.
- Dry Ingredients:
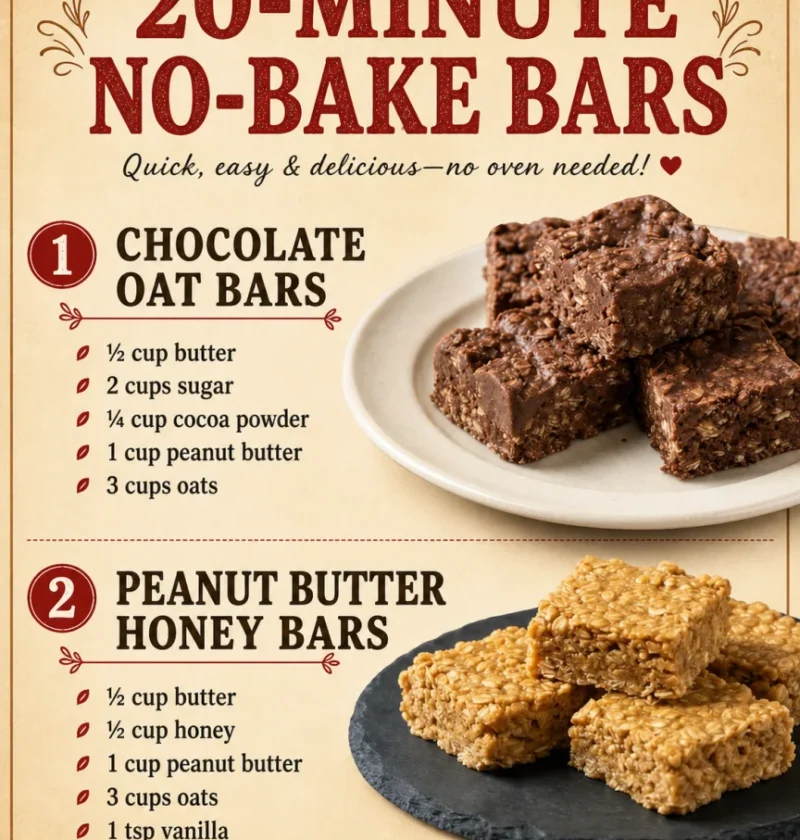
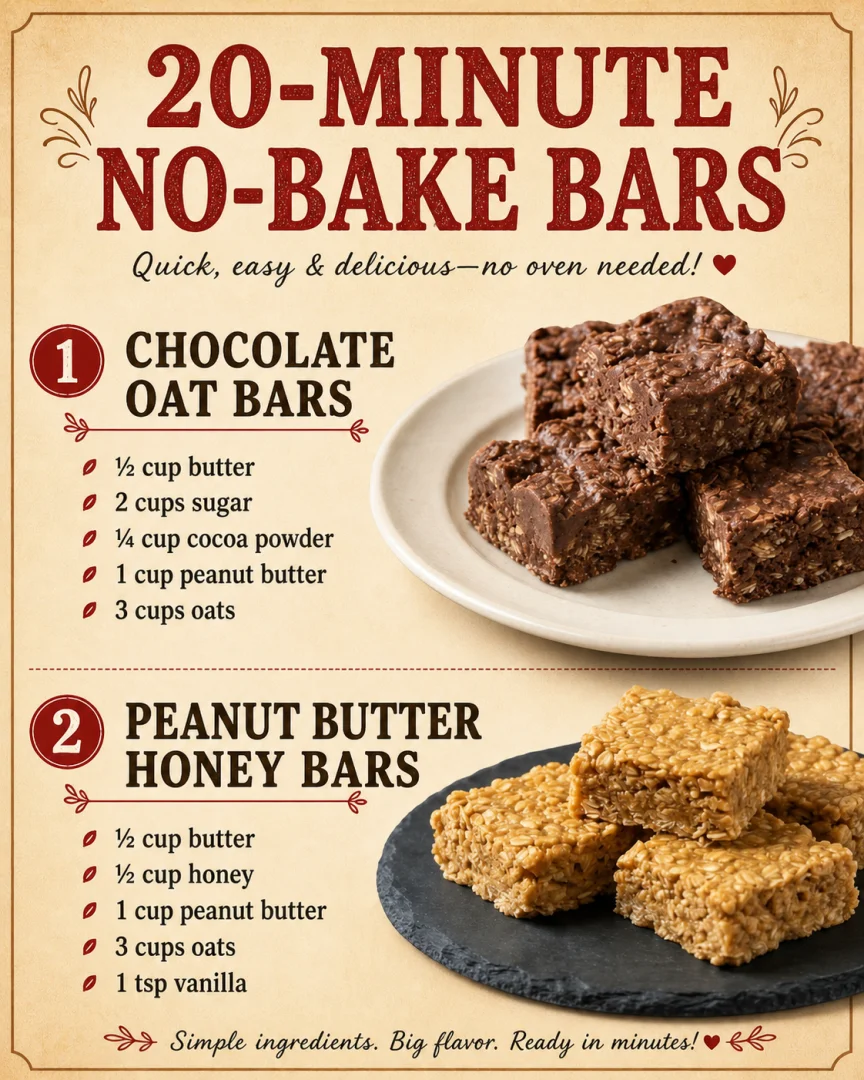
- 1 cup rolled oats – Opt for gluten-free oats if you want a gluten-free option. You can also lightly toast them to bring out a nutty aroma.
- 1 cup crispy rice cereal – Choose a low-sugar version to keep the sweetness balanced, or try a flavored variety for an unexpected twist.
- 1/4 cup ground flaxseed – Packed with omega-3 fatty acids for added health benefits. A small yet mighty addition for those mindful of their diet.
- 1/2 cup mini chocolate chips – Dark chocolate chips can provide a richer flavor profile. Milk chocolate chips work too if you prefer a sweeter taste.
- Wet Ingredients:
- 1/2 cup honey – Agave syrup can be a substitute for a vegan-friendly version. Choose raw honey for a more robust taste.
- 1/2 cup creamy peanut butter (or almond butter for a nut-free no-bake bars option) – Ensure a smooth texture by using a fresh jar. Stir well if oil separation has occurred.
- 1 teaspoon vanilla extract – Pure vanilla extract adds a more authentic flavor than imitation. Consider doubling the quantity for an extra hint of vanilla.
- Toppings (optional):
- 1/4 cup chopped nuts (almonds, walnuts, or pecans) – Toasting the nuts can enhance their flavor. A sprinkle of sea salt over these can add a delightful contrast.
- 1/4 cup dried cranberries or raisins – Opt for organic to avoid added sugars. Alternatively, use dried cherries for a tart kick.
Steps / Instructions
- Line an 8×8-inch baking pan with parchment paper, allowing some overhang for easy removal. This helps prevent sticking and makes cleanup effortless. Ensure the paper is snug to avoid any mixture seeping through.
- In a large mixing bowl, combine the rolled oats, crispy rice cereal, ground flaxseed, and mini chocolate chips. Mix until evenly distributed. This step ensures that each bite contains a perfect mix of ingredients. A large spoon or spatula works best to achieve an even distribution.
- In a microwave-safe bowl, combine the honey and peanut butter. Microwave on high for 30 seconds, then stir until smooth and well-blended. If the mixture is too thick, microwave for an additional 10 seconds. Be cautious of overheating, as this can alter the texture.
- Add the vanilla extract to the honey and peanut butter mixture, stirring thoroughly. The vanilla enhances the overall flavor complexity of the bars. A gentle fold ensures the vanilla is evenly incorporated without losing heat.
- Pour the wet mixture over the dry ingredients. Stir with a spatula until everything is well-coated and combined. Take your time to ensure there are no dry spots left in the mixture. A consistent mix will ensure uniformity in each bar slice.
- Transfer the mixture to the prepared baking pan. Use a spatula or the back of a spoon to press it firmly and evenly into the pan. Ensure the surface is as smooth as possible for uniform bars. Pressing firmly minimizes air pockets, ensuring each bar holds together.
- Sprinkle the optional toppings evenly over the mixture, pressing lightly to adhere. This can provide an extra layer of texture and flavor. A light press ensures that toppings stay put without sinking into the base.
- Refrigerate the bars for at least 20 minutes or until set and firm to the touch. For optimal results, let them chill for a bit longer if you prefer firmer bars. Overnight refrigeration can enhance the flavors further.
- Once set, use the parchment paper overhang to lift the bars from the pan. Cut into squares or rectangles to serve. Use a sharp knife for clean cuts, wiping it between slices for a neat presentation. Warm the knife under hot water for smoother slicing.
Tips & Tricks
- Storage: Store the bars in an airtight container in the refrigerator for up to one week. For longer storage, freeze them for up to three months. When freezing, separate layers with parchment paper to prevent them sticking together. Label the container with the date for easy tracking.
- Make-Ahead: Prepare the bars a day in advance and store them chilled for a convenient, ready-to-eat snack. They make a perfect grab-and-go breakfast option for busy mornings. These bars are ideal for meal prep, saving you time during the week.
- Pro Technique: For a smoother finish, use a rolling pin or a flat-bottomed glass to gently press the mixture into an even layer. This ensures the bars are compact and hold their shape. An even surface also provides a better base for toppings.
- Common Mistakes to Avoid: Ensure the mixture is firmly pressed into the pan to prevent crumbling when cutting. Don’t skip the chilling step, as it’s crucial for the bars to set properly. Avoid using overly dry or stale ingredients, which can affect the texture.
Variations
Customize your flavorful no-bake desserts with these variations: Check out our related guide for more tips. These adjustments can help cater to a range of tastes and dietary requirements, making them perfect for sharing with family and friends. Experimenting with ingredients not only diversifies flavors but also opens up possibilities for discovering new favorites.
- Dietary Alternatives: For vegan no-bake treats, use maple syrup instead of honey and replace chocolate chips with vegan ones. This change maintains the sweetness while making the bars suitable for vegan diets. Consider swapping butter options to cater to different dietary needs.
- Flavor Variations: Add 1/4 cup desiccated coconut for a tropical twist or 2 tablespoons cocoa powder for deeper chocolate flavor. Experiment with different extracts like almond or coconut for unique tastes. A pinch of cinnamon or nutmeg can add warmth and depth to the flavor profile.
- Ingredient Swaps: Swap peanut butter for sunflower seed butter to create perfectly delicious nut-free no-bake bars. This is ideal for nut allergy sufferers or those seeking new flavor profiles. Try using different nut butters like cashew or hazelnut for a gourmet touch.
Serving Suggestions
For optimal enjoyment, serve these bars chilled. Consider pairing them with a refreshing beverage like iced tea or a cold brew coffee. When presenting the bars, arrange them on a decorative platter, garnished with a drizzle of melted chocolate for added elegance. They make an excellent addition to a picnic spread or as a sweet finale to a light lunch, perhaps alongside an creamy pasta salad. These bars also pair well with fresh fruit or a light dessert wine for a sophisticated end to a dinner party. For a festive touch, dust these bars with powdered sugar or add edible flowers as a garnish.
FAQ
- Can I use quick oats instead of rolled oats? Yes, quick oats can be used, but they may result in a softer texture. Consider toasting the oats for added flavor if using quick oats. This slight change can also influence the chewiness of the bars.
- How do I prevent the bars from sticking to the parchment paper? Ensure the parchment paper is well-lined and greased, or use a non-stick spray. This will help in the easy removal of the bars without leaving any residue. Adding a dusting of cornstarch or flour can also aid in preventing sticking.
- What if my bars are too crumbly? Ensure the mixture is thoroughly mixed, and try adding more honey or peanut butter to bind the ingredients. If the mixture appears dry before setting, a small amount of coconut oil can help improve the texture. Adjusting the wet ingredients is key to achieving the perfect consistency.
Conclusion
These 20-minute no-bake bars offer a delightful combination of simplicity, versatility, and flavor, making them a must-try in your simple snack preparations. Whether you’re indulging in chocolate peanut butter bars or experimenting with healthy energy bars, these recipes are sure to become a favorite. Engage with us and share your creations, or leave feedback on your experience. Happy no-baking! We hope these bars add a touch of sweetness to your day and inspire you to explore more no-bake treats that fit effortlessly into your lifestyle. Don’t hesitate to personalize these bars; their adaptability is what makes them a staple in any dessert lover’s repertoire.
20-Minute No-Bake Bars
Luscious, creamy dessert bars that can be made without an oven in just 20 minutes. Perfect for quick desserts with a delightful combination of flavors and textures.
Ingredients
- 1 cup rolled oats
- 1 cup crispy rice cereal
- 1/4 cup ground flaxseed
- 1/2 cup mini chocolate chips
- 1/2 cup honey
- 1/2 cup creamy peanut butter
- 1 teaspoon vanilla extract
- 1/4 cup chopped nuts (optional)
- 1/4 cup dried cranberries or raisins (optional)
Directions
Line an 8x8-inch baking pan with parchment paper.
In a large mixing bowl, combine the rolled oats, crispy rice cereal, ground flaxseed, and mini chocolate chips.
In a microwave-safe bowl, combine the honey and peanut butter, microwave on high for 30 seconds, then stir until smooth.
Add the vanilla extract to the honey and peanut butter mixture, stirring thoroughly.
Pour the wet mixture over the dry ingredients and stir until everything is well-coated.
Transfer the mixture to the prepared baking pan and press it firmly and evenly.
Sprinkle the optional toppings evenly over the mixture, pressing lightly to adhere.
Refrigerate the bars for at least 20 minutes or until set.
Once set, use the parchment paper overhang to lift the bars from the pan and cut into squares or rectangles to serve.
Recipe Reviews
- ★★★★★
Excellent recipe!
Leave a Reply
Your email address will not be published. Required fields are marked *