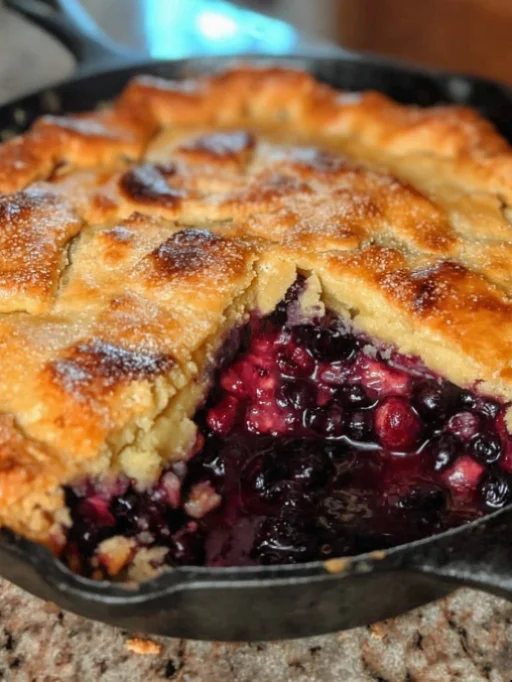
When the summer sun casts its golden rays, it’s the perfect time to indulge in a delightful dessert that embodies the season’s spirit. Enter the Iron Skillet Blackberry Cobbler—a comforting and rustic dish that celebrates the freshness of ripe blackberries. This cobbler not only fills your home with the irresistible aroma of baked fruit but also provides a taste of Southern tradition that dates back generations. With its buttery, biscuit-like topping cradling sweet, juicy blackberries, this recipe is a must-try for anyone looking to create a crowd-pleasing dessert that’s both easy and satisfying. The combination of tart and sweet blackberries creates a symphony of flavors that dance on your palate, while the warm, soft topping offers a delightful contrast in texture.
Ingredients
To craft the perfect Iron Skillet Blackberry Cobbler, gather the following ingredients: You can learn more about this topic.
- For the Filling:
- 4 cups fresh blackberries (washed and drained) – look for plump, shiny berries for maximum flavor.
- 1 cup granulated sugar – adjust this to taste depending on the sweetness of your blackberries.
- 2 tablespoons cornstarch – this helps thicken the blackberry juices as they cook.
- 1 tablespoon lemon juice – fresh juice adds brightness to balance the sweetness.
- 1 teaspoon vanilla extract – enhances the overall flavor profile of the cobbler.
- 1/2 teaspoon ground cinnamon – a pinch of warmth to complement the fruit.
- For the Topping:
- 1 cup all-purpose flour – for a tender, fluffy topping, be sure to measure correctly.
- 1/2 cup granulated sugar – sweetens the biscuit-like topping perfectly.
- 2 teaspoons baking powder – ensures a light and airy texture.
- 1/4 teaspoon salt – balances the sweetness of the topping.
- 1/2 cup unsalted butter (melted) – rich flavor that adds moisture.
- 1/2 cup milk – contributes to the overall tenderness of the topping.
- 1 teaspoon vanilla extract – a repeated boost of flavor for the topping.
Note: For a twist on flavor, consider adding a pinch of nutmeg to the fruit filling or substituting some of the blackberries with other seasonal berries like raspberries or blueberries. These additions can create a more complex flavor profile. Check out our related guide for more tips on ingredient selection.
Steps / Instructions
- Preheat your oven: Start by preheating your oven to 350°F (175°C). This ensures that your cobbler bakes evenly and develops a golden top, which is crucial for presentation.
- Prepare the blackberry filling: In a large mixing bowl, combine the fresh blackberries, sugar, cornstarch, lemon juice, vanilla extract, and cinnamon. Gently toss until the blackberries are well-coated. Allow this mixture to sit for about 10 minutes. This resting period is important as it will help the blackberries release their juices, creating a delicious syrup during baking.
- Transfer the filling: Pour the berry mixture into a well-seasoned cast iron skillet. Spread it out evenly to ensure it bakes uniformly. Using a skillet not only enhances the flavor but also provides a beautiful rustic appeal.
- Make the topping: In another bowl, whisk together the flour, sugar, baking powder, and salt. Pour in the melted butter and milk, along with the vanilla extract. Stir until just combined; be careful not to overmix. A few lumps are okay, as this will help keep the topping light and fluffy.
- Assemble the cobbler: Spoon the topping over the blackberry filling. It doesn’t need to cover the fruit completely; leaving some gaps allows the fruit to peek through and caramelize, contributing to a more visually appealing dish.
- Bake: Place the skillet in the preheated oven and bake for 35-40 minutes or until the topping is golden brown and the blackberries are bubbling. You’ll know it’s done when the edges are crispy and the center is set. The aroma wafting from the oven will be absolutely irresistible.
- Cool and serve: Once baked, remove the skillet from the oven and let it cool slightly before serving. This cooling period helps the juices thicken a bit more, making it easier to serve without making a mess.
Tips & Tricks
To ensure your Iron Skillet Blackberry Cobbler turns out perfectly, keep these tips in mind:
- Storage: Store any leftovers in an airtight container in the refrigerator for up to 3 days. Reheat in the oven at 350°F (175°C) for about 10-15 minutes for the best texture. Avoid reheating in the microwave, as this can make the topping soggy.
- Make-Ahead: You can prepare the blackberry filling a day in advance and keep it in the refrigerator. Assemble and bake just before serving for optimal freshness and taste.
- Avoiding a soggy bottom: Make sure to mix the cornstarch with the berries well, as this will help thicken the juices during baking. Additionally, baking in a hot skillet helps prevent sogginess, providing a crispy base.
- Pro Techniques: For an extra crispy topping, consider sprinkling a bit of coarse sugar on top of the batter before baking. This will create a delightful crunchy texture that contrasts beautifully with the soft filling.
Variations
While this recipe is delicious as is, here are some variations to explore:
- Gluten-Free: Substitute all-purpose flour with a gluten-free flour blend. Ensure that the blend contains xanthan gum for better structure.
- Vegan Option: Replace milk with almond milk and use a plant-based butter alternative. You can also use flaxseed meal mixed with water as an egg substitute if your recipe requires it.
- Berry Mix: Feel free to add other fruits such as blueberries or raspberries for a mixed berry cobbler. Combining different berries not only enhances the flavor but adds visual appeal.
Serving Suggestions
This Iron Skillet Blackberry Cobbler is best served warm, ideally with a scoop of vanilla ice cream or a dollop of whipped cream on top. Pair it with a refreshing glass of iced tea or lemonade to complement the sweetness. For an added touch, sprinkle a bit of fresh mint over the serving to elevate its rustic charm. The combination of warm cobbler and cold ice cream creates a delightful contrast that is hard to resist!
Iron Skillet Blackberry Cobbler
A comforting and rustic dish that celebrates the freshness of ripe blackberries with a buttery, biscuit-like topping.
Ingredients
- 4 cups fresh blackberries (washed and drained)
- 1 cup granulated sugar
- 2 tablespoons cornstarch
- 1 tablespoon lemon juice
- 1 teaspoon vanilla extract
- 1/2 teaspoon ground cinnamon
- 1 cup all-purpose flour
- 1/2 cup granulated sugar
- 2 teaspoons baking powder
- 1/4 teaspoon salt
- 1/2 cup unsalted butter (melted)
- 1/2 cup milk
- 1 teaspoon vanilla extract
Directions
Preheat your oven to 350°F (175°C).
In a large mixing bowl, combine the fresh blackberries, sugar, cornstarch, lemon juice, vanilla extract, and cinnamon. Gently toss until the blackberries are well-coated. Allow this mixture to sit for about 10 minutes.
Pour the berry mixture into a well-seasoned cast iron skillet. Spread it out evenly.
In another bowl, whisk together the flour, sugar, baking powder, and salt. Pour in the melted butter and milk, along with the vanilla extract. Stir until just combined.
Spoon the topping over the blackberry filling, leaving some gaps for the fruit to peek through.
Place the skillet in the preheated oven and bake for 35-40 minutes or until the topping is golden brown and the blackberries are bubbling.
Once baked, remove the skillet from the oven and let it cool slightly before serving.
Recipe Reviews
- ★★★★★
Excellent recipe!
Leave a Reply
Your email address will not be published. Required fields are marked *