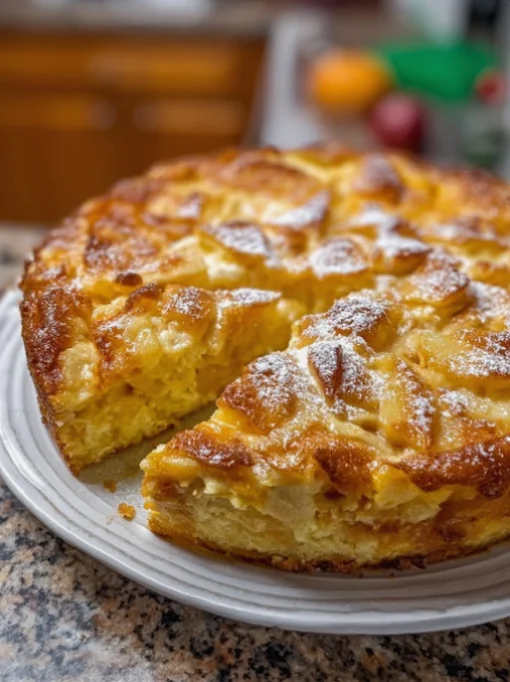
The Apple Hurricane Cake is a delightful dessert that perfectly embodies the essence of fall. With the warm, spiced aroma of cinnamon and nutmeg wafting through your kitchen, this cake is not just a feast for the taste buds but also a sensory experience that warms the soul. Originating from traditional apple cake recipes, this particular version stands out for its moist texture and rich flavor profile. The addition of fresh, juicy apples, combined with a hint of cinnamon and a buttery cake base, makes it the perfect dessert for gatherings, family dinners, or simply to enjoy with a cup of coffee. Whether you’re looking for apple pie alternatives or simply want to indulge in some comfort food desserts, this Apple Hurricane Cake will surely become a favorite. Its unique combination of flavors and textures is a testament to the beauty of simple, seasonal ingredients, making it an ideal choice for any occasion. This cake also evokes fond memories of crisp autumn afternoons and family baking sessions, making it a classic that brings people together. Each slice tells a story of warmth, nostalgia, and the joy of sharing good food with loved ones.
Ingredients
Gather the following ingredients to create your Apple Hurricane Cake. For the best results, use fresh, high-quality apples, and don’t skimp on the spices! You can learn more about this topic. Fresh, organic ingredients will elevate the flavor and texture of your cake, so consider using locally sourced apples if available. The flavor of the cake is heavily reliant on the quality of your apples, so opting for varieties that are in season will yield the best results. Additionally, measuring your dry ingredients accurately is crucial for the best outcome, as even slight variations can impact the texture and flavor of the cake. Always take a moment to read through the entire list of ingredients before starting, ensuring that you have everything on hand for a smooth baking experience.
Dry Ingredients
- 3 cups all-purpose flour – sifted to ensure lightness and aeration, which is key for a fluffy cake. Make sure to spoon the flour into the measuring cup and level it off for accuracy.
- 2 teaspoons baking powder – make sure it’s fresh for maximum leavening; aged baking powder can lead to a flat cake. Check the expiration date if you’re unsure.
- 1 teaspoon baking soda – helps the cake rise and contributes to its moistness, creating a delightful texture.
- 1 teaspoon salt – enhances the overall flavor, balancing the sweetness and bringing out the warmth of the spices.
- 2 teaspoons ground cinnamon – for that warm, comforting flavor, reminiscent of autumn; freshly ground cinnamon can enhance the taste.
- 1/2 teaspoon ground nutmeg – adds a warm spice note that beautifully complements the apples, giving depth to the cake.
- 1/4 teaspoon ground cloves – gives depth to the flavor, providing a hint of warmth that rounds out the spice mixture.
- 2 cups granulated sugar – adjust to taste if you prefer it less sweet; some may prefer one cup of brown sugar for added moisture and flavor, as it contributes a subtle caramel note.
Wet Ingredients
- 1 cup unsalted butter, softened – room temperature is best for creaming, ensuring a smooth mixture. This step is crucial for incorporating air into the batter.
- 4 large eggs – at room temperature for better mixing and to create a uniform batter; cold eggs can cause the butter to harden.
- 1 teaspoon vanilla extract – pure vanilla is recommended for richer flavor; avoid imitation for the best results, as real vanilla brings a depth that enhances the overall taste.
- 1 cup buttermilk – adds moisture and a slight tanginess that balances the sweetness of the apples and sugar. If you don’t have buttermilk, you can make a quick substitute by mixing one tablespoon of vinegar or lemon juice with enough milk to make one cup.
Apples
- 4 cups peeled, cored, and diced apples (such as Granny Smith or Honeycrisp) – choose firm apples that hold their shape well during baking for a delightful texture. The tartness of Granny Smith apples pairs beautifully with the sweetness of the cake, while Honeycrisp adds a juicy crunch that elevates the experience. Be sure to dice the apples into uniform pieces for even distribution throughout the batter.
Toppings
- 1/2 cup chopped walnuts or pecans (optional) – for added crunch and nutty flavor; toasting them lightly can enhance their taste, making them more aromatic and flavorful.
- Powdered sugar for dusting (optional) – a light sprinkle adds an elegant touch and visual appeal, making each slice look inviting and delicious. Consider adding a drizzle of caramel sauce for an extra indulgent presentation.
Steps / Instructions
- Preheat your oven to 350°F (175°C). Grease and flour a 9×13-inch baking pan, or line it with parchment paper for easier removal. This ensures your cake will come out cleanly and maintains its shape, preventing any sticking that could mar the presentation. A well-prepared pan is essential for a flawless finish.
- In a large mixing bowl, combine the dry ingredients: flour, baking powder, baking soda, salt, cinnamon, nutmeg, cloves, and sugar. Whisk these together until well blended, ensuring there are no lumps. This is essential for an evenly flavored cake; sifting the dry ingredients before mixing can help, ensuring a light and airy texture.
- In another bowl, cream the softened butter until light and fluffy using an electric mixer. This will take about 3-4 minutes. Properly creamed butter creates air pockets that contribute to the cake’s rise, leading to a lighter texture. Scrape down the sides of the bowl to ensure even mixing.
- Add the eggs, one at a time, mixing well after each addition. Stir in the vanilla extract, ensuring it is evenly incorporated into the mixture. The eggs should be fully integrated to create a homogenous batter; this step adds richness and moisture, enhancing the final product.
- Gradually incorporate the dry ingredients into the butter mixture, alternating with the buttermilk. Begin and end with the dry ingredients, mixing until just combined. Be careful not to overmix; overworking the batter can lead to a dense cake, which is less desirable. Use a spatula to carefully fold in the ingredients to retain air.
- Fold in the diced apples gently, ensuring that they are evenly distributed throughout the batter. This step is vital as it adds moisture and texture to the cake. Look for even specks of apple in the batter, which indicates they are well mixed. The apples should be coated in batter for the best texture.
- If desired, fold in chopped nuts for added texture and flavor. Nuts not only enhance the flavor but also provide a delightful crunch that complements the soft cake. Gently incorporate them to preserve the airiness of the batter; you can also sprinkle some on top for an appealing finish.
- Pour the batter into the prepared baking pan and spread it evenly. Tap the pan gently on the counter to remove any air bubbles that may have formed, ensuring a uniform rise during baking. This helps avoid unsightly holes in your finished cake, resulting in a beautiful, professional-looking dessert.
- Bake in the preheated oven for 45-50 minutes, or until a toothpick inserted into the center comes out clean. The top should be golden brown and spring back when lightly pressed. This visual cue indicates that your cake is perfectly baked; if it browns too quickly, you may need to cover it loosely with foil to prevent burning.
- Once baked, remove the cake from the oven and let it cool in the pan for about 10 minutes. Then, transfer it to a wire rack to cool completely. Cooling is essential to achieve the right texture and to prevent sogginess, allowing the cake to set properly and develop its flavors.
Tips & Tricks
Here are some practical tips to ensure your Apple Hurricane Cake turns out perfectly: Check out our related guide for more tips. These insights will help you navigate the process smoothly and achieve a cake that impresses guests and family alike.
- For the best flavor, use a mix of sweet and tart apples. Granny Smith adds a nice tartness that balances the sweetness of the cake. Consider mixing in some sweeter varieties like Fuji or Gala for depth, creating a more complex flavor profile. The contrast in flavors keeps each bite interesting.
- Store any leftover cake in an airtight container at room temperature for up to 3 days, or refrigerate for up to a week. For longer storage, freeze the cake wrapped in plastic wrap and aluminum foil. This method retains moisture and flavor, allowing you to enjoy your cake at a later date. When ready to serve, gently reheat slices in the microwave to revive the warmth.
- If you want to make it ahead of time, the cake can be baked and frozen. Wrap it tightly in plastic wrap and aluminum foil, and freeze for up to 3 months. Thaw in the refrigerator before serving; this will maintain its moisture and freshness, making it taste just baked. Consider making two cakes at once to enjoy one later!
- Common mistakes to avoid include overmixing the batter, which can lead to a tough cake. Mix until just combined, and use a spatula to fold in the apples and nuts gently. This preserves the delicate structure of the batter and ensures a light cake texture.
- For a lovely presentation, dust the cooled cake with powdered sugar just before serving. This touch not only looks appealing but also adds a subtle sweetness that enhances each slice. You can also serve it with a dollop of whipped cream or a scoop of vanilla ice cream for an indulgent treat, creating a perfect dessert experience.
Conclusion
Now that you have the recipe, it’s time to gather your ingredients and start baking. The Apple Hurricane Cake is a wonderful way to celebrate the flavors of fall and create lasting memories with friends and family. This moist apple cake is not only simple to make but is sure to impress everyone at your next gathering. Enjoy the comforting blend of sweet and savory flavors, and savor each bite! Feel free to share your experiences and variations with this recipe in the comments below!
Apple Hurricane Cake
The Apple Hurricane Cake is a delightful dessert that perfectly embodies the essence of fall. With the warm, spiced aroma of cinnamon and nutmeg wafting through your kitchen, this cake is not just a feast for the taste buds but also a sensory experience that warms the soul. Originating from traditional apple cake recipes, this particular version stands out for its moist texture and rich flavor profile. The addition of fresh, juicy apples, combined with a hint of cinnamon and a buttery cake base, makes it the perfect dessert for gatherings, family dinners, or simply to enjoy with a cup of coffee.
Ingredients
- 3 cups all-purpose flour – sifted
- 2 teaspoons baking powder
- 1 teaspoon baking soda
- 1 teaspoon salt
- 2 teaspoons ground cinnamon
- 1/2 teaspoon ground nutmeg
- 1/4 teaspoon ground cloves
- 2 cups granulated sugar
- 1 cup unsalted butter, softened
- 4 large eggs
- 1 teaspoon vanilla extract
- 1 cup buttermilk
- 4 cups peeled, cored, and diced apples (such as Granny Smith or Honeycrisp)
- 1/2 cup chopped walnuts or pecans (optional)
- Powdered sugar for dusting (optional)
Directions
Preheat your oven to 350°F (175°C). Grease and flour a 9x13-inch baking pan, or line it with parchment paper.
In a large mixing bowl, combine the dry ingredients: flour, baking powder, baking soda, salt, cinnamon, nutmeg, cloves, and sugar. Whisk until well blended.
In another bowl, cream the softened butter until light and fluffy using an electric mixer.
Add the eggs, one at a time, mixing well after each addition. Stir in the vanilla extract.
Gradually incorporate the dry ingredients into the butter mixture, alternating with the buttermilk. Mix until just combined.
Fold in the diced apples gently, ensuring they are evenly distributed throughout the batter.
If desired, fold in chopped nuts for added texture and flavor.
Pour the batter into the prepared baking pan and spread it evenly. Tap the pan gently on the counter to remove air bubbles.
Bake in the preheated oven for 45-50 minutes, or until a toothpick inserted into the center comes out clean.
Once baked, remove the cake from the oven and let it cool in the pan for about 10 minutes. Then transfer it to a wire rack to cool completely.
Nutrition Facts
Recipe Reviews
- ★★★★★
Excellent recipe!
Leave a Reply
Your email address will not be published. Required fields are marked *