Introduction
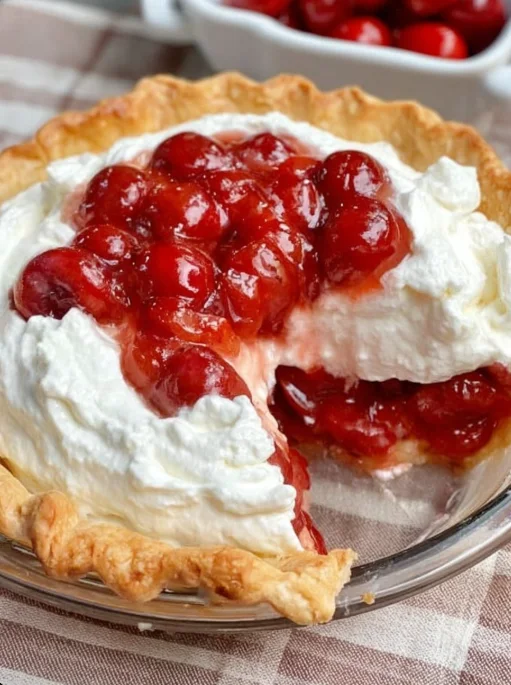
Cherry Pie is a quintessential American dessert that evokes memories of summer gatherings and festive occasions. Its delightful blend of sweet and tart flavors, paired with a flaky pie crust, makes it a beloved treat across the country. This homemade cherry pie recipe capitalizes on the natural sweetness of fresh cherries, making it a standout in classic dessert recipes. Originating from early American settlers who brought their pie-making traditions from Europe, cherry pie has become a staple in American pie traditions, often enjoyed during Fourth of July celebrations and Thanksgiving dinners. The joy of baking cherry pie comes not only from the delicious outcome but also from the process of creating something comforting and timeless. There’s something truly magical about pulling a cherry pie from the oven, its bubbling filling and golden crust promising the perfect bite. The tantalizing aroma that fills the kitchen as the pie bakes is an experience in itself, drawing family and friends to the table in eager anticipation of this classic delight.
Ingredients
For the Pie Crust:
- 2 1/2 cups all-purpose flour
- 1 teaspoon salt
- 1 tablespoon sugar
- 1 cup unsalted butter, chilled and diced
- 1/4 to 1/2 cup ice water
For the Sweet Cherry Filling:
- 5 cups fresh cherries, pitted
- 1 cup granulated sugar
- 1/4 cup cornstarch
- 1 tablespoon lemon juice
- 1 teaspoon vanilla extract
- 1/4 teaspoon almond extract
- 1/4 teaspoon salt
For Topping:
- 1 tablespoon butter, cut into small pieces
- 1 egg, beaten (for egg wash)
- 1 tablespoon sugar (for sprinkling)
Steps / Instructions
- Preheat your oven to 425°F (220°C). This ensures the pie begins baking immediately at the right temperature, helping to achieve a perfectly flaky crust. The high initial temperature also helps the crust set quickly, creating a barrier that prevents the filling from making it soggy.
- Make the Pie Crust: In a large bowl, combine the flour, salt, and sugar. Add the chilled butter, using a pastry cutter or your fingers to blend until the mixture resembles coarse crumbs. Gradually add ice water, a tablespoon at a time, mixing until the dough comes together. Divide the dough in half, shape into discs, wrap in plastic wrap, and refrigerate for at least 1 hour. Chilling the dough allows the gluten to relax, making it easier to roll out later. This step is crucial for achieving the desired flakiness in the pie crust.
- Prepare the Sweet Cherry Filling: In a large saucepan, combine the pitted cherries, sugar, cornstarch, lemon juice, vanilla extract, almond extract, and salt. Cook over medium heat, stirring frequently until the mixture thickens and the cherries become glossy, about 10 minutes. Remove from heat and let cool. The cooling process is important to prevent the crust from becoming too soggy. A well-thickened filling ensures the pie slices beautifully and holds together when served.
- Roll Out the Dough: On a floured surface, roll out one disc of dough to fit your 9-inch pie pan, leaving an overhang. Roll out the second disc for the top crust. You can choose a lattice design or a full cover with slits for steam. A lattice top is not only decorative but also allows steam to escape, preventing a soggy filling. Ensure the dough is rolled evenly to prevent uneven baking.
- Assemble the Pie: Pour the cherry filling into the prepared crust. Dot with butter pieces. Cover with the top crust, crimp the edges to seal, and brush with beaten egg. Sprinkle with sugar for extra crunch and shine. Crimping the edges well prevents the filling from leaking out during baking. Make sure the edges are sealed tightly to trap steam, which helps cook the filling thoroughly.
- Bake in the preheated oven for 20 minutes. Then, reduce the temperature to 375°F (190°C) and bake for another 30-35 minutes, or until the crust is golden brown and the filling is bubbling. The reduction in temperature ensures the filling has time to cook thoroughly without overbaking the crust. Monitor the pie carefully towards the end of baking to prevent over-browning.
- Allow the pie to cool on a wire rack for at least 2 hours before serving to ensure the filling sets properly. Patience is key here to achieve clean, firm slices. This cooling period allows the flavors to meld together, enhancing the overall taste of the cherry pie.
Tips & Tricks
- Quality Ingredients: Fresh cherries are key. Opt for a mixture of sweet and tart cherries to balance the flavors. If fresh cherries are not available, frozen cherries that have been thawed and drained well can be a substitute, though the flavor may vary slightly. Always taste your cherries before using to gauge their sweetness and adjust sugar accordingly.
- Chill the Dough: Keeping the dough cold prevents shrinking and ensures a flaky crust. If your kitchen is particularly warm, consider chilling the rolling pin and rolling surface as well. Cold utensils help maintain the integrity of the butter pieces in the dough, crucial for a good texture.
- Prevent Soggy Bottoms: Sprinkle a thin layer of breadcrumbs or crushed cookies on the bottom crust before adding the filling. This acts as a barrier, absorbing excess moisture from the filling. Alternatively, you can pre-bake the bottom crust slightly (a technique called blind baking) before adding the filling.
- Storage: Store cherry pie at room temperature for up to 2 days, or refrigerate for up to 5 days. For longer storage, wrap the pie tightly in plastic wrap and foil before freezing for up to 3 months. Reheat slices gently in the oven before serving to restore crispness.
- Make-Ahead Options: The pie dough can be made in advance and stored in the freezer for up to a month. Thaw overnight in the refrigerator before rolling out. This allows you to prepare in advance and save time on the day of baking.
Variations
- Dietary Alternatives: Use gluten-free flour for the crust, or substitute coconut oil for butter to make it vegan. Be sure to check that all other ingredients are suitable for your dietary needs. This ensures everyone can enjoy your delicious cherry pie, regardless of dietary restrictions.
- Flavor Variations: Add a pinch of cinnamon or nutmeg to the filling for a warm spice note. For a more complex flavor, consider adding a tablespoon of brandy or a splash of balsamic vinegar. These additions can elevate the flavor profile, offering a unique twist to the traditional cherry pie.
- Ingredient Swaps: Swap fresh cherries for canned or frozen if out of season, adjusting the sugar to taste. Remember that canned cherries are often packed in syrup, so reduce the added sugar accordingly. Always drain canned cherries thoroughly to avoid a watery filling.
- Creative Twists: Incorporate other fruits such as blueberries or raspberries for a mixed berry pie that offers a delightful contrast of flavors and textures. This variation not only adds a visual appeal but also introduces new flavor dimensions to the classic cherry pie.
Serving Suggestions
- Serve warm with a scoop of vanilla ice cream or a dollop of whipped cream for an indulgent experience. The creamy, cool contrast enhances the pie’s rich flavors. For an extra touch of luxury, try a flavored whipped cream such as almond or vanilla bean.
- Pair with a glass of chilled rosé or a cup of coffee for a simple, satisfying dessert. Alternatively, a fresh herbal tea such as chamomile can complement the pie’s sweetness without overpowering it. The gentle notes of a herbal tea can refresh the palate between rich bites.
- Consider serving alongside other classic desserts like Chocolate Coconut Cake for a delightful variety of flavors. This can create an impressive dessert spread for larger gatherings or special occasions. Offering multiple dessert options allows guests to sample and enjoy different treats.
- For a festive presentation, dust the top of the pie with powdered sugar just before serving, or add a few fresh cherries as a garnish. This simple touch can enhance the visual appeal and make the dessert more inviting.
FAQ
- Can I use jarred cherries? Yes, but ensure they are well-drained, and you may need to adjust sugar levels accordingly. Jarred cherries often come in syrup, which can make the pie overly sweet if not accounted for. It’s important to taste and adjust the filling before baking.
- How do I know when the pie is done? The crust should be golden brown, and the filling should bubble through the slits or lattice. If you have a thermometer, the internal temperature of the pie should reach around 200°F (93°C). This ensures the filling is fully cooked and safe to eat.
- Can I make this pie in advance? Absolutely, prepare and bake the day before. Store it covered at room temperature or chilled. If making ahead for more than a day, consider waiting to add the egg wash until just before baking to ensure it retains its shine. This helps maintain the pie’s visual appeal.
- What if my crust cracks while rolling? Don’t worry! Simply repair cracks by pressing together with a bit of water to seal. This simple trick can salvage the crust without affecting the final outcome.
- How can I prevent over-browning of the crust edges? If the edges brown too quickly, cover them with aluminum foil or a pie shield during the last 15-20 minutes of baking. This method ensures even baking and prevents the edges from becoming too dark or burnt.
Conclusion
Cherry Pie is more than just a dessert; it’s a journey through American culinary traditions, bringing the sweet and tart flavors of cherries into a delicious, flaky pastry. This homemade cherry pie recipe offers a taste of nostalgia and an invitation to create new memories with loved ones. Whether enjoyed as a summer dessert or a special occasion treat, it’s sure to delight everyone around the table. Try this recipe, and share your baking adventures with us. We can’t wait to hear your feedback and see your beautiful creations! There’s nothing quite like the satisfaction of crafting a cherry pie from scratch and sharing it with those you care about. Baking a cherry pie is a rewarding experience that combines the joy of cooking with the pleasure of sharing, making it a perfect centerpiece for any gathering.
Cherry Pie
Cherry Pie is a quintessential American dessert that evokes memories of summer gatherings and festive occasions. Its delightful blend of sweet and tart flavors, paired with a flaky pie crust, makes it a beloved treat across the country.
Ingredients
- 2 1/2 cups all-purpose flour
- 1 teaspoon salt
- 1 tablespoon sugar
- 1 cup unsalted butter, chilled and diced
- 1/4 to 1/2 cup ice water
- 5 cups fresh cherries, pitted
- 1 cup granulated sugar
- 1/4 cup cornstarch
- 1 tablespoon lemon juice
- 1 teaspoon vanilla extract
- 1/4 teaspoon almond extract
- 1/4 teaspoon salt
- 1 tablespoon butter, cut into small pieces
- 1 egg, beaten (for egg wash)
- 1 tablespoon sugar (for sprinkling)
Directions
Preheat your oven to 425°F (220°C).
Make the Pie Crust: In a large bowl, combine the flour, salt, and sugar. Add the chilled butter, using a pastry cutter or your fingers to blend until the mixture resembles coarse crumbs. Gradually add ice water, a tablespoon at a time, mixing until the dough comes together. Divide the dough in half, shape into discs, wrap in plastic wrap, and refrigerate for at least 1 hour.
Prepare the Sweet Cherry Filling: In a large saucepan, combine the pitted cherries, sugar, cornstarch, lemon juice, vanilla extract, almond extract, and salt. Cook over medium heat, stirring frequently until the mixture thickens and the cherries become glossy, about 10 minutes. Remove from heat and let cool.
Roll Out the Dough: On a floured surface, roll out one disc of dough to fit your 9-inch pie pan, leaving an overhang. Roll out the second disc for the top crust. You can choose a lattice design or a full cover with slits for steam.
Assemble the Pie: Pour the cherry filling into the prepared crust. Dot with butter pieces. Cover with the top crust, crimp the edges to seal, and brush with beaten egg. Sprinkle with sugar for extra crunch and shine.
Bake in the preheated oven for 20 minutes. Then, reduce the temperature to 375°F (190°C) and bake for another 30-35 minutes, or until the crust is golden brown and the filling is bubbling.
Allow the pie to cool on a wire rack for at least 2 hours before serving.
Recipe Reviews
- ★★★★★
Excellent recipe!
Leave a Reply
Your email address will not be published. Required fields are marked *