Chocolate Candy Cake: Indulge in Decadent Delights
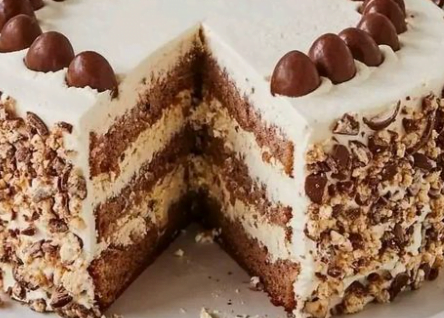
If you’re a fan of chocolate and all things sweet, get ready to embark on a culinary journey that will satisfy your cravings and delight your taste buds. Introducing Chocolate Candy Cake, a decadent dessert that combines rich chocolate flavors with creamy mascarpone and whipped cream for a truly indulgent experience. Whether you’re celebrating a special occasion or simply treating yourself to a sweet treat, this recipe is guaranteed to impress. So, roll up your sleeves and let’s dive into the delicious world of Chocolate Candy Cake!
Ingredients:
For the Ground:
- 6 eggs (size M)
- 230g sugar
- 1 pinch of salt
- 150 g wheat flour (Type 405)
- 2 tbsp baking cocoa
- 70 g ground hazelnuts
For the Cream:
- 100 g chocolate eggs
- 500g mascarpone
- 250 g cream
- 2 tbsp sugar
- 1 tbsp vanilla extract
Instructions:
For the Ground:
- Preheat the Oven: Preheat your oven to 180°C (350°F). Grease a 10-inch round cake pan and line the bottom with parchment paper.
- Prepare the Batter: In a large mixing bowl, beat the eggs, sugar, and salt with an electric mixer until pale and fluffy, about 5 minutes.
- Combine Dry Ingredients: In a separate bowl, sift together the flour and baking cocoa. Gradually fold the dry ingredients into the egg mixture until just combined. Be careful not to overmix.
- Add Ground Hazelnuts: Gently fold in the ground hazelnuts until evenly distributed throughout the batter.
- Bake: Pour the batter into the prepared cake pan and smooth the top with a spatula. Bake in the preheated oven for 25-30 minutes, or until a toothpick inserted into the center comes out clean.
- Cool: Remove the cake from the oven and let it cool in the pan for 10 minutes before transferring it to a wire rack to cool completely.
For the Cream:
- Melt Chocolate: In a heatproof bowl set over a pot of simmering water, melt the chocolate eggs until smooth. Remove from heat and let cool slightly.
- Whip Cream: In a separate bowl, whip the cream with sugar and vanilla extract until stiff peaks form.
- Mix Mascarpone and Chocolate: In another bowl, beat the mascarpone until smooth. Gradually add the melted chocolate and mix until well combined.
- Fold in Whipped Cream: Gently fold the whipped cream into the mascarpone mixture until smooth and creamy.
Assembly:
- Slice Cake: Once the cake has cooled completely, use a serrated knife to carefully slice it horizontally into two equal layers.
- Layer Cream: Spread a generous layer of the chocolate mascarpone cream on top of one cake layer. Place the second cake layer on top and press down gently to adhere.
- Frost Cake: Spread the remaining chocolate mascarpone cream over the top and sides of the cake, using a spatula to smooth it out evenly.
- Decorate: Garnish the cake with chocolate shavings, cocoa powder, or chocolate candies for an extra touch of indulgence.
- Chill: Refrigerate the cake for at least 2 hours, or until the cream is set and the flavors have melded together.
- Serve and Enjoy: Slice the Chocolate Candy Cake into generous portions and serve chilled. Enjoy the heavenly combination of rich chocolate cake and creamy mascarpone cream with every decadent bite!
Cook Notes and Variations:
- Nut-Free Option: If you have nut allergies or prefer a nut-free version, simply omit the ground hazelnuts from the cake batter.
- Coffee Infusion: For an added depth of flavor, substitute brewed coffee for water in the cake batter.
- Fruit Addition: Layer sliced strawberries or raspberries between the cake layers for a fruity twist.
Keto and Low-Carb Versions:
Keto Version:
To make a keto-friendly Chocolate Candy Cake, consider the following adjustments:
- Substitute almond flour or coconut flour for wheat flour to reduce the carb content.
- Use a keto-friendly sweetener such as erythritol or stevia instead of sugar in both the cake and cream.
Low-Carb Version:
For those looking to cut carbs, try the following modifications:
- Replace the wheat flour with a combination of almond flour and coconut flour for a lower carb cake base.
- Use a sugar-free chocolate alternative for the chocolate eggs to reduce the carb content further.
In conclusion, Chocolate Candy Cake is a luxurious dessert that’s perfect for any occasion. With its moist chocolate cake layers and creamy mascarpone filling, it’s sure to impress even the most discerning palates. Whether you’re celebrating a birthday, anniversary, or simply indulging your sweet tooth, this recipe is guaranteed to satisfy your cravings and leave you craving more. So why wait? Treat yourself and your loved ones to the irresistible flavors of Chocolate Candy Cake today!
Frequently Asked Questions (FAQs)
Q: Can I make the cake layers in advance? A: Yes, you can bake the cake layers ahead of time and store them in an airtight container at room temperature for up to 2 days. Alternatively, you can freeze the cake layers for up to 1 month and thaw them before assembling the cake.
Q: Can I use whipped cream instead of mascarpone for the cream filling? A: While whipped cream can be used as a substitute for mascarpone, keep in mind that it may result in a lighter texture and flavor. Mascarpone adds richness and creaminess to the filling, so it’s recommended for the best results.
Q: Can I decorate the cake with fresh fruit? A: Yes, you can decorate the Chocolate Candy Cake with fresh fruit such as berries, cherries, or sliced bananas for added color and flavor. Arrange the fruit on top of the cake just before serving for a beautiful presentation.
Q: Can I make the cake gluten-free? A: Yes, you can make the cake gluten-free by using a gluten-free flour blend or almond flour in place of wheat flour. Just be sure to check the labels of all ingredients to ensure they are gluten-free.
Q: How should I store leftovers of the cake? A: Leftovers of the Chocolate Candy Cake can be stored in the refrigerator in an airtight container for up to 3 days. Allow the cake to come to room temperature before serving for the best taste and texture.
