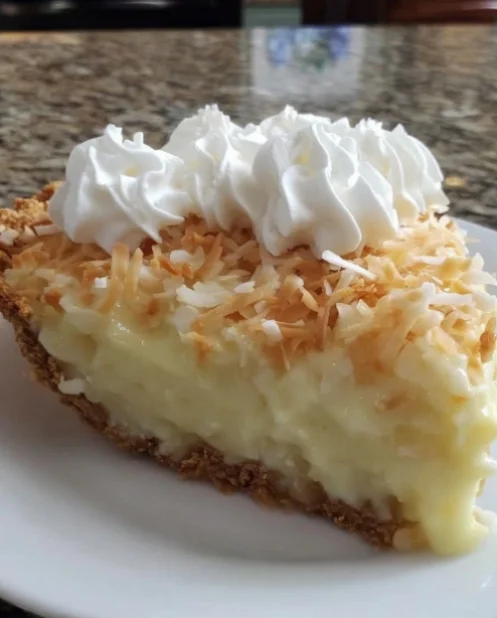
If you’re looking for a dessert that embodies the essence of summer, look no further than a Classic Coconut Cream Pie. This beloved dessert is not only a feast for the eyes with its luscious layers but also a delightful treat for the taste buds. The combination of rich coconut cream filling nestled within a flaky pie crust, topped with fluffy whipped cream, creates a symphony of textures and flavors that transports you straight to a tropical paradise. The creamy filling is infused with the natural sweetness of coconut, making each bite both refreshing and indulgent. Each slice of this pie is a celebration of summer, evoking visions of sunlight, ocean breezes, and carefree days. The visual appeal of the pie is undeniable, with its golden crust and snowy white topping inviting everyone to take a slice.
The history of coconut cream pie can be traced back to classic American desserts, often enjoyed during special occasions and family gatherings. It evokes warm memories of summer picnics and holiday celebrations, where desserts like this played a central role in bringing family and friends together. Many families pass down their recipes through generations, each adding their own special touch, whether it’s using a secret ingredient or a unique cooking method. This recipe celebrates the traditional techniques while ensuring that even novice bakers can master it with ease. The versatility of the Classic Coconut Cream Pie means it can be enjoyed at any gathering, from casual family dinners to elaborate parties. Whether you’re hosting a summer barbecue or simply indulging in a sweet craving, this Classic Coconut Cream Pie is a must-try! You can learn more about this topic and its delightful variations. Each bite tells a story, a reminder of why this dessert remains a favorite year after year, and why it holds a special place in our culinary hearts.
Ingredients
- For the pie crust:
- 1 ½ cups all-purpose flour, sifted for a lighter texture, and to prevent clumping. Consider using a high-quality brand for the best results.
- ½ teaspoon salt, to balance sweetness and enhance flavor, making the crust more savory.
- ½ cup unsalted butter, chilled and cubed, ideally from grass-fed cows for better flavor and richness; this choice makes a significant difference in taste.
- 4 to 5 tablespoons ice water, use more if needed to bring the dough together; the colder the water, the flakier the crust will be, so keep it icy!
- For the coconut cream filling:
- 1 cup sweetened coconut flakes, lightly toasted for added flavor if desired; toasting enhances the nutty aroma and deepens the flavor profile.
- 1 cup coconut milk, full-fat for creaminess, which helps create a luscious consistency that’s hard to resist.
- 1 cup whole milk, or use a dairy-free alternative like almond milk for a lighter option without sacrificing flavor — this is great for those with dietary restrictions.
- ¾ cup granulated sugar, adjust to taste if you prefer a less sweet filling; consider using coconut sugar for a deeper, caramel-like flavor that complements the coconut.
- 3 tablespoons cornstarch, for thickening the filling to achieve the perfect creamy texture that will hold up nicely.
- ¼ teaspoon salt, enhances the overall flavor profile significantly, bringing all the ingredients together.
- 3 large egg yolks, room temperature for better emulsification, ensuring a smooth filling that is rich and satisfying.
- 2 tablespoons unsalted butter, to enrich the filling and provide a velvety mouthfeel that makes each bite indulgent.
- 1 teaspoon vanilla extract, opt for pure vanilla for the best flavor, as imitation can lack the depth that elevates this dessert.
- For the whipped cream topping:
- 1 cup heavy whipping cream, chilled for better whipping; a well-chilled bowl also helps achieve the best results, making the cream fluffier.
- ¼ cup powdered sugar, sifted to avoid clumps, ensuring a smooth texture in your whipped cream that blends effortlessly.
- 1 teaspoon vanilla extract, adding depth to the cream, enhancing the overall flavor of the pie and balancing the sweetness.
Steps / Instructions
- Prepare the pie crust: In a medium bowl, whisk together the flour and salt until well combined. Add the chilled butter and mix with a pastry cutter or your fingers until the mixture resembles coarse crumbs with pea-sized pieces of butter remaining. This step is crucial for creating a flaky crust, as the small chunks of butter will create steam during baking. Gradually add ice water, one tablespoon at a time, mixing until the dough comes together but is not sticky. Form into a disk, wrap in plastic wrap, and refrigerate for at least 30 minutes to allow the gluten to relax, making it easier to roll out the dough later. This chilling step is key to achieving that tender, flaky texture.
- Preheat the oven: Preheat your oven to 375°F (190°C) to ensure even baking of the crust; this temperature helps achieve that perfect golden finish that everyone loves in a pie crust.
- Roll out the dough: On a floured surface, roll out the chilled dough to about 1/8-inch thickness to fit your pie dish. Carefully place it in the dish, trim excess dough, and crimp the edges to create an attractive border. Prick the bottom with a fork to prevent bubbling during baking, ensuring an even texture throughout your crust. This also allows steam to escape, preventing a soggy bottom.
- Bake the crust: Line the pie crust with parchment paper and fill with pie weights or dried beans. Bake for 20 minutes until lightly golden. The pie weights prevent the crust from puffing up, ensuring a flat surface for your filling. Remove the parchment and weights, then bake for an additional 5-10 minutes until the bottom is golden brown and fully cooked. Allow to cool completely on a wire rack before filling, ensuring the crust retains its crunch and does not become soggy.
- Make the coconut cream filling: In a medium saucepan, combine the coconut flakes, coconut milk, whole milk, sugar, cornstarch, and salt. Whisk until smooth and well integrated, ensuring there are no lumps. Cook over medium heat, stirring constantly until the mixture thickens and begins to bubble, about 5-7 minutes, which indicates it is ready for the next step. Keep an eye on it, as the bubbling is a sign that the cornstarch has activated and the filling is thickening properly, creating that luxurious texture we crave.
- Incorporate the egg yolks: In a small bowl, whisk the egg yolks until pale. Slowly add a few tablespoons of the hot coconut mixture to the yolks to temper them, preventing them from scrambling. This gradual process ensures a smooth filling. Gradually whisk the tempered yolks back into the saucepan, incorporating them smoothly. Cook for an additional 2-3 minutes, stirring continuously until the mixture is thick and creamy, resembling a custard consistency that will make your filling irresistible.
- Finish the filling: Remove from heat and stir in the butter and vanilla extract until fully melted and incorporated. The mixture should be glossy and rich, bursting with flavor. Pour the filling into the cooled pie crust, smoothing the top with a spatula for an even finish. Cover with plastic wrap, pressing it directly onto the surface of the filling to prevent a skin from forming. Chill for at least 4 hours or overnight to allow the filling to set properly, which enhances the flavors and results in the perfect slice.
- Prepare the whipped cream: In a mixing bowl, beat the heavy cream with an electric mixer until soft peaks form. Gradually add the powdered sugar and vanilla extract, continuing to beat until stiff peaks form, ensuring a fluffy topping that holds its shape beautifully. This step is important for achieving the perfect texture that complements the smooth filling and adds a delightful contrast in every bite.
- Assemble the pie: Once the filling is set, remove the plastic wrap and spread the whipped cream topping evenly over the coconut cream filling with a spatula. Garnish with additional sweetened coconut flakes, if desired, for a decorative touch and extra coconut flavor. This not only adds visual appeal but also enhances the coconut experience, making your Classic Coconut Cream Pie truly memorable.
- Serve: Slice and serve chilled. Enjoy the tropical flavors of your Classic Coconut Cream Pie, relishing the contrast of the creamy filling and the flaky crust! This dessert is best enjoyed on a warm day, paired with a refreshing drink, making it the perfect ending to any meal.
Tips & Tricks
- Ingredient quality: Use high-quality coconut milk for a richer flavor; look for brands that contain minimal additives and preservatives. Using fresh coconut milk can elevate your pie to a whole new level of deliciousness. This can significantly enhance the taste of your filling and make your Classic Coconut Cream Pie truly stand out, turning a simple dessert into a gourmet experience.
- Make-ahead option: This pie is perfect for making ahead of time. The flavors deepen as it chills, making it an excellent choice for gatherings, where the pie can be prepared a day in advance, saving you time on the day of your event. Just ensure to keep the whipped cream topping separate until serving, as it retains its texture and lightness better that way.
- Storage: Store any leftovers in an airtight container in the refrigerator for up to 3 days. The whipped cream may lose some volume but will still taste delicious; consider re-whipping it slightly before serving if it has deflated. Keeping it covered will prevent it from absorbing any unwanted fridge odors, ensuring it remains as fresh as possible.
- Avoiding common mistakes: Ensure you whisk continuously when cooking the filling to prevent it from scorching on the bottom of the pan. Temperature control is key! If the heat is too high, the mixture can quickly turn from perfect to burnt. Keeping your attention on the filling will yield a creamy, delicious result that everyone will love.
- Pro technique: To achieve a perfectly flaky pie crust, handle the dough as little as possible and keep your ingredients chilled. This will help maintain the little pockets of butter necessary for flakiness, resulting in a beautifully textured crust. If the dough warms, you may end up with a tough crust instead of a tender one; so keep it cold for the best results.
Conclusion
Give this Classic Coconut Cream Pie a try, and bring a taste of the tropics to your table. Whether you’re celebrating a special occasion or simply indulging in a sweet craving, this pie is sure to impress. With its delightful layers of coconut cream filling, flaky crust, and fluffy whipped topping, it’s a dessert that encapsulates the warmth of summer and the joy of sharing dessert with loved ones. Each bite is a reminder of sunny days spent with family and friends, creating lasting memories. Check out our related guide for more tips and enjoy the experience of creating this timeless dessert that will surely become a favorite in your home!
Classic Coconut Cream Pie
A delightful dessert that combines rich coconut cream filling in a flaky pie crust, topped with fluffy whipped cream.
Ingredients
- 1 ½ cups all-purpose flour, sifted
- ½ teaspoon salt
- ½ cup unsalted butter, chilled and cubed
- 4 to 5 tablespoons ice water
- 1 cup sweetened coconut flakes, lightly toasted
- 1 cup coconut milk, full-fat
- 1 cup whole milk
- ¾ cup granulated sugar
- 3 tablespoons cornstarch
- ¼ teaspoon salt
- 3 large egg yolks
- 2 tablespoons unsalted butter
- 1 teaspoon vanilla extract
- 1 cup heavy whipping cream, chilled
- ¼ cup powdered sugar, sifted
- 1 teaspoon vanilla extract
Directions
Prepare the pie crust: In a medium bowl, whisk together the flour and salt. Add the chilled butter and mix until it resembles coarse crumbs. Gradually add ice water until the dough comes together. Form into a disk, wrap in plastic wrap, and refrigerate for at least 30 minutes.
Preheat the oven to 375°F (190°C).
Roll out the dough on a floured surface to about 1/8-inch thickness. Fit it into your pie dish, trim excess dough, and crimp the edges. Prick the bottom with a fork.
Line the pie crust with parchment paper and fill with weights. Bake for 20 minutes until lightly golden. Remove parchment and weights, then bake for an additional 5-10 minutes until fully cooked. Cool completely.
In a medium saucepan, combine coconut flakes, coconut milk, whole milk, sugar, cornstarch, and salt. Cook over medium heat, stirring constantly, until thickened and bubbling, about 5-7 minutes.
In a small bowl, whisk the egg yolks. Gradually temper them with a few tablespoons of the hot coconut mixture, then whisk back into the saucepan. Cook for an additional 2-3 minutes until thick and creamy.
Remove from heat and stir in butter and vanilla extract until melted. Pour into the cooled pie crust, cover with plastic wrap directly on the filling, and chill for at least 4 hours.
Prepare the whipped cream: In a mixing bowl, beat the heavy whipping cream with powdered sugar and vanilla extract until soft peaks form.
Spread the whipped cream over the chilled pie before serving.
Nutrition Facts
Recipe Reviews
- ★★★★★
Excellent recipe!
Leave a Reply
Your email address will not be published. Required fields are marked *