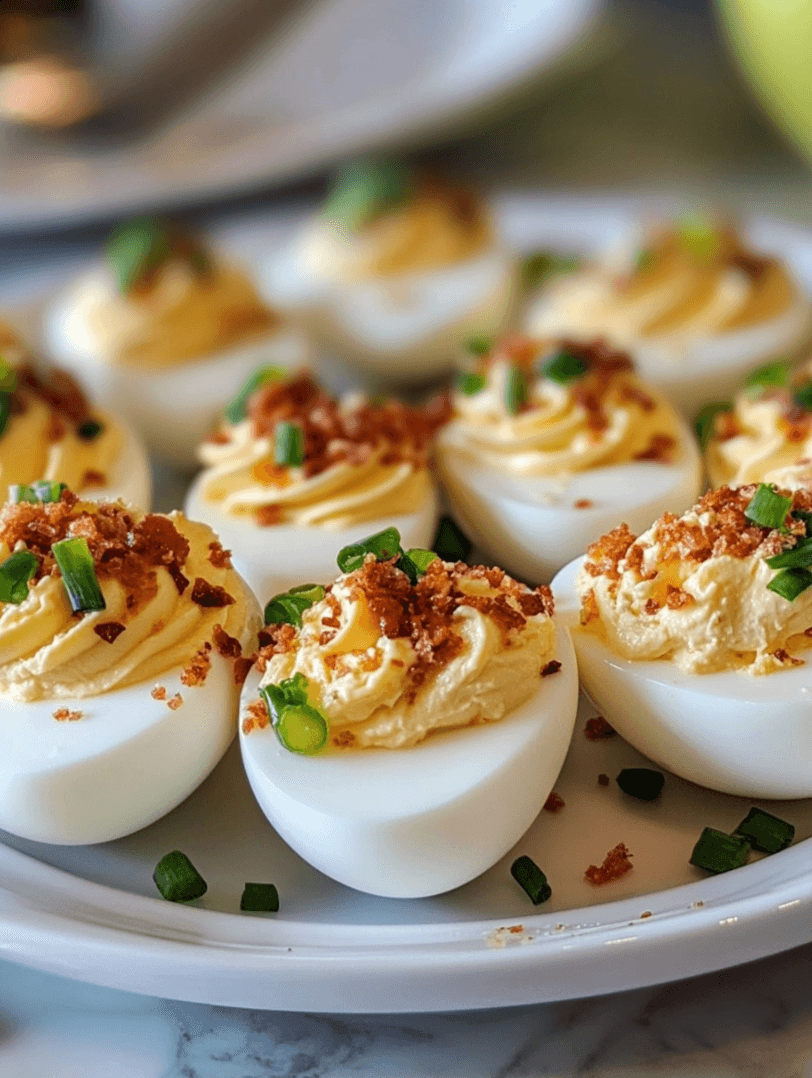
Deviled eggs are a timeless classic, beloved for their creamy texture and savory flavor. They’re a staple at parties, picnics, and holiday gatherings. But when you take traditional deviled eggs and load them up with crispy bacon, sharp cheddar cheese, sour cream, and fresh chives, you elevate them to a whole new level of deliciousness. These Loaded Deviled Eggs are a mouthwatering twist on the original, adding rich flavors and a hint of crunch. They’re sure to be a hit no matter where you serve them.
Why You’ll Love These Loaded Deviled Eggs
- Rich and Creamy: The combination of mayonnaise, sour cream, and Dijon mustard creates a creamy base that perfectly complements the savory toppings.
- Burst of Flavor: Each bite is packed with smoky bacon, tangy cheddar, and the mild onion flavor of chives, all balanced by the slight heat of Dijon mustard.
- Perfect for Any Occasion: Whether you’re hosting a party, going to a potluck, or just want a tasty snack, these loaded deviled eggs are versatile and easy to prepare ahead of time.
- Crowd-Pleasing Garnishes: A sprinkle of paprika adds color and a subtle smokiness, while the crispy bacon and cheese provide texture and flavor that everyone will love.
Now, let’s dive into the ingredients and the step-by-step process to make these irresistible loaded deviled eggs.
Ingredients
For the Eggs:
- 12 large eggs, hard-boiled and peeled
- 1/3 cup mayonnaise
- 2 tablespoons sour cream
- 1 tablespoon Dijon mustard
- Salt and pepper to taste
For the Toppings:
- 4 strips crispy bacon, crumbled (reserve some for garnish)
- 1/4 cup sharp cheddar cheese, finely shredded (reserve some for garnish)
- 2 tablespoons chives, finely chopped (reserve some for garnish)
- Paprika, for garnish
Step-by-Step Instructions
Step 1: Hard-Boil and Peel the Eggs
Start by boiling your eggs. Place the eggs in a single layer in a large saucepan and cover them with cold water. Bring the water to a boil over medium-high heat. Once the water reaches a rolling boil, remove the saucepan from heat, cover it with a lid, and let the eggs sit for 10-12 minutes. This method ensures perfectly cooked eggs every time without overcooking the yolks.
After 12 minutes, transfer the eggs to an ice bath (a large bowl of cold water with ice) to cool them quickly and stop the cooking process. Let the eggs sit in the ice bath for at least 5 minutes before peeling them. This method also makes peeling the eggs much easier, as the cold water helps the shells separate from the egg whites.
Step 2: Slice the Eggs and Remove the Yolks
Once the eggs are peeled, slice each egg in half lengthwise using a sharp knife. Be sure to wipe the knife clean between slices to keep the egg whites looking neat. Carefully remove the yolks from each half and place them in a medium-sized mixing bowl. Set the egg whites aside on a serving platter.
Step 3: Prepare the Filling
Now it’s time to create the delicious creamy filling for your deviled eggs. In the mixing bowl with the egg yolks, add the mayonnaise, sour cream, and Dijon mustard. Season with a pinch of salt and pepper to taste. Using a fork or a potato masher, mash the ingredients together until the mixture is smooth and creamy. The consistency should be thick but not too dry; if it seems too thick, you can add a little extra mayonnaise or sour cream to loosen it up.
Step 4: Add the Bacon, Cheddar, and Chives
To make these deviled eggs truly loaded, stir in most of the crumbled bacon, shredded cheddar cheese, and chopped chives into the egg yolk mixture. Be sure to reserve some bacon, cheese, and chives for garnishing later. Fold everything together until evenly distributed. The bacon adds a nice crunch, while the cheddar brings a sharp, tangy flavor, and the chives add a mild, fresh onion note.
Step 5: Fill the Egg Whites
There are two ways to fill the egg whites with the yolk mixture. The easiest method is to use a spoon to scoop the filling into the egg white halves. For a more professional and polished look, transfer the filling to a piping bag (or a plastic bag with a small hole cut in one corner) and pipe the filling into each egg white half. Either way, you’ll end up with delicious results.
Step 6: Garnish and Serve
Now comes the fun part—garnishing! Sprinkle the reserved bacon crumbles, shredded cheddar cheese, and chopped chives over the top of each deviled egg. For an extra pop of color and flavor, lightly dust the eggs with paprika. The paprika not only enhances the appearance but also adds a subtle smokiness that complements the other ingredients.
Serve the deviled eggs immediately, or refrigerate them for up to 4 hours before serving. If you’re preparing them in advance, wait to add the garnishes until just before serving to keep everything fresh and crisp.
Tips for Success
- Use Fresh Eggs for Boiling: Fresher eggs can be more difficult to peel, so try to use eggs that are a few days old if possible. The slight air gap inside the egg increases as they age, making peeling easier.
- Don’t Overboil the Eggs: Follow the recommended cooking time to avoid overcooking the eggs, which can result in a greenish-gray ring around the yolk.
- Piping Bag Tip: If you don’t have a piping bag, a resealable plastic bag works just as well. Simply fill the bag with the yolk mixture, cut off a small corner, and pipe the filling into the egg whites.
Variations
- Spicy Loaded Deviled Eggs: For a little kick, add a teaspoon of hot sauce or a pinch of cayenne pepper to the yolk mixture. You can also top the eggs with jalapeño slices for extra heat.
- Avocado Deviled Eggs: Replace the mayonnaise with mashed avocado for a healthier, creamy alternative. The avocado adds a rich, buttery flavor that pairs wonderfully with the bacon and cheddar.
- Pickle-Lovers’ Deviled Eggs: Add a tablespoon of finely chopped pickles or relish to the filling for a tangy twist. Garnish with pickle slices for an extra burst of flavor.
Serving Suggestions
These Loaded Deviled Eggs make an excellent appetizer or side dish for a variety of occasions. They’re perfect for:
- Holiday gatherings: Serve them at Easter, Thanksgiving, or Christmas for a festive snack.
- Picnics and potlucks: Deviled eggs travel well and are always a crowd favorite.
- Game day: These loaded deviled eggs make a fun, bite-sized snack that’s ideal for game-day parties and get-togethers.
Pair them with other finger foods like sliders, wings, or veggie platters for a complete spread.
Frequently Asked Questions
How long do deviled eggs last?
Deviled eggs can be stored in an airtight container in the refrigerator for up to 2 days. After that, the texture may start to change, and the eggs won’t taste as fresh.
Can I make deviled eggs ahead of time?
Yes! You can make the deviled eggs up to a day in advance. Simply store the egg whites and filling separately, and assemble them right before serving to keep them fresh.
These Loaded Deviled Eggs are a delicious twist on the classic recipe, featuring crispy bacon, tangy cheddar, and fresh chives. Whether you’re hosting a party, bringing a dish to a potluck, or just enjoying them as a snack, they’re sure to be a hit. With simple ingredients and a quick prep time, these deviled eggs are easy to make and incredibly satisfying. Give this recipe a try, and watch them disappear from the plate in no time


