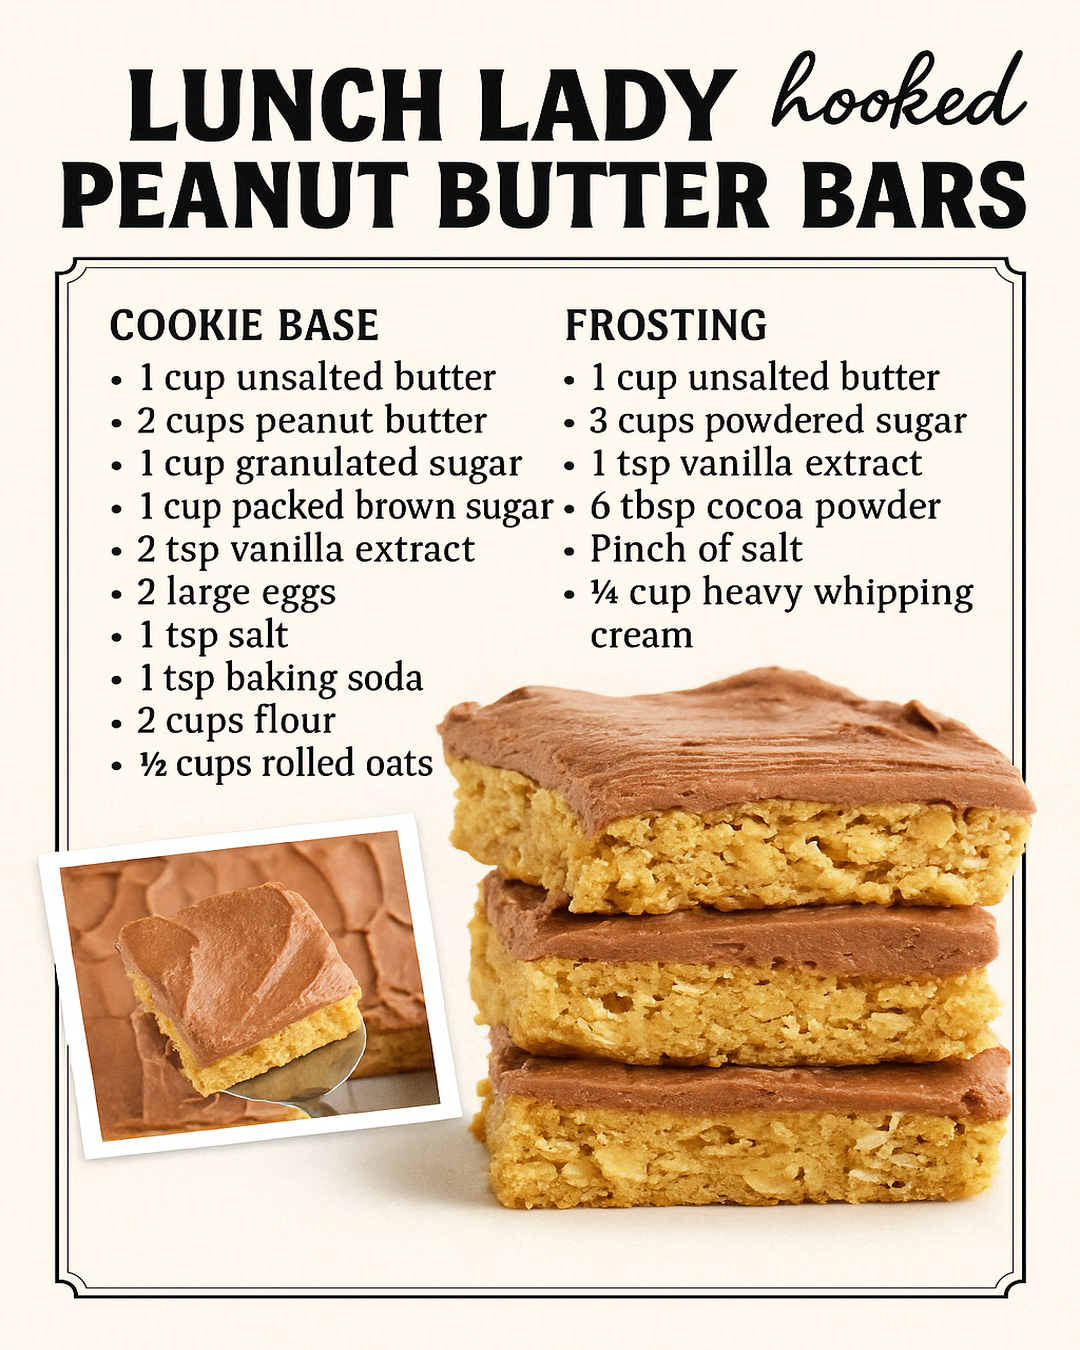
Lunch Lady Peanut Butter Bars (Old-School Favorite That Hooks You!)
Remember those soft, chewy peanut butter bars served by the lunch ladies back in school? This recipe brings back every sweet memory. These Lunch Lady Peanut Butter Bars are thick, rich, and topped with a silky chocolate layer that’s impossible to resist.
Whether you grew up with them or just love the combo of peanut butter and chocolate, this classic bar is here to stay.
—
Why You’ll Love These Peanut Butter Bars
No mixer needed
Perfect balance of salty and sweet
Easy to make in one pan
No chilling or waiting overnight
Taste just like the old-school cafeteria bars
They’re a go-to for potlucks, bake sales, or a cozy weekend treat.
—
Ingredients
For the bars:
1 cup creamy peanut butter
½ cup unsalted butter, melted
1 cup brown sugar
½ cup granulated sugar
2 large eggs
1 teaspoon vanilla extract
1 cup all-purpose flour
1 teaspoon baking powder
¼ teaspoon salt
For the chocolate topping:
1½ cups semi-sweet chocolate chips
½ cup creamy peanut butter (for spreading over the base)
—
How to Make Lunch Lady Peanut Butter Bars
1. Preheat the Oven
Preheat your oven to 350°F (175°C). Grease a 9×13-inch baking pan or line it with parchment paper for easy lifting.
—
2. Make the Peanut Butter Base
In a large bowl, mix together:
melted butter
peanut butter
brown sugar
granulated sugar
eggs
vanilla
Stir until smooth. Then add flour, baking powder, and salt. Mix until fully combined, but don’t overmix.
Spread the thick batter evenly into your prepared pan.
—
3. Bake the Bars
Bake for 20–25 minutes, or until the edges are golden and a toothpick comes out clean.
Let cool for 10 minutes before the next step.
—
4. Add the Peanut Butter Layer
While still warm, spread ½ cup of peanut butter over the top of the bars. Let it melt and cover the surface evenly. This adds extra creaminess and helps the chocolate stick.
—
5. Melt and Spread the Chocolate
In the microwave or over low heat, melt the chocolate chips. Stir until smooth.
Spread the melted chocolate over the peanut butter layer. Smooth it out with a spatula.
Let cool completely before cutting into squares or bars.
—
Tips for Success
Use room-temperature eggs for a smoother batter.
Let the bars cool slightly before adding chocolate or it may melt unevenly.
Add a sprinkle of sea salt on top for a modern twist.
Store in an airtight container at room temp for 3–4 days or in the fridge for up to a week.
—
Flavor Variations
Swap chocolate chips for white chocolate or butterscotch chips.
Add crushed pretzels to the topping for crunch.
Use chunky peanut butter if you like a little texture.
For extra richness, mix ½ cup oats into the batter for a chewy bite.
—
Why Are They Called “Lunch Lady” Bars?
Because they were everywhere in school cafeterias across the U.S. in the ’70s, ’80s, and ’90s. They were always served on a sheet tray, cut into perfect squares, and somehow always came out just right.
This homemade version keeps the same nostalgic flavor—but you can eat as many as you want without waiting in line.
—
Frequently Asked Questions
Can I use natural peanut butter?
You can, but bars may be oilier and less stable. For best results, use classic creamy peanut butter like Jif or Skippy.
—
Can I freeze these bars?
Yes! Let them cool fully, then freeze cut bars in layers with parchment in between. Thaw overnight in the fridge before serving.
—
Can I make these gluten-free?
Yes. Use a gluten-free all-purpose baking blend and check your baking powder is gluten-free.
—
Serve With
Cold glass of milk
Cup of coffee or hot cocoa
Scoop of vanilla ice cream (if you’re feeling wild)
These bars are rich, so cut into small pieces… but don’t be surprised if you go back for seconds.