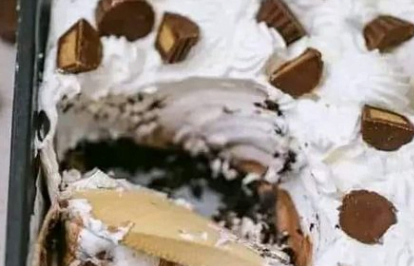
Welcome to our kitchen, where we’re diving into the world of irresistible desserts with our No-Bake Chocolate Marshmallow Pie. This pie combines the rich flavors of dark chocolate and fluffy marshmallow in a creamy mousse, all nestled within a crisp Oreo crust. Whether you’re hosting a dinner party, celebrating a special occasion, or simply craving a delicious treat, this pie is sure to satisfy your sweet tooth and impress your guests.
Ingredients:
For the Crust:
- 1 package (14 oz) Oreos, keep 2 aside for garnishing
- 1/2 cup (113 grams) unsalted butter, melted
For the Mousse Filling:
- Two 4-ounce (113 grams each) dark chocolate bars, your choice
- 1 cup (236 ml) cold heavy whipping cream
- 3 tablespoons (15 grams) cocoa powder
- 8 ounces (226 grams) full-fat cream cheese, at room temperature
- 2 tablespoons (24 grams) granulated sugar
- 1 jar (7 oz) Jet-Puffed Marshmallow Crème
For the Whipped Cream Topping:
- 1 cup (236 ml) heavy whipping cream
- 1/2 cup (65 grams) powdered sugar
- Optional: Hot fudge sauce for drizzling
- Optional: 2 crushed Oreos for garnish
Instructions:
- Prepare the Crust:
- Begin by crushing the Oreos in a food processor or blender until fine crumbs form. Set aside 2 Oreos for garnishing later.
- In a mixing bowl, combine the Oreo crumbs with the melted butter. Mix until well combined and the mixture resembles wet sand.
- Press into Pie Pan:
- Press the Oreo mixture firmly and evenly into the bottom and up the sides of a 9-inch pie pan. Use the back of a spoon or a flat-bottomed glass to pack it down firmly. Place the crust in the refrigerator to chill while you prepare the filling.
- Make the Chocolate Mousse Filling:
- In a heatproof bowl, melt the dark chocolate bars in the microwave in 30-second intervals, stirring between each interval until smooth. Set aside to cool slightly.
- In a separate large mixing bowl, whip the cold heavy cream using a hand mixer or stand mixer until stiff peaks form. Set aside.
- Combine Cream Cheese and Sugar:
- In another bowl, beat the room temperature cream cheese and granulated sugar until smooth and creamy.
- Mix in Chocolate and Marshmallow Crème:
- Gradually add the melted chocolate and cocoa powder to the cream cheese mixture, mixing until smooth and well combined.
- Gently fold in the Jet-Puffed Marshmallow Crème until fully incorporated.
- Fold in Whipped Cream:
- Carefully fold the whipped cream into the chocolate marshmallow mixture until well combined and no streaks remain. This will create a light and fluffy chocolate mousse filling.
- Assemble the Pie:
- Pour the chocolate marshmallow mousse filling into the prepared Oreo crust, spreading it out evenly with a spatula.
- Chill the Pie:
- Cover the pie with plastic wrap or aluminum foil and refrigerate for at least 4 hours, or until the filling is set and firm to the touch.
- Prepare Whipped Cream Topping:
- In a chilled bowl, whip the heavy whipping cream and powdered sugar until stiff peaks form. This will create a light and airy whipped cream topping for the pie.
- Decorate the Pie:
- Once the pie has chilled and set, spread or pipe the whipped cream topping over the surface.
- Optional: Drizzle with hot fudge sauce for added indulgence and sprinkle with crushed Oreos for a decorative finish.
- Serve and Enjoy:
- Slice the No-Bake Chocolate Marshmallow Pie into generous portions and serve chilled. Refrigerate any leftovers for up to 3 days.
Cook’s Notes:
- Choosing Chocolate: Use your favorite dark chocolate bars for the mousse filling, ensuring a rich and decadent flavor profile.
- Chilling Time: Properly chilling the pie allows the flavors to meld together and ensures a firm, sliceable texture.
- Garnish Options: Customize your pie with additional toppings such as chocolate shavings, mini marshmallows, or a dusting of cocoa powder for added visual appeal.
Variations:
- Nutty Crunch: Add chopped toasted nuts such as pecans or almonds to the Oreo crust for a delightful crunch.
- Fruity Twist: Layer sliced strawberries or raspberries between the mousse and crust for a burst of fruity freshness.
- Seasonal Flavors: Experiment with different flavored marshmallow crèmes or garnishes to suit different seasons or holidays.
Indulge in the luxurious flavors of our No-Bake Chocolate Marshmallow Pie, where velvety chocolate mousse meets fluffy marshmallow goodness, all nestled within a crunchy Oreo crust. Whether you’re serving this pie at a gathering or enjoying a slice at home, its decadent layers and rich textures are sure to make every bite a delightful experience.
Enjoy creating this delightful pie and sharing its irresistible flavors with your loved ones. It’s a dessert that combines ease of preparation with a luxurious taste that will leave everyone asking for more. Happy baking!