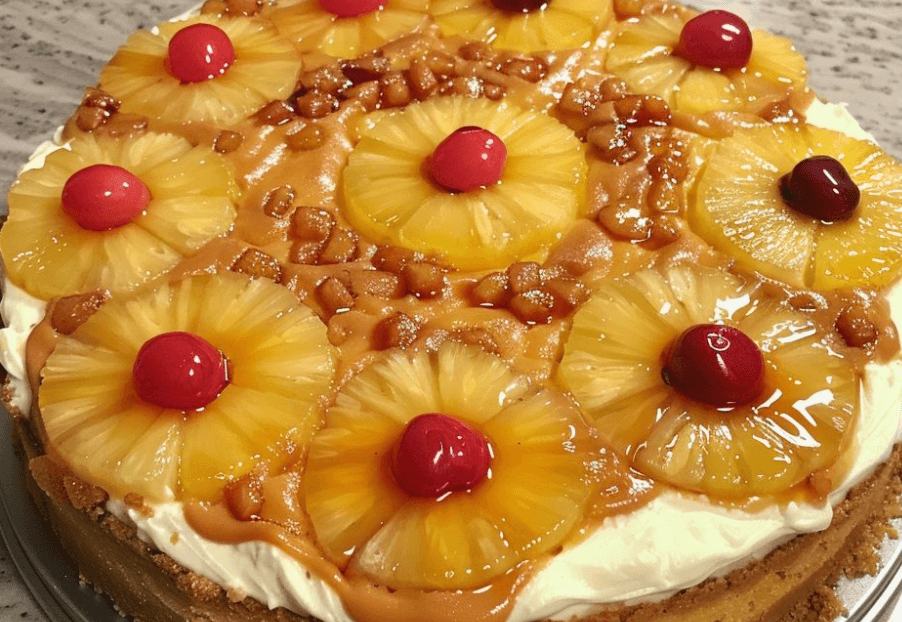
Pineapple Upside-Down Cheesecake is a delightful twist on two classic desserts: the nostalgic pineapple upside-down cake and the rich, creamy cheesecake. This dessert features a caramelized pineapple and cherry topping, a buttery graham cracker crust, and a smooth, velvety cheesecake filling. Perfect for summer gatherings or special occasions, this recipe will impress your family and friends with its beautiful presentation and delicious flavor.
Ingredients
For the Pineapple Topping:
- 5 tablespoons melted butter
- 2 tablespoons brown sugar
- 2 cans (8 ounces each) pineapple slices, drained
- 7 maraschino cherries, chopped
For the Graham Cracker Crust:
- 1 cup graham cracker crumbs
- 3 tablespoons white sugar
- 5 tablespoons melted butter
For the Cheesecake Filling:
- 3 tubs (8 ounces each) smooth cream cheese, softened
- 3/4 cup white sugar
- 3/4 cup sour cream
- 2 teaspoons vanilla extract
Instructions
Preparing the Pineapple Topping:
- Preheat Oven: Preheat your oven to 350°F (175°C).
- Caramelize Pineapple: In a small saucepan, melt 5 tablespoons of butter over medium heat. Stir in 2 tablespoons of brown sugar until dissolved.
- Arrange Pineapple and Cherries: Pour the caramel mixture into a 9-inch springform pan. Arrange the pineapple slices in a single layer on top of the caramel. Place a chopped maraschino cherry in the center of each pineapple ring. Set aside.
Making the Graham Cracker Crust:
- Combine Ingredients: In a medium bowl, combine 1 cup of graham cracker crumbs and 3 tablespoons of white sugar. Stir in 5 tablespoons of melted butter until the mixture resembles wet sand.
- Press Crust: Press the graham cracker mixture evenly over the pineapple slices, ensuring the crust is firmly packed.
- Bake Crust: Bake the crust for 10 minutes, then remove from the oven and let cool.
Preparing the Cheesecake Filling:
- Beat Cream Cheese: In a large bowl, beat the softened cream cheese with an electric mixer until smooth and creamy.
- Add Sugar: Gradually add 3/4 cup of white sugar, beating until well combined.
- Incorporate Sour Cream and Vanilla: Mix in 3/4 cup of sour cream and 2 teaspoons of vanilla extract until the mixture is smooth.
- Pour Filling: Pour the cheesecake filling over the cooled graham cracker crust, spreading it evenly.
Baking the Cheesecake:
- Bake Cheesecake: Place the springform pan in a larger baking pan. Pour hot water into the larger pan to reach halfway up the sides of the springform pan, creating a water bath. This helps prevent cracks in the cheesecake.
- Bake in Water Bath: Bake at 350°F (175°C) for 50-60 minutes, or until the center is set but still slightly jiggly.
- Cool: Turn off the oven and let the cheesecake cool in the oven with the door slightly open for about 1 hour. This gradual cooling helps prevent cracks.
- Refrigerate: Remove the cheesecake from the oven and water bath. Refrigerate for at least 4 hours, or overnight, to set completely.
Serving the Cheesecake:
- Invert the Cheesecake: Run a knife around the edge of the springform pan to loosen the cheesecake. Carefully invert the cheesecake onto a serving plate so that the pineapple topping is on top.
- Slice and Serve: Slice the cheesecake into wedges and serve chilled. Enjoy!
Cook’s Notes
- Room Temperature Ingredients: Ensure the cream cheese, sour cream, and eggs are at room temperature before starting. This helps create a smooth, lump-free cheesecake filling.
- Water Bath Tips: To prevent water from leaking into the springform pan, wrap the outside of the pan with aluminum foil before placing it in the water bath.
- Preventing Cracks: Avoid overmixing the cheesecake batter to prevent incorporating too much air, which can cause cracks during baking.
Variations
- Tropical Twist: Add a tablespoon of rum extract or coconut extract to the cheesecake filling for a tropical flavor.
- Nutty Crust: Replace the graham cracker crumbs with crushed nuts such as pecans or almonds for added texture and flavor.
- Mini Cheesecakes: Use a muffin tin to create individual servings. Adjust the baking time to 20-25 minutes.
Keto and Low-Carb Version
For the Pineapple Topping:
- Use a low-carb sweetener like erythritol instead of brown sugar.
- Use fresh pineapple slices and cherries in moderation, as they contain natural sugars.
For the Graham Cracker Crust:
- Replace graham cracker crumbs with a mix of almond flour and coconut flour. Use a low-carb sweetener instead of white sugar.
For the Cheesecake Filling:
- Use a low-carb sweetener instead of white sugar.
- Ensure all other ingredients are low-carb and keto-friendly.
Frequently Asked Questions (FAQs)
- Can I make this cheesecake ahead of time?
- Yes, you can make Pineapple Upside-Down Cheesecake a day in advance. It actually tastes better after chilling overnight.
- How do I store leftovers?
- Store leftovers in an airtight container in the refrigerator for up to 5 days.
- Can I freeze this cheesecake?
- Yes, you can freeze this cheesecake. Wrap it tightly in plastic wrap and aluminum foil, then freeze for up to 2 months. Thaw in the refrigerator overnight before serving.
- What if I don’t have a springform pan?
- You can use a regular 9-inch cake pan, but be extra careful when inverting the cheesecake to avoid breaking the crust.
- Can I use canned pineapple chunks instead of slices?
- Yes, you can use pineapple chunks, but the presentation will be different. Make sure to drain them well to avoid excess moisture.
Pineapple Upside-Down Cheesecake is a delightful dessert that combines the best of both worlds: the caramelized fruitiness of a pineapple upside-down cake and the rich, creamy texture of a cheesecake. With its stunning presentation and irresistible taste, it’s sure to become a favorite in your dessert repertoire. Enjoy making and savoring this delightful treat, and don’t forget to share it with loved ones. Happy baking!