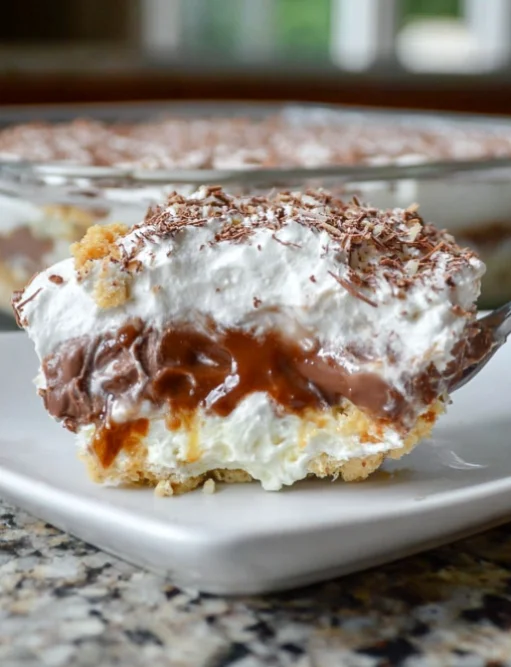
The Robert Redford Dessert is a delightfully layered chocolate treat that has charmed many dessert lovers since its inception. Often attributed to the allure of classic American cuisine, it combines rich ingredients in a way that creates a perfectly balanced dessert experience. This dessert features an exceptional combination of textures, from the crunch of the cookie crust to the creamy layers above, resulting in an indulgent bite every time. The name itself evokes a sense of nostalgia, potentially inspired by the Hollywood star’s charm and charisma. Interestingly, this dessert is not only celebrated in American households but has also gained popularity in various restaurants across the globe, showcasing its universal appeal. This dessert stands out not only for its taste but also for its elegant presentation, making it an ideal choice for dinner parties or special occasions. Whether you’re enjoying a slice with a cup of coffee or serving it to guests, the Robert Redford Dessert ensures indulgent moments filled with rich chocolate flavors and creamy textures. This dessert is not just a treat; it embodies a celebration of culinary artistry that captures the essence of comfort food in an extraordinary way. Every layer tells a story, making it a favorite among both novice bakers and experienced confectioners alike. With its luxurious flavors and satisfying textures, it’s no surprise that many consider the Robert Redford Dessert a must-try indulgence for any chocolate lover.
Ingredients
To create this decadent dessert, gather the following ingredients: You can learn more about this topic. It’s essential to measure your ingredients accurately to achieve the perfect balance of flavors and textures in each layer. Each ingredient plays a vital role in the overall success of the Robert Redford Dessert, enhancing both its flavor and visual appeal. The quality of your ingredients can dramatically impact the final product, so choose wisely.
For the Chocolate Layer
- 1 cup chocolate cookie crumbs
- 1/2 cup unsalted butter, melted
- 2 tablespoons granulated sugar
For the Creamy Custard Layer
- 1 (8 oz) package cream cheese, softened
- 1 cup powdered sugar
- 1 cup whipped topping (or homemade whipped cream)
For the Chocolate Mousse Layer
- 1 cup heavy whipping cream
- 1/2 cup semi-sweet chocolate chips
- 1/2 teaspoon vanilla extract
For the Toppings
- Chocolate shavings or cocoa powder for garnish
- Seasonal fruit, such as raspberries or strawberries, for topping
Ensure you use high-quality chocolate and fresh ingredients for the best flavor. If you prefer, you can substitute the chocolate cookie crumbs with graham cracker crumbs for a different taste and texture, which adds a hint of sweetness and a unique crunch. The choice of chocolate is crucial; opt for dark chocolate for a richer taste or semi-sweet chocolate for a balanced sweetness. For an even more decadent experience, consider using a blend of different chocolates, which can add depth and complexity to the overall flavor profile. Check out our related guide for more tips on ingredient selection and enhancing your dessert with complementary flavors. Remember, the freshness of your ingredients, particularly the cream cheese and whipped cream, can significantly impact the overall outcome of your dessert, ensuring that every bite is as delicious as possible.
Steps / Instructions
- Prepare the crust: Preheat your oven to 350°F (175°C). In a mixing bowl, combine the chocolate cookie crumbs, melted butter, and granulated sugar. Mix well until the crumbs are completely coated. The mixture should resemble wet sand, which helps it hold together when pressed into the pan. This step is crucial as a well-prepared crust forms the foundation of your Robert Redford Dessert. Take care to ensure that the mixture is evenly mixed; uneven mixing can lead to inconsistent texture in the final crust.
- Bake the crust: Press the mixture firmly into the bottom of a 9-inch square baking dish, ensuring an even layer. Use the bottom of a flat measuring cup to create a compact layer that won’t crumble easily. Bake for 10 minutes, then remove from the oven and let it cool completely. Taking the time to let it cool is essential, as it will firm up and support the layers above. A hot crust can melt the cream cheese layer, compromising the structure of your dessert, leading to a less satisfying experience.
- Make the cream cheese layer: In a separate bowl, beat the softened cream cheese until smooth. Gradually add the powdered sugar and continue to mix until well combined. The goal is to achieve a creamy, lump-free mixture that blends nicely with the whipped topping. Gently fold in the whipped topping until no streaks remain, which should create a light yet rich layer that contrasts beautifully with the dense chocolate crust. This step adds a luscious creaminess that is essential for balancing the rich chocolate flavors.
- Layer the cream cheese mixture: Spread the cream cheese layer evenly over the cooled chocolate crust. Use a spatula for a smooth finish to avoid any air pockets. Chill in the refrigerator while you prepare the chocolate mousse, allowing the layers to set slightly. This chilling step is important as it helps the layers adhere to each other effectively, ensuring that they maintain their structure when served.
- Prepare the chocolate mousse: In a microwave-safe bowl, melt the semi-sweet chocolate chips in 30-second intervals, stirring between each, until smooth. Pay close attention to avoid overheating, which can cause the chocolate to seize. Allow the melted chocolate to cool slightly; this ensures it doesn’t melt the whipped cream. It’s important to let the chocolate cool enough to prevent it from deflating the whipped cream when combined. Proper cooling will also enhance the mousse’s texture, giving it a rich, velvety consistency that pairs beautifully with the other layers.
- Whip the cream: In a large bowl, whip the heavy cream until soft peaks form. Stir in the vanilla extract to infuse flavor. Gradually fold the whipped cream into the melted chocolate until well blended, using a gentle hand to maintain the airy texture of the mousse layer. This technique is essential for creating a light yet rich chocolate mousse that complements the other layers beautifully, adding a luxurious mouthfeel.
- Add the mousse layer: Pour the chocolate mousse over the cream cheese layer, smoothing it out with a spatula. Ensure the mousse is evenly distributed for consistent flavor and texture with every bite. Refrigerate for at least 4 hours or until set, which is crucial for the layers to hold their shape and provide that satisfying contrast in textures. The longer it chills, the better the flavors meld together.
- Garnish and serve: Before serving, top with chocolate shavings or a dusting of cocoa powder for a touch of elegance. Add seasonal fruit for a pop of color and flavor, which also balances the richness of the dessert. Cut into squares and enjoy! Each bite should reveal the delightful layers of chocolate, cream, and cookie, making the effort worthwhile and perfect for sharing with friends or family.
Tips & Tricks
To ensure your Robert Redford Dessert turns out perfectly, consider these helpful tips:
- Make-ahead option: This dessert can be prepared a day in advance. Just keep it covered in the refrigerator to maintain freshness, which allows the flavors to meld beautifully, enhancing the overall taste and texture even further. Making it ahead also frees up time for other preparations if you’re hosting, allowing you to enjoy the gathering without the stress of last-minute dessert preparations.
- Storage: Store any leftovers in an airtight container in the refrigerator for up to 3 days. However, this dessert is best enjoyed fresh, as the layers can start to separate over time if not stored properly. If you notice any condensation on the surface, dab it gently with a paper towel before serving to maintain its visual appeal and ensure each serving looks as delightful as it tastes.
- Whipped cream: If making homemade whipped cream, be careful not to overwhip it, or it may become grainy. Stop whipping as soon as you achieve soft peaks for the best texture that will enhance the mousse layer. If you’re short on time, store-bought whipped topping works fine but may not be as rich; however, it can still yield a delicious dessert.
- Common mistakes: Avoid rushing the cooling process of the crust and the setting time for the mousse. These steps are crucial for the right texture, ensuring that each layer melds perfectly. Patience is key; the end result is worth the wait, especially when sharing your creation with loved ones who will appreciate the care you put into making this dessert.
- Presentation: For an elegant dessert presentation, consider layering individual servings in glass cups to showcase the beautiful layers. This not only enhances visual appeal but also allows for easier serving during gatherings. You can create a stunning display by alternating layers in clear cups or jars, which invites guests to admire and enjoy your creation while savoring the delicious flavors of the Robert Redford Dessert.
Robert Redford Dessert
The Robert Redford Dessert is a delightfully layered chocolate treat that has charmed many dessert lovers since its inception. This dessert features an exceptional combination of textures, from the crunch of the cookie crust to the creamy layers above, resulting in an indulgent bite every time.
Ingredients
- 1 cup chocolate cookie crumbs
- 1/2 cup unsalted butter, melted
- 2 tablespoons granulated sugar
- 1 (8 oz) package cream cheese, softened
- 1 cup powdered sugar
- 1 cup whipped topping (or homemade whipped cream)
- 1 cup heavy whipping cream
- 1/2 cup semi-sweet chocolate chips
- 1/2 teaspoon vanilla extract
- Chocolate shavings or cocoa powder for garnish
- Seasonal fruit, such as raspberries or strawberries, for topping
Directions
Preheat your oven to 350°F (175°C). In a mixing bowl, combine the chocolate cookie crumbs, melted butter, and granulated sugar. Mix well until the crumbs are completely coated.
Press the mixture firmly into the bottom of a 9-inch square baking dish, ensuring an even layer. Bake for 10 minutes, then remove from the oven and let it cool completely.
In a separate bowl, beat the softened cream cheese until smooth. Gradually add the powdered sugar and continue to mix until well combined. Fold in the whipped topping until no streaks remain.
Spread the cream cheese layer evenly over the cooled chocolate crust. Chill in the refrigerator while you prepare the chocolate mousse.
In a microwave-safe bowl, melt the semi-sweet chocolate chips in 30-second intervals, stirring between each, until smooth. Allow the melted chocolate to cool slightly.
In a large bowl, whip the heavy cream until soft peaks form. Stir in the vanilla extract and then fold the whipped cream into the melted chocolate until well blended.
Pour the chocolate mousse over the cream cheese layer, smoothing it out with a spatula. Refrigerate for at least 4 hours or until set.
Before serving, top with chocolate shavings or cocoa powder and seasonal fruit. Cut into squares and enjoy!
Nutrition Facts
Recipe Reviews
- ★★★★★
Excellent recipe!
Leave a Reply
Your email address will not be published. Required fields are marked *