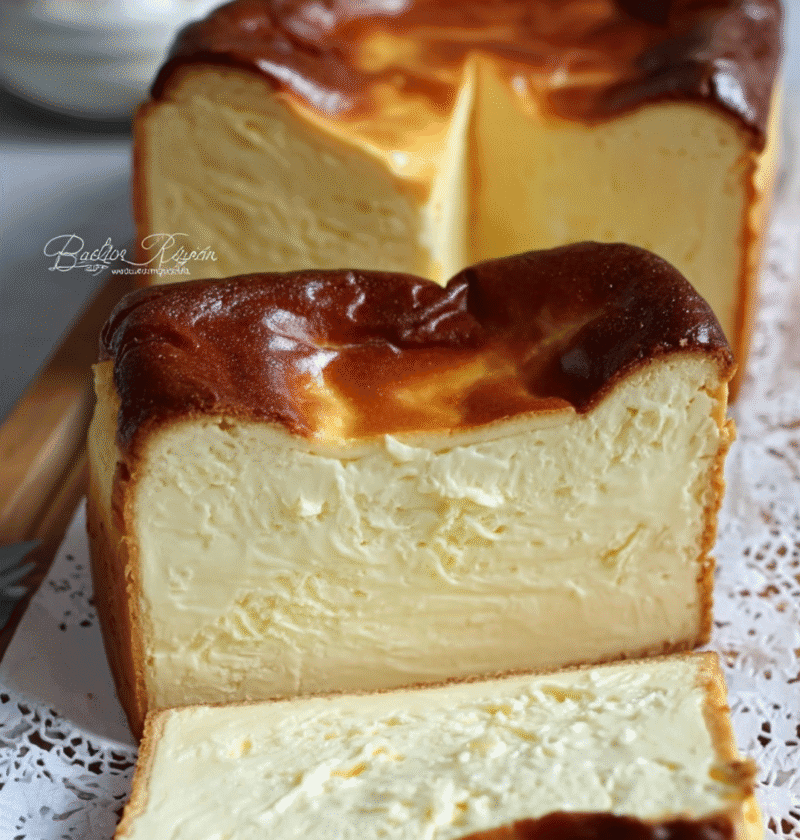
Super creamy burnt cheesecake has become one of my absolute favorite desserts to bake—and I’ve baked a lot of cakes over the years. There’s something so comforting about how rustic it looks, and yet every bite feels luxurious and silky. I’ve always loved a good cheesecake, but once I discovered this burnt version, I never looked back. It’s rich, creamy, and caramelized on top—like crème brûlée and cheesecake had a baby.
To make it, I always gather these ingredients:
2 pounds (900g) full-fat cream cheese, softened
1½ cups granulated sugar
5 large eggs
2 cups heavy cream
1 teaspoon vanilla extract
2 tablespoons all-purpose flour
Parchment paper for lining
When I first heard of it, I thought it looked “burnt” in a bad way. But it turns out, that scorched top is what makes this cake so special. The flavor is deep and just a little bitter in the best possible way, which balances out the sweetness beautifully. And the inside? Oh my. It’s soft, smooth, and melts on your tongue. No crust, no water bath, no fuss. That’s my kind of baking.
I usually make this cake when I want to impress someone without spending hours in the kitchen. It’s also a lifesaver when I don’t have graham crackers on hand for a crust. All I need is cream cheese, eggs, sugar, heavy cream, a little flour, and vanilla. That’s it. Everything goes into one bowl, and the oven does the rest.
I always bring my ingredients to room temperature. That’s a trick I learned decades ago when I baked my first classic cheesecake. It helps everything mix together smoothly and gives you that silky texture I’m always chasing. I use full-fat cream cheese—Philadelphia is my go-to—and I never skimp on the cream.
To get that gorgeous top, I preheat my oven to 425°F. That high heat is what creates the burn on top. It might feel scary at first, but trust me—it’s worth it. That toasty brown top is full of flavor, and it makes the cake stand out.
I line my springform pan with parchment paper, and I don’t try to make it perfect. In fact, the wrinkles and folds are part of what makes the cake so charming. I make sure the paper sticks up a couple inches above the rim, since the cake puffs up quite a bit in the oven. It always reminds me of soufflés when it rises.
In my mixer bowl, I beat the cream cheese until it’s completely smooth—usually about 2 to 3 minutes. Then I add the sugar and mix until it’s nice and fluffy. After that, I add the eggs one at a time. I never rush this part. I take my time and make sure each egg is fully incorporated before I move to the next. The batter should look thick and glossy.
Then I pour in the heavy cream and vanilla. Sometimes I use a dash of almond extract if I want to switch things up, but most of the time, I stick with good old vanilla. After the cream is mixed in, I sift in just a tablespoon or two of flour. Not much—just enough to help it hold together. Some folks use cornstarch instead, but I’ve always had great results with flour.
Once everything is combined, I pour the batter into the pan. I give it a little tap on the counter to pop any air bubbles and slide it right into the oven. I usually bake it for 55 to 60 minutes, depending on how golden I want the top. Sometimes I let it go a little longer for a darker, more dramatic look. Other times, I pull it out earlier for a lighter top and a softer center. The cake should jiggle just a bit in the middle when it’s ready.
Now, this part is important: I let the cake cool completely in the pan. It will deflate—that’s totally normal. In fact, it’s part of what makes it look like a burnt cheesecake. I don’t worry about cracks or dips. This cake isn’t supposed to be perfect, and that’s exactly why I love it.
After it cools to room temperature, I cover it and pop it in the fridge overnight. I know it’s hard to wait, but it’s always better the next day. The texture firms up just enough, and the flavor deepens in the most wonderful way. When I slice into it the next day, the center is like velvet. Every bite is creamy, rich, and just a little tangy.
I’ve served this cake at family gatherings, church bake sales, and even just on a quiet Sunday afternoon with coffee. It always disappears fast. My grandkids call it “the cheesecake with the burnt top,” and they love it. Sometimes I serve it plain. Other times, I add a spoonful of raspberry sauce or dust it with powdered sugar. It’s also fantastic with stewed plums or a drizzle of warm caramel.
Over the years, I’ve tried a few variations. I once added lemon zest and a splash of limoncello for a bright spring version. Another time, I swirled in some Nutella before baking, which gave it a beautiful marbled look. I’ve even added a tablespoon of instant espresso powder to the batter, which brought out the bitterness in the best way. But honestly, the original is still my favorite.
This cake also freezes beautifully. I slice it into individual pieces, wrap them tightly in plastic, and freeze them for up to a month. When I want a treat, I just take out a slice and let it thaw in the fridge overnight. It tastes just as good as fresh.
When it comes to slicing, I use a sharp knife dipped in hot water. That helps me get clean slices without dragging the filling. I wipe the blade after each cut. I learned that trick from my mother when I was a teenager helping her in the kitchen. She used to say, “A clean knife makes a clean cake,” and she was right.
One thing I’ve learned is that burnt cheesecake doesn’t need to look perfect to taste incredible. In fact, the more rustic it looks, the better. The crinkled parchment, the golden top, the jiggly center—those are all signs that it’s going to be delicious.
I’ve shared this recipe with so many friends, and it always surprises me how easy it is to make. People think cheesecake is complicated, but this one is so forgiving. No water bath. No crust. No need to babysit the oven. Just mix, bake, cool, and enjoy.
Sometimes I serve it as-is. Other times, I dress it up for holidays with sugared cranberries or a sprig of mint. For Thanksgiving, I once added a cinnamon-spice swirl, and it paired beautifully with the turkey dinner. Around Christmas, I top it with pomegranate seeds for a pop of color.
I’ve even made mini versions in muffin tins with parchment liners. They bake in about 20 minutes and make adorable little servings for parties or gifts. They don’t get as dark on top, but they still taste wonderful.
People always ask me what makes this cheesecake so creamy, and I tell them—it’s the cream cheese and the heavy cream. Don’t use low-fat anything. This cake is meant to be indulgent. I also tell them not to skip the chilling step. It really needs time to set up and become sliceable.
If you’re nervous about baking it at such a high temperature, just trust the process. I was skeptical the first time too. But once I saw how golden and beautiful it turned out, I was hooked. Now, it’s the only cheesecake I make.
This recipe has become a staple in my kitchen. I make it when I’m having company, when someone needs cheering up, or when I just want something special for myself. It always feels like a little celebration.
No matter how many times I bake it, I still get excited when I open the oven door and see that dark, blistered top. It smells like sugar, cream, and just a hint of something toasted. And when I take that first bite, it reminds me why I love baking so much.
This cake brings people together. It gets people talking. It makes them ask for the recipe, even if they’ve never baked before. And that, to me, is the best kind of dessert—one that tastes amazing and brings joy to the table.
So if you’ve never tried making a burnt cheesecake before, I hope you do. It’s simple, forgiving, and absolutely worth every bite. Just don’t be afraid of the burn—it’s the best part.