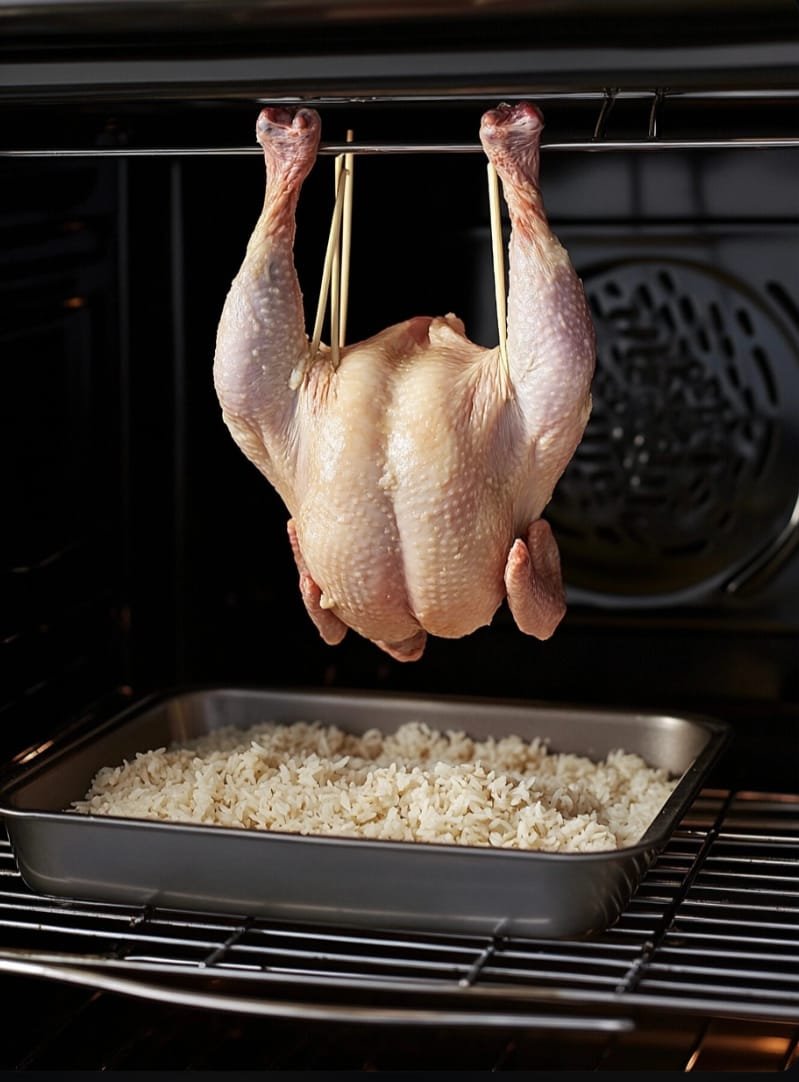
In the image, we see a whole chicken prepared for roasting, hanging vertically inside the oven. This technique, where the chicken is suspended on a rack, allows for even cooking and extra crispy skin. Below the chicken, a tray of uncooked rice is placed, which can serve to catch the drippings and absorb the moisture. This method, though not conventional, ensures that the chicken roasts evenly from all sides, with the skin becoming beautifully golden and crispy.
Why You’ll Love This Recipe:
- Even Cooking: By hanging the chicken vertically, the heat circulates around the entire bird, ensuring even cooking.
- Crispy Skin: The airflow around the chicken results in crispy skin, a key feature of any great roast chicken.
- Minimal Effort: Despite the unique method, this recipe is simple to follow and requires minimal hands-on time.
Ingredients:
For 4-6 servings of perfectly roasted chicken, you’ll need:
- 1 whole chicken (about 1.5 – 2 kg / 3.5 – 4.5 lbs)
- 2 tbsp olive oil or melted butter
- 1 tsp salt
- 1/2 tsp black pepper
- 1 tsp paprika (optional, for color)
- 4 cloves garlic, crushed
- 1 lemon, halved
- Fresh rosemary or thyme sprigs (optional)
- Uncooked rice (enough to cover the bottom of the roasting tray)
Instructions:
1. Preheat the Oven
Preheat your oven to 200°C (400°F). Prepare your roasting setup by placing a baking sheet or roasting tray on the bottom of the oven, filled with a layer of uncooked rice. The rice will absorb the drippings and moisture from the chicken, leaving it crispy and flavorful.
2. Prepare the Chicken
Pat the chicken dry with paper towels to ensure that the skin crisps up properly during roasting. Rub the chicken all over with olive oil or melted butter, making sure to get under the skin if possible for extra flavor. Season the chicken generously with salt, black pepper, and paprika (if using).
Stuff the cavity of the chicken with crushed garlic, lemon halves, and a few sprigs of rosemary or thyme if desired. This will infuse the meat with a lovely aroma and subtle flavor.
3. Hang the Chicken
Using kitchen twine and skewers (as seen in the image), securely truss the chicken and suspend it on a wire rack placed in the oven. Ensure the chicken is hanging securely, as this will allow it to cook evenly from all angles. The rice tray should be directly underneath the chicken to catch any drippings.
Pro Tip: If you don’t have a wire rack that allows for vertical hanging, you can use a vertical roasting stand or a sturdy skewer to prop the chicken upright.
4. Roast the Chicken
Roast the chicken in the preheated oven for 1 to 1.5 hours, depending on the size of the bird. You’ll want to baste the chicken every 20-30 minutes with its own juices to keep the meat moist and enhance the flavor.
The chicken is done when the internal temperature reaches 75°C (165°F), or when the juices run clear when the thickest part of the thigh is pierced with a knife.
5. Rest the Chicken
Once the chicken is fully cooked and the skin is golden and crispy, remove it from the oven and allow it to rest for about 10-15 minutes before carving. This allows the juices to redistribute throughout the meat, keeping it moist and tender.
6. Serve
Carve the chicken and serve it alongside your favorite sides. If you’ve used the rice tray, you can toast the rice in the oven for a few more minutes to create a crispy, flavorful accompaniment, or discard it if you prefer.
Cook’s Notes:
- Seasoning Variations: Feel free to customize the seasoning with your favorite spices or a blend of herbs de Provence, garlic powder, or even cayenne pepper for a spicy kick.
- Cooking Time: Always use a meat thermometer to check for doneness. A whole chicken typically takes 15-20 minutes per pound at 200°C (400°F), but oven temperatures may vary.
- Rice Method: The rice at the bottom of the tray absorbs the drippings and can be toasted for a crispy, slightly savory side. However, some may prefer to use the drippings for gravy or sauce instead.
FAQ:
Q: Why should I hang the chicken vertically instead of using a traditional roasting pan?
A: Hanging the chicken vertically allows heat to circulate more evenly around the entire bird, which results in more even cooking and crispy skin all over, rather than just on the top.
Q: Can I use this method on a smaller or larger bird?
A: Yes! This method works well for chickens of various sizes, as well as other poultry like turkey or duck. Just adjust the cooking time accordingly, and always check the internal temperature to ensure it’s fully cooked.
Q: Can I stuff the chicken with other ingredients?
A: Definitely! You can add onions, fresh herbs, or even fruits like oranges or apples to the cavity for additional flavors.
Final Thoughts
This Vertical Roast Chicken with Crispy Skin method may seem unconventional, but it delivers incredibly flavorful results with minimal effort. The vertical roasting ensures that every part of the chicken is evenly cooked, with perfectly crispy skin from top to bottom. Whether you’re preparing a special meal or a weeknight dinner, this technique will give you a beautifully roasted chicken that’s tender, juicy, and full of flavor.