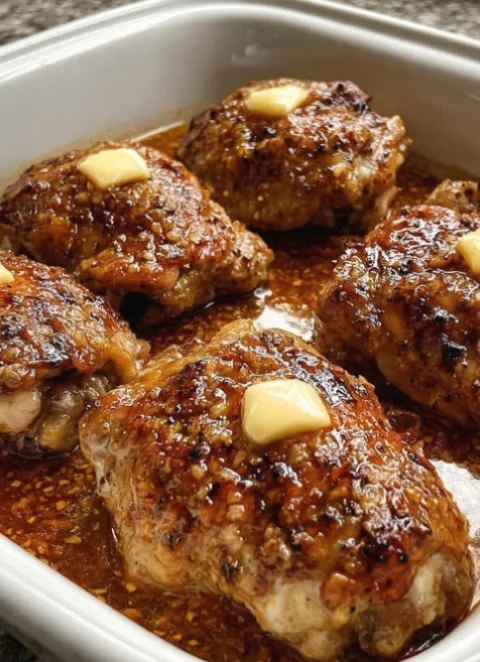
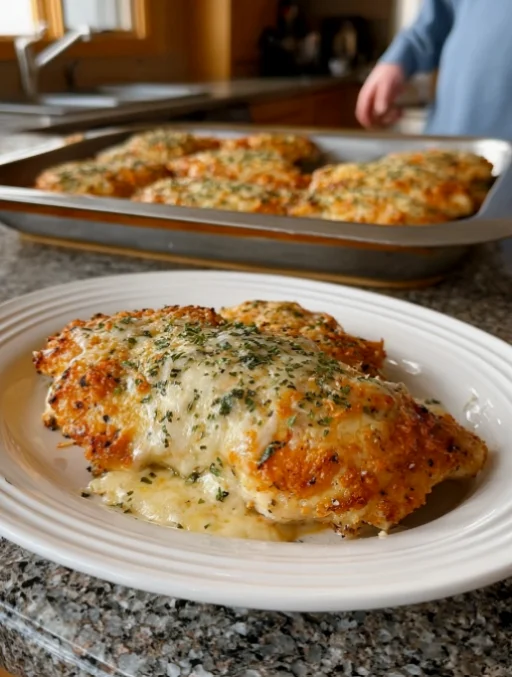
When it comes to easy weeknight dinners, few recipes can compete with the deliciously savory Baked Garlic Parmesan Chicken. This dish is a delightful blend of tender chicken coated in a crispy, flavorful garlic and Parmesan crust that tantalizes the taste buds. Perfectly baked until golden brown, the chicken emerges from the oven with an irresistible aroma that fills the kitchen and invites everyone to the table. This chicken dish is not just about flavor; it also boasts a beautiful presentation, making it perfect for both casual family meals and special occasions. The recipe is simple yet versatile, making it an ideal choice for those busy nights when you need to whip up something quick yet satisfying. Whether you are an experienced cook or just starting, this oven-baked chicken recipe is straightforward, rewarding, and sure to please even the pickiest eaters. With the ability to pair easily with various side dishes, it becomes a staple in any home kitchen. The combination of garlic and Parmesan adds an aromatic touch that elevates this dish far beyond the average chicken recipe. Additionally, the use of minimal yet high-quality ingredients makes this dish not only accessible but also an excellent choice for health-conscious cooks looking to minimize additives in their meals.
Ingredients
To make the Baked Garlic Parmesan Chicken, you will need the following ingredients: You can learn more about this topic. Make sure to choose the freshest ingredients, as quality greatly influences the final result.
- Chicken:
- 4 boneless, skinless chicken breasts (about 1.5 pounds) – Choose chicken that is fresh and of high quality for the best flavor and texture, ideally organic or free-range if possible. The quality of chicken can significantly affect the overall taste and juiciness of the dish. Look for chicken that is moist and has a slight sheen, indicating freshness.
- Dry Ingredients:
- 1 cup Italian breadcrumbs – These add a wonderful texture and flavor; you can make your own or use store-bought. Homemade breadcrumbs can be seasoned to your liking, enhancing the flavor profile even further. Consider adding herbs or spices to your breadcrumbs for an extra kick.
- 1/2 cup grated Parmesan cheese – Use freshly grated cheese for optimal melting and flavor; pre-grated varieties may include anti-caking agents that can affect texture. Fresh cheese also has a creamier taste that elevates the dish. Aged Parmesan can add a deeper flavor, so feel free to experiment with different types.
- 2 teaspoons garlic powder – This provides a concentrated garlic flavor; fresh minced garlic can also be used for a more robust taste. Fresh garlic can add a delightful punch, but be cautious as it can overpower if used excessively. Additionally, roasting garlic beforehand can provide a sweeter, more mellow taste.
- 1 teaspoon dried oregano – A fragrant herb that complements the other flavors beautifully. Oregano is known for its aromatic qualities and is a staple in Italian cuisine. For a variation, try swapping oregano with dried thyme or basil to explore different flavor profiles.
- 1 teaspoon salt – Enhances the overall flavor of the dish; adjust to taste depending on dietary needs. Salt is essential for bringing out all the flavors in the chicken and the coating. Remember to taste the breadcrumb mixture before coating the chicken to ensure it’s seasoned to your preference.
- 1/2 teaspoon black pepper – Adds a mild heat; feel free to increase the amount for a spicier kick. Freshly ground black pepper has a distinct flavor that differs from pre-ground varieties, and it can enhance the overall depth of flavor in the dish.
- Wet Ingredients:
- 1/4 cup unsalted butter, melted – This adds richness; you can substitute olive oil for a healthier option. Using olive oil can impart a different flavor profile and is a great alternative for those avoiding dairy. Additionally, using garlic-infused oil can enhance the garlic flavor even further.
- 2 large eggs – These act as a binder, helping the breadcrumb coating adhere to the chicken. Eggs also contribute to browning and creating a crispy exterior. If you are looking for a lower cholesterol option, you can use egg whites or a flaxseed mixture as a substitute.
- Optional Toppings:
- Fresh parsley, chopped (for garnish) – This adds a pop of color and freshness to the dish, enhancing not only the appearance but also the flavor. Consider using other fresh herbs like basil or chives for additional layers of flavor.
For the best flavor, use high-quality Parmesan cheese and fresh garlic powder. If you’re looking for gluten-free options, consider substituting the Italian breadcrumbs with a gluten-free variety. You can also experiment with panko breadcrumbs for an extra crunch. Panko breadcrumbs are coarser and create a lighter, airier crust, which can be particularly appealing. Check out our related guide for more tips on ingredient quality and substitutions. Remember, the best dishes often come from using the freshest ingredients, so take care in selecting your components.
Steps / Instructions
- Preheat the oven: Set your oven to 400°F (200°C) to ensure it’s hot enough for perfect baking. Preheating is crucial as it allows for even cooking and helps achieve that golden crust. An adequately preheated oven ensures that the chicken starts cooking immediately upon entering, resulting in a moist interior and crispy exterior. Use an oven thermometer to verify the temperature, as oven settings can sometimes be inaccurate.
- Prepare the baking dish: Lightly grease a 9×13 inch baking dish with non-stick spray or olive oil. This will prevent the chicken from sticking and make cleanup easier. Additionally, you can line the dish with parchment paper for even easier cleanup. Ensure that the dish is suitable for oven use and can withstand the heat without warping.
- Mix the dry ingredients: In a large bowl, combine the Italian breadcrumbs, grated Parmesan cheese, garlic powder, oregano, salt, and black pepper. Stir until well blended, ensuring that all ingredients are evenly distributed for consistent flavor in every bite. This step is essential for giving every piece of chicken the same delicious coating. You can also add a pinch of cayenne pepper if you want to introduce a bit more heat to the mixture.
- Prepare the chicken: In another bowl, whisk together the melted butter and eggs until smooth. This mixture will help the breadcrumb coating stick to the chicken, creating a delicious crust. Make sure to mix thoroughly so that the butter and eggs are fully combined. For extra flavor, consider adding a teaspoon of Dijon mustard to the egg mixture, which can provide a subtle tang.
- Coat the chicken: Dip each chicken breast first into the butter and egg mixture, allowing excess to drip off. Then, roll the chicken in the breadcrumb mixture, pressing lightly to ensure an even coating. Make sure every part of the chicken is covered for maximum flavor and crunch. A thorough coating will not only enhance the flavor but also provide a satisfying texture. If you’re a fan of a thicker crust, double dip the chicken by repeating this process.
- Arrange in the baking dish: Place the coated chicken breasts in the prepared baking dish, leaving space between each piece for even cooking. This allows hot air to circulate around the chicken, promoting even baking and preventing steaming. Avoid overcrowding the dish, as this can lead to uneven cooking. For best results, arrange the chicken in a single layer.
- Bake: Place the baking dish in the preheated oven and bake for 25-30 minutes, or until the chicken is cooked through and the coating is golden brown. Use a meat thermometer to ensure the internal temperature reaches 165°F (74°C). The chicken should be juicy and tender when pierced with a knife; the juices should run clear. If the coating begins to brown too quickly, you can tent the dish with aluminum foil to prevent burning while the chicken finishes cooking.
- Garnish and serve: Once baked, remove the chicken from the oven and let it rest for 5 minutes. This resting period allows the juices to redistribute throughout the chicken, ensuring a moist result. Garnish with chopped fresh parsley before serving to add a touch of color and freshness. The resting time is crucial for a juicy result, as cutting immediately can lead to dry chicken. For added flavor, drizzle a bit of lemon juice over the chicken before serving.
Tips & Tricks
To achieve the best results with your Baked Garlic Parmesan Chicken, consider the following tips:
- Resting the chicken: Allow the chicken to rest for a few minutes after baking. This helps retain moisture and ensures juicy chicken. A well-rested chicken will slice better and maintain its flavor, enhancing the overall eating experience. Covering the chicken loosely with foil while it rests can help keep it warm.
- Storage: Leftover chicken can be stored in an airtight container in the refrigerator for up to 3 days. Reheat in the oven at 350°F (175°C) for best results, as this will help maintain the crispiness of the coating. Microwave reheating can lead to a soggy texture, which is best avoided if you want to preserve that delightful crunch. You can also freeze leftovers for up to three months, ensuring you have a quick meal on hand.
- Make-ahead option: You can prepare the chicken in advance by coating it and then storing it in the refrigerator for a few hours or overnight before baking. This allows the flavors to meld together beautifully. Just be sure to allow extra cooking time if baking from a cold state. Marinating the chicken in the butter and egg mixture can also enhance the flavor.
- Common mistakes to avoid: Ensure the chicken breasts are of even thickness for uniform cooking. You can pound thicker parts gently with a meat mallet if needed. This step is vital for ensuring that all pieces cook evenly and finish at the same time. Using chicken breasts of similar size helps avoid the risk of undercooked pieces. Also, avoid opening the oven door frequently, as this can cause fluctuations in temperature.
- Pro technique: For an extra crispy texture, consider broiling the chicken for the last 2-3 minutes of cooking. Keep a close watch to prevent burning, as broilers can quickly overcook delicate items. Broiling can give your chicken an irresistible golden-brown color and a satisfying crunch. Adding a sprinkle of extra Parmesan just before broiling can create an even more decadent topping.
Conclusion
This Baked Garlic Parmesan Chicken recipe is not just another dinner idea; it’s a ticket to a flavorful, satisfying meal that the whole family will love. With its crispy exterior and moist interior, it stands out among other garlic chicken recipes. The combination of garlic and Parmesan creates a savory flavor profile that pairs wonderfully with a variety of sides, such as roasted vegetables, mashed potatoes, or a fresh salad. Be sure to give this simple garlic chicken a try for your next family dinner, and watch as everyone comes back for seconds! Embrace the joy of cooking and share your experiences with us; we’d love to hear how your dish turns out!
Baked Garlic Parmesan Chicken
A delightful blend of tender chicken coated in a crispy, flavorful garlic and Parmesan crust. Perfectly baked until golden brown, this dish invites everyone to the table with its irresistible aroma.
Ingredients
- 4 boneless, skinless chicken breasts (about 1.5 pounds)
- 1 cup Italian breadcrumbs
- 1/2 cup grated Parmesan cheese
- 2 teaspoons garlic powder
- 1 teaspoon dried oregano
- 1 teaspoon salt
- 1/2 teaspoon black pepper
- 1/4 cup unsalted butter, melted
- 2 large eggs
- Fresh parsley, chopped (for garnish)
Directions
Preheat the oven to 400°F (200°C).
Lightly grease a 9x13 inch baking dish with non-stick spray or olive oil.
In a large bowl, combine the Italian breadcrumbs, grated Parmesan cheese, garlic powder, oregano, salt, and black pepper.
In another bowl, whisk together the melted butter and eggs until smooth.
Dip each chicken breast into the butter and egg mixture, then roll in the breadcrumb mixture.
Place the coated chicken breasts in the prepared baking dish, leaving space between each piece.
Nutrition Facts
Recipe Reviews
- ★★★★★
Excellent recipe!
Leave a Reply
Your email address will not be published. Required fields are marked *