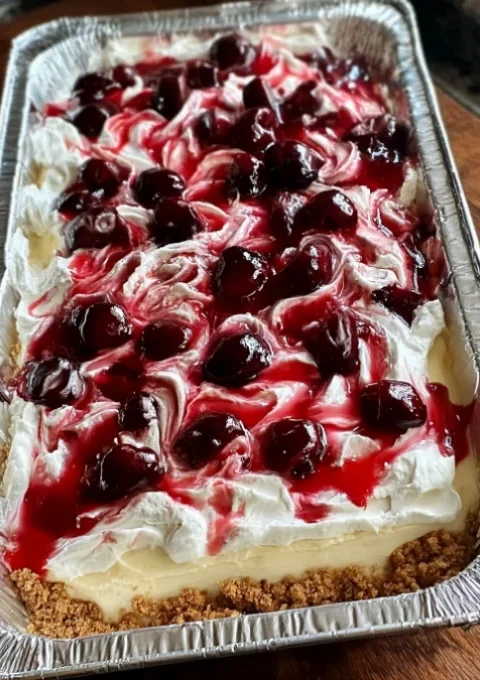
Summer desserts call for something light, refreshing, and utterly delicious, and the No-Bake Woolworth Icebox Cheesecake fits the bill perfectly. This delightful cheesecake hails from the nostalgic era of Woolworth’s lunch counters, where it gained immense popularity for its creamy texture and ease of preparation. The absence of baking makes it incredibly convenient, allowing you to whip up a delectable dessert in no time. With no baking required, it is the ideal dessert for warm weather gatherings, picnics, or any occasion where you want to impress your guests without spending hours in the kitchen. The combination of cream cheese, sweetened condensed milk, and whipped topping makes for a cheesecake that is both rich and airy, leaving a lasting impression on anyone who takes a bite. Whether you’re revisiting an old favorite or trying this retro dessert for the first time, you’re in for a treat! It’s not just the great taste that draws people to this cheesecake, but also the simplicity and nostalgia that it brings, reminding many of carefree summer days spent enjoying dessert with loved ones. The memories tied to this dessert make it not only a treat for the taste buds but also for the heart. This cheesecake has become a staple in many households, often shared during family gatherings and celebrations, making it a cherished recipe that brings joy to all who enjoy it.
Ingredients
Gather these ingredients to create your No-Bake Woolworth Icebox Cheesecake. Ensure that your cream cheese is at room temperature for easier mixing and optimal texture. Using high-quality ingredients will significantly enhance your cheesecake’s flavor and texture. You can learn more about this topic and the origins of this beloved dessert. Preparing your ingredients ahead of time will streamline the process and allow you to enjoy the making of this dessert even more. Having everything ready can also help avoid any last-minute rush and ensure a smooth preparation.
- For the Crust:
- 2 cups graham cracker crumbs – For a more flavorful crust, consider using honey graham crackers that add a subtle sweetness and richness. The type of cracker can subtly alter the final taste, so feel free to experiment with different brands.
- 1/2 cup unsalted butter, melted – Unsalted butter allows you to control the saltiness of your dessert, ensuring that the sweetness is pronounced. Always use fresh butter for the best flavor, and be careful not to overheat it, as this can affect the crust’s texture.
- 1/4 cup granulated sugar – This sweetener helps to bind the crust together while adding a hint of sweetness, which enhances the overall flavor profile of the crust. You might also consider brown sugar for a deeper flavor that can slightly caramelize during chilling.
- For the Filling:
- 16 oz cream cheese, softened – Choose full-fat cream cheese for the creamiest texture, which is crucial for a rich cheesecake experience. Low-fat versions can result in a less satisfying texture, so avoid them if possible.
- 14 oz sweetened condensed milk – This is the key ingredient that contributes to the cheesecake’s creamy sweetness; it creates a luscious filling that melts in your mouth. Be sure to use a brand you trust, as quality can vary between products.
- 1 teaspoon vanilla extract – Opt for pure vanilla extract for a more robust flavor that elevates the dessert beyond the ordinary. Imitation vanilla can lack depth and richness, so choose wisely for the best results.
- 1/4 cup fresh lemon juice (about 1 large lemon) – This brightens the dessert and balances the sweetness perfectly, adding a refreshing zing. Freshly squeezed lemon juice is always preferable to bottled for optimal flavor.
- 8 oz whipped topping (like Cool Whip) – Ensure it is thawed and well-integrated for a light texture that complements the dense filling. Properly folding in the whipped topping is essential to maintain its airy quality.
Note: You can substitute the graham cracker crumbs with crushed cookies or gluten-free graham crackers for a gluten-free version. Ensure you choose high-quality cream cheese for the best flavor. If you prefer a darker crust, consider using chocolate wafer cookies instead of graham crackers, providing a delightful contrast to the creamy filling. Check out our related guide for more tips and ideas on ingredient substitutions that can customize your cheesecake experience. Remember, the right ingredients not only contribute to taste but also impact the overall texture and appearance of your cheesecake.
Steps / Instructions
- Prepare the Crust: In a medium bowl, combine the graham cracker crumbs, melted butter, and sugar. Mix until well combined, ensuring that the crumbs are evenly coated with butter. The mixture should resemble wet sand, which will help it hold together when pressed into the baking dish. This step is essential for achieving the right texture in your crust; if it feels too dry, add a little more melted butter.
- Form the Crust: Press the crumb mixture firmly into the bottom of a 9×13-inch baking dish. Use the back of a measuring cup or your hands to pack it tightly and create an even layer. Make sure there are no gaps as this will prevent the filling from leaking through, ensuring a clean cut when serving. Chill in the refrigerator for at least 15 minutes to set, which will help the crust maintain its shape and provide a sturdy base for the filling. A well-chilled crust will also enhance the overall structure of your cheesecake.
- Make the Cream Cheese Filling: In a large mixing bowl, beat the softened cream cheese until smooth and creamy using an electric mixer on medium speed (about 2 minutes). This step is crucial for achieving a lump-free filling, so take your time to ensure it’s well-mixed. Scrape down the sides of the bowl as needed to ensure all the cream cheese is incorporated. Proper mixing at this stage is key to a silky texture.
- Add the Sweetened Condensed Milk: Gradually add the sweetened condensed milk while continuing to mix. Ensure the mixture is fully combined and fluffy, which will contribute to the overall lightness of the cheesecake filling. Mixing slowly at first helps to prevent splatters and keeps your workspace clean. The filling should become smooth and creamy, indicating it’s ready for the next step.
- Incorporate Flavorings: Add the vanilla extract and lemon juice, mixing until fully combined. The lemon juice adds a refreshing tang to balance the sweetness, enhancing the overall flavor profile. This step is essential for achieving that signature taste that makes the No-Bake Woolworth Icebox Cheesecake so memorable; make sure to taste the mixture and adjust if necessary.
- Fold in the Whipped Topping: Gently fold in the whipped topping with a spatula until the mixture is just combined. Be careful not to deflate the fluffiness of the whipped topping, as this is what makes the cheesecake so light and airy. Using a gentle folding motion ensures that the mixture remains fluffy and voluminous. This technique is vital for achieving the right texture in your cheesecake filling.
- Spread the Filling: Pour the cream cheese mixture over the chilled graham cracker crust. Use a spatula to spread it evenly across the top, ensuring a smooth surface for presentation. This step is important for visual appeal, making your cheesecake look as delightful as it tastes. Aim for an even layer to ensure consistent texture in each slice.
- Chill the Cheesecake: Cover the dish with plastic wrap and refrigerate for at least 4 hours, or preferably overnight. This chilling time allows the flavors to meld and the cheesecake to set perfectly, resulting in a firmer texture that’s easier to cut. The longer it chills, the better the flavors will develop, so don’t rush this crucial step; it’s during this time that the cheesecake achieves its characteristic creaminess.
- Serve: Once set, cut into squares and serve chilled. Garnish with additional whipped topping, fresh fruit, or a drizzle of chocolate or caramel sauce for an extra special touch. Adding lemon slices or berries on top can also complement the flavors beautifully, making each slice visually stunning and appealing. Consider serving with a side of freshly brewed coffee or iced tea for a complete dessert experience.
Tips & Tricks
To ensure your No-Bake Woolworth Icebox Cheesecake turns out perfectly, consider the following tips:
- Room Temperature Ingredients: Always use softened cream cheese and room temperature ingredients for a smoother filling. This helps in achieving a beautifully creamy texture that is essential for a delectable cheesecake. A quick way to soften cream cheese is to cut it into cubes and let it sit at room temperature for about 30 minutes.
- Storage: Store any leftovers covered in the refrigerator for up to 5 days. The cheesecake can be made up to 3 days in advance, making it a convenient option for parties and gatherings. Just make sure to keep it tightly wrapped to maintain freshness, and place a piece of parchment paper between the wrap and cheesecake to avoid sticking.
- Serving Size: This recipe yields approximately 12 servings. Adjust the portion sizes based on your gathering or how indulgent you want each slice to be. You can also consider serving smaller portions if you’re pairing it with other desserts, allowing guests to enjoy a variety of flavors.
- Common Mistakes to Avoid: Make sure the graham cracker crust is tightly packed to avoid crumbling. Also, do not skip the chilling time, as it is crucial for the cheesecake to set properly. If the filling seems too runny, it may need additional chilling time; in some cases, extra time in the refrigerator can help it firm up nicely. Always check for firmness before serving to ensure the desired texture.
- Enhance Flavor: Consider adding a teaspoon of lemon zest to the filling for an extra burst of citrus flavor. This small addition can elevate the overall taste of your cheesecake, making it even more refreshing and delicious. You might also explore ideas like adding a hint of almond extract for a unique twist.

No-Bake Woolworth Icebox Cheesecake
A light, refreshing cheesecake that is easy to prepare without baking, featuring a creamy filling and graham cracker crust.
Ingredients
- For the Crust:
- 2 cups graham cracker crumbs
- 1/2 cup unsalted butter, melted
- 1/4 cup granulated sugar
- For the Filling:
- 16 oz cream cheese, softened
- 14 oz sweetened condensed milk
- 1 teaspoon vanilla extract
- 1/4 cup fresh lemon juice (about 1 large lemon)
- 8 oz whipped topping (like Cool Whip)
Directions
Prepare the Crust: In a medium bowl, combine the graham cracker crumbs, melted butter, and sugar. Mix until well combined.
Form the Crust: Press the crumb mixture firmly into the bottom of a 9x13-inch baking dish. Chill in the refrigerator for at least 15 minutes.
Make the Cream Cheese Filling: In a large mixing bowl, beat the softened cream cheese until smooth and creamy using an electric mixer.
Add the Sweetened Condensed Milk: Gradually add the sweetened condensed milk while continuing to mix.
Incorporate Flavorings: Add the vanilla extract and lemon juice, mixing until fully combined.
Fold in the Whipped Topping: Gently fold in the whipped topping with a spatula until just combined.
Spread the Filling: Pour the cream cheese mixture over the chilled graham cracker crust and spread it evenly.
Chill the Cheesecake: Cover and refrigerate for at least 4 hours or until set.
Nutrition Facts
Recipe Reviews
- ★★★★★
Excellent recipe!
Leave a Reply
Your email address will not be published. Required fields are marked *